• Home
  • Blog
  • 2020 Finish - A - Long
  • 2019 Finish - A - Long
  • 2018 Finish - A - Long
  • Contact
  • Shop
  • 2017 Finish - A - Long
Marci Girl Designs

Fabric Ball Tutorial

7/2/2019

3 Comments

 
This post was originally part of I'm Feeling Crafty's Sew Ready to Play yearly event back in 2015.  I was into Bocce Ball big time with my husband and decided to create a tutorial for fabric Bocce Balls so my kids could play along too without hurting anyone or breaking anything.  I thought now would be a good time to bring the tutorial back home and that the Finish-A-Long participants may enjoy it and find it useful.

  For any of you not familiar with Bocce Ball or want to know the rules of the game, click HERE for the basics and images of how the game plays.

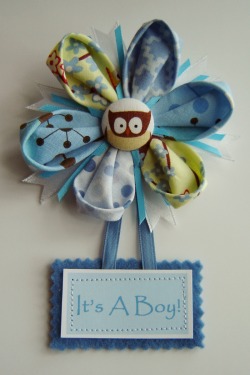
This tutorial can be used to make a variety of sizes of fabric balls, just increase the size of the starting Pentagon and your ball will be larger.  I drew the original Pentagon and then enlarged it on my copier.  This resulted in a ball just large enough for babies to play with.  Insert a small rattle or bell along with the stuffing and baby will have fun hours!

Picture

3.5" Fabric Bocce Ball Tool and Supply Lists


Tools Needed:

Paper, Pen, Sewing Machine, Thread, Pins, Scissors, Ruler, Rotary Cutter, Self Healing Cutting Mat

Supplies Needed:
Drafted template onto paper.
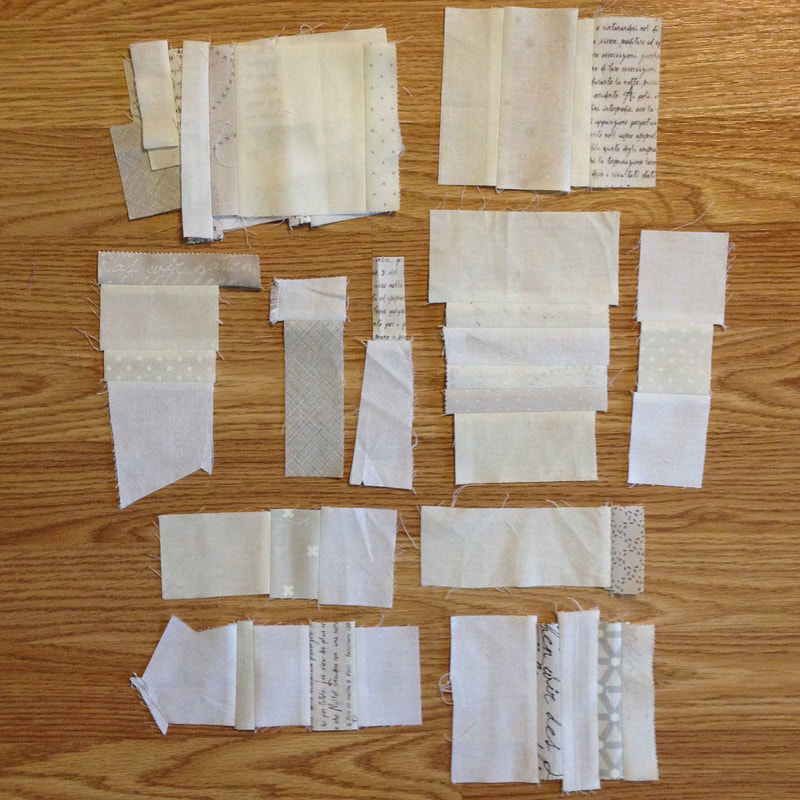
6 fabric prints/solids for each ball, cutting 2 pentagons from each fabric for a total of 12 for each ball.
Iron on interfacing scraps, I used Pellon SF-101 in both black and white.
Fiberfill or Batting Scraps

How to Draft the Pentagon Template

Picture
I wanted to include a pdf download template file for you guys, but alas my scanner decided to HATE me and isn't working right now, but that is ok because I can easily show you how to draft the template yourself.  All you need is a piece of paper, pen and a ruler (preferably a quilters ruler that has both parallel and perpendicular lines on it.)

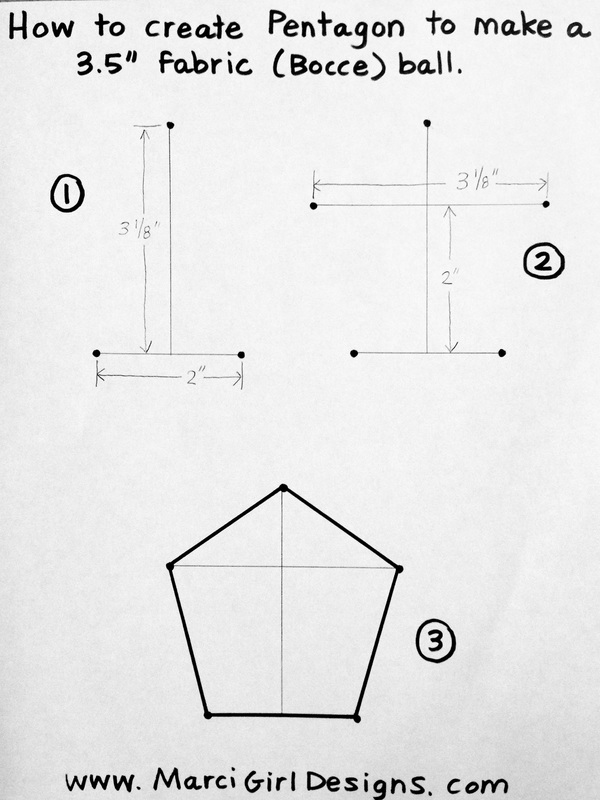
1.  Draw a dot, which will be the top of the pentagon.  Draw a line straight down from the dot that measures 3 1/8."  Next draw a perpendicular line at the bottom that measures 2".  This line should be centered with 1" on either side.  Draw two dots, one on each end of this line.
2.  Measure up 2" from the bottom line and draw a line that is perpendicular with the center line.  This line should measure 3 1/8" and should be centered just like the bottom line.  Since this measurement is a bit odd, I just measured over 1 1/2" and then marked 1/16" over from that.  Do that on both sides and then check to make sure the overall line measures 3 1/8".  Draw two dots, one on each end of this line.
3.  Now that you have 5 dots, ignore everything else and just connect the dots.  Voila!  You now have a finished pentagon template.  To double check and make sure everything is the correct size, each side of the pentagon should measure right at 2".  Trust me, if the measurement is a little off, you will still be fine.  Now cut out the template and move on to the next step.

3.5" Fabric Bocce Ball Cutting and Interfacing Instructions

Picture
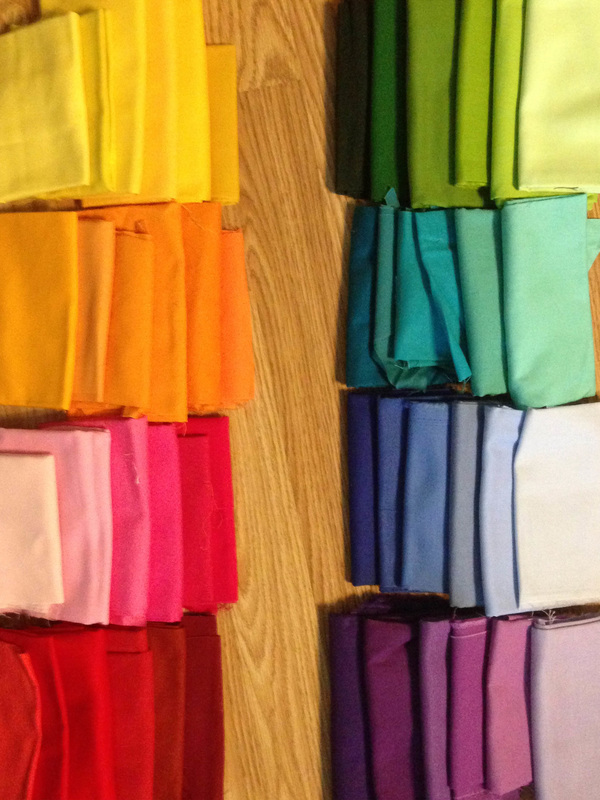
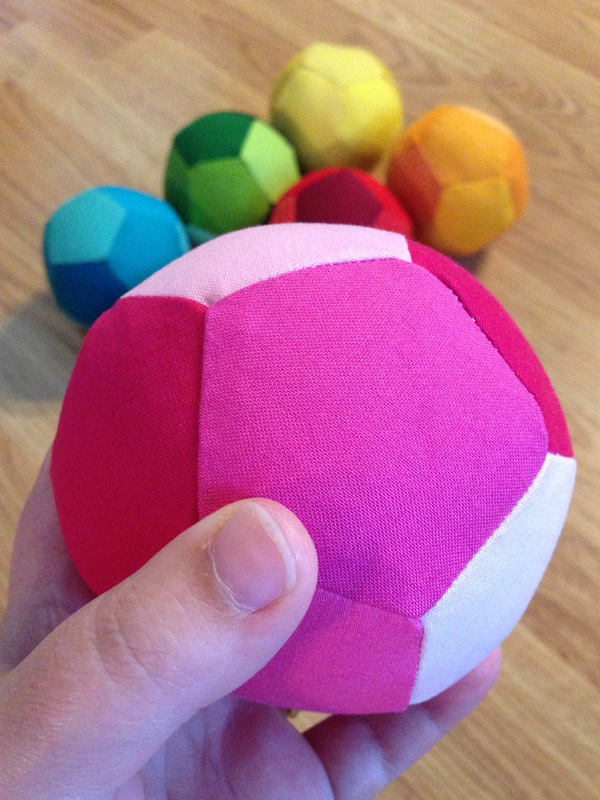
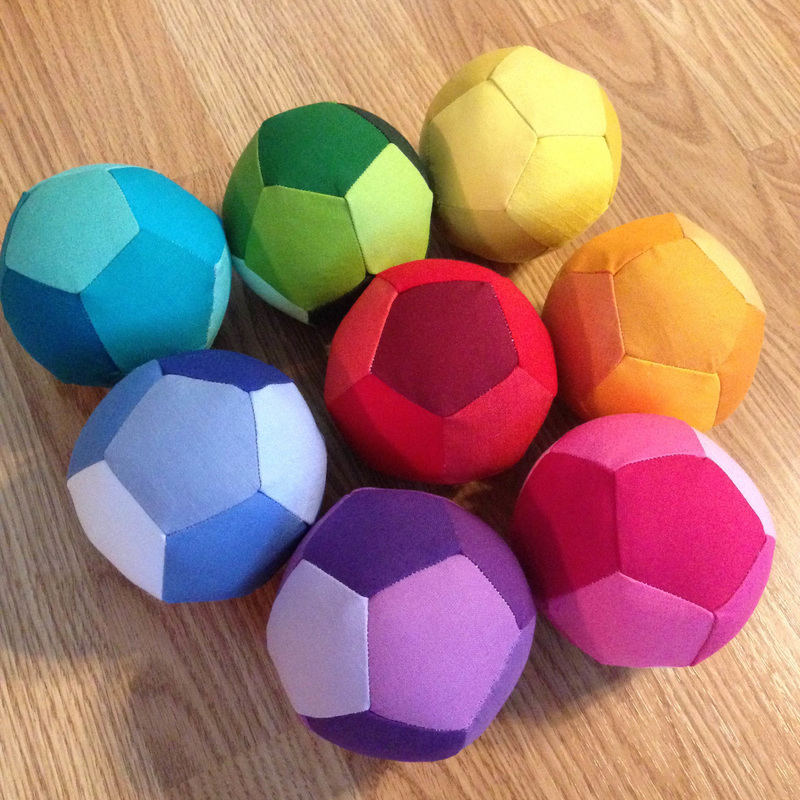
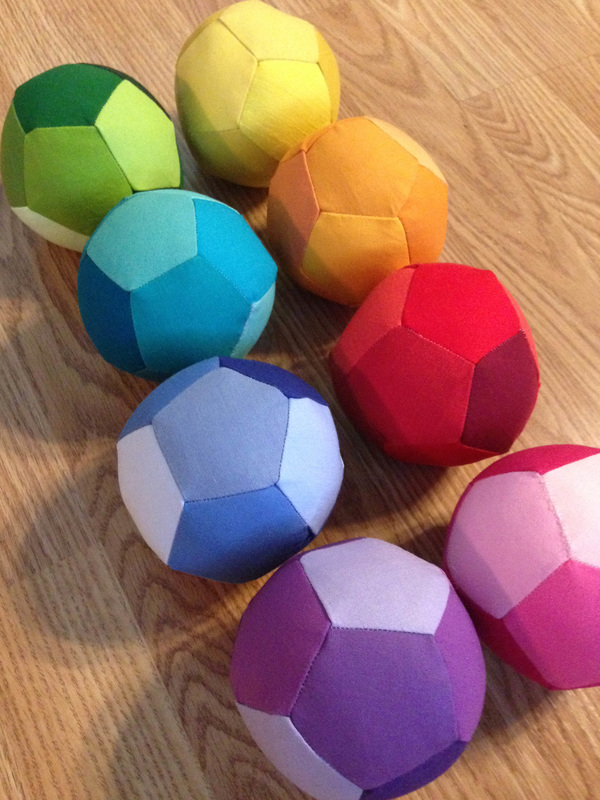
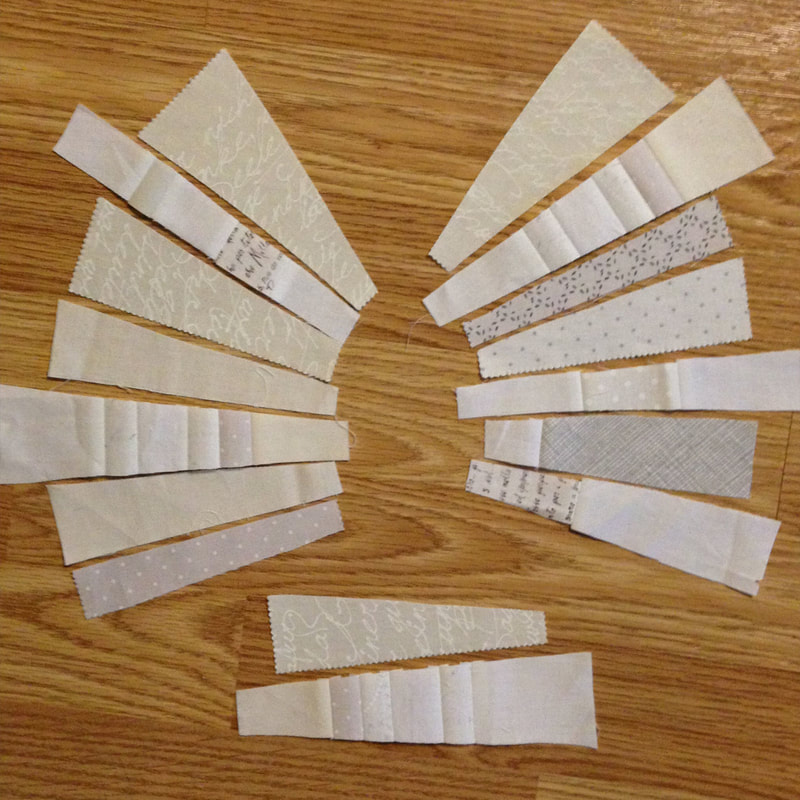
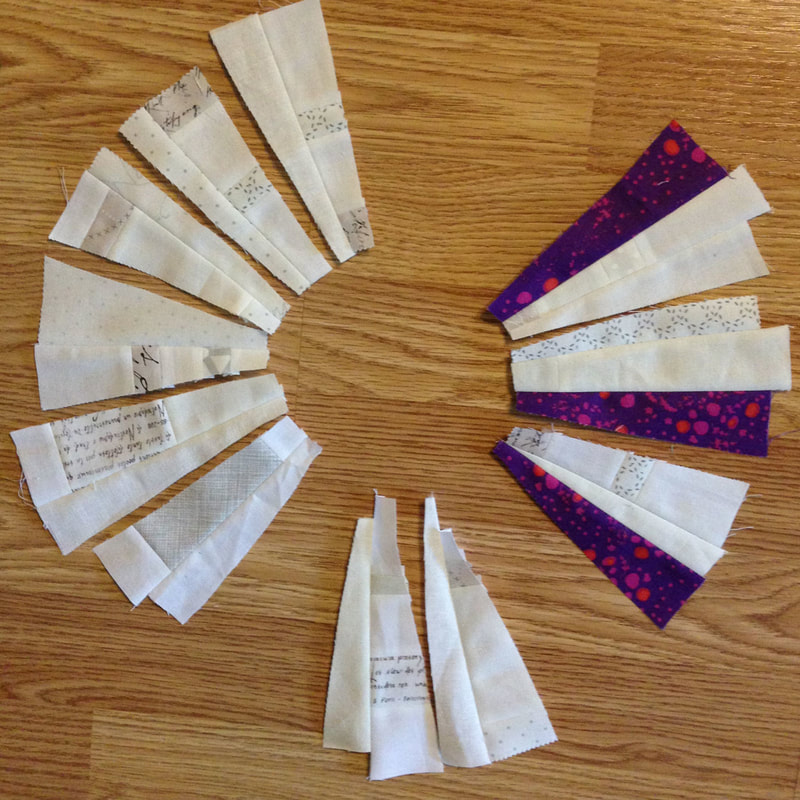
In order to play Bocce Ball, you need 8 balls, 4 for each player.  In a normal set, 4 of the balls are red and 4 of the balls are green.  I decided to change things up and instead made a cool color and warm color set.  Originally I thought of using prints but in the end thought solids would be fun and less distracting.  You can see in the above photo my fabric pull for the 8 balls.  You need to have 6 different colors for each ball if you don't want any duplicate colors or prints touching each other. 
Picture
I didn't worry with making the template on card stock, as long as you don't cut the actual paper, it will be fine, you don't have to be super accurate when cutting out the pentagons, just close enough.  The above left photo shows that I am using scraps.  I then line up my ruler along the edge of the template and cut with a rotary cutter.  Continue for each side just making sure not to cut the paper.  You can see on the right photo that I'm not even that close to the paper.  You need to cut 12 pentagons for each ball, ideally in 6 different prints/solids.
Picture
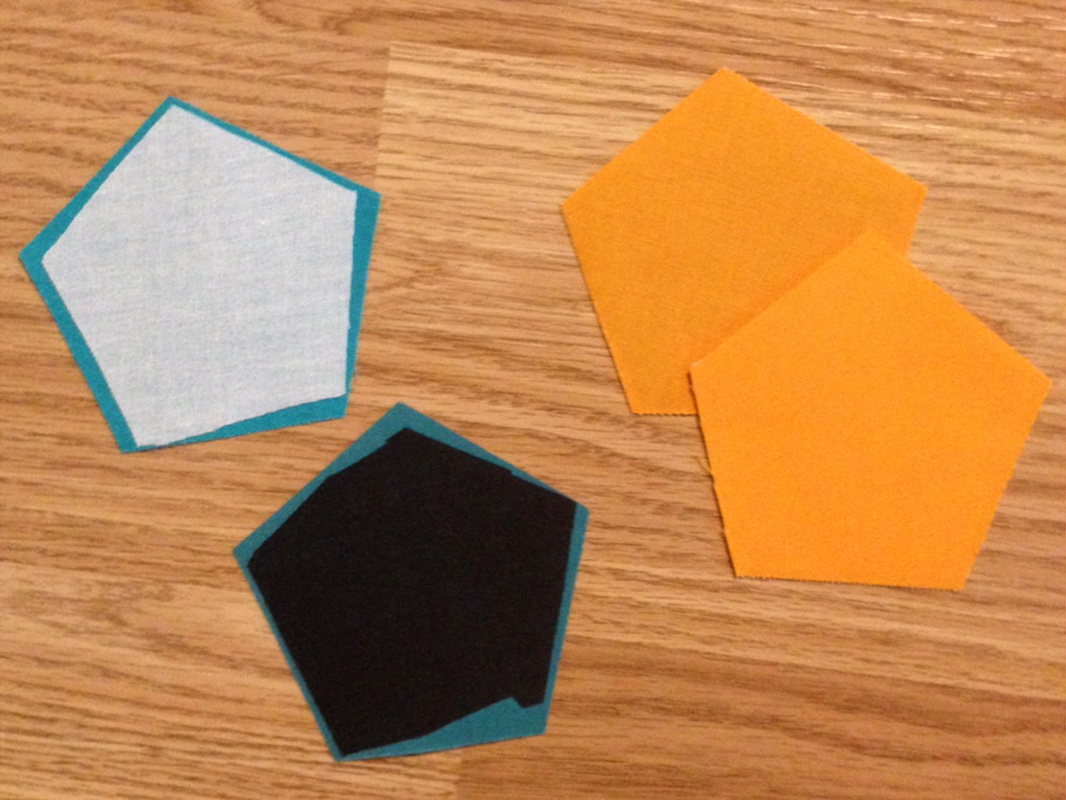
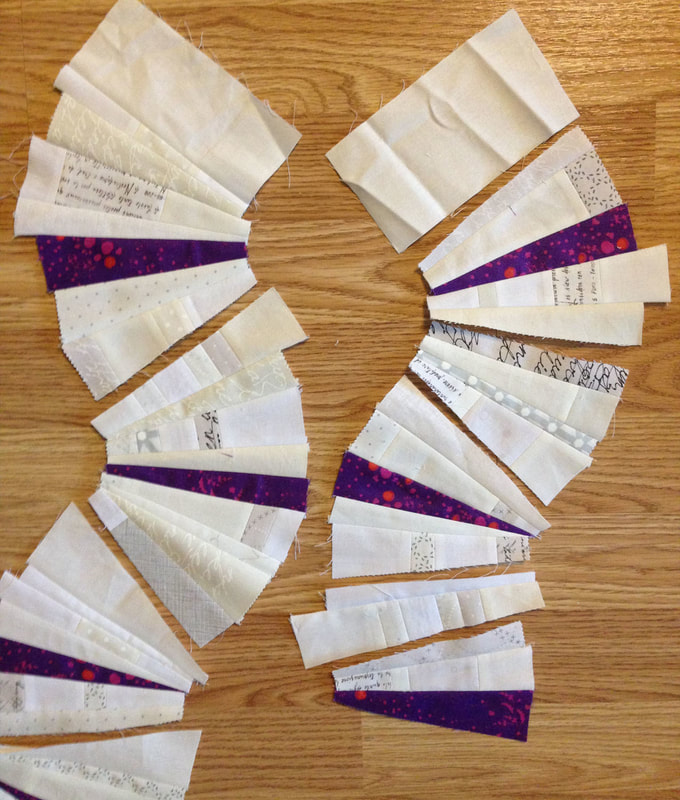
The next step is key to getting a nice sturdy, tough and smooth ball.  You need to interface each piece.  So I used Pellon Shapeflex 101, which is an iron on interfacing.  As you can see I used scraps, they don't have to be perfect and it is better to cut the pieces about 1/8" smaller than the fabric.  This is also beneficial when Ironing as you have less chance of getting glue on your iron or ironing board.  I used both black and white interfacing.  White on the light colors and dark on the dark colors.  I also used the interfacing to create a subtle difference between solids that are really close in color.  For example the two orange pentagons were very close in color, the top has black interfacing and the bottom has white interfacing.  Notice how it creates a greater color difference between the two, subtle but different.  Now that cutting and interfacing are finished let's get to sewing these babies!

3.5" Fabric Bocce Ball Sewing Tutorial

Picture
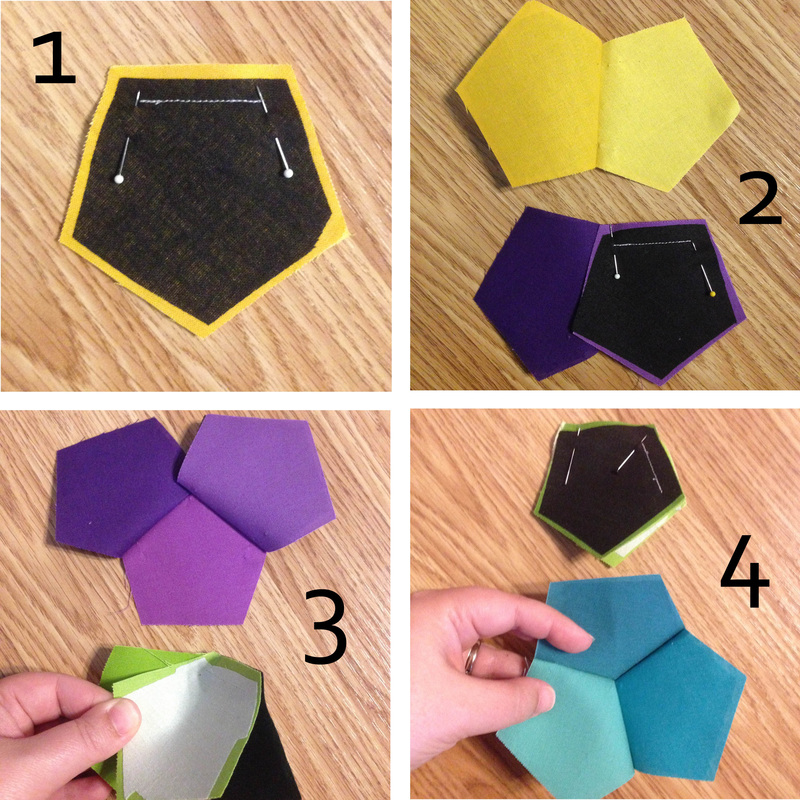
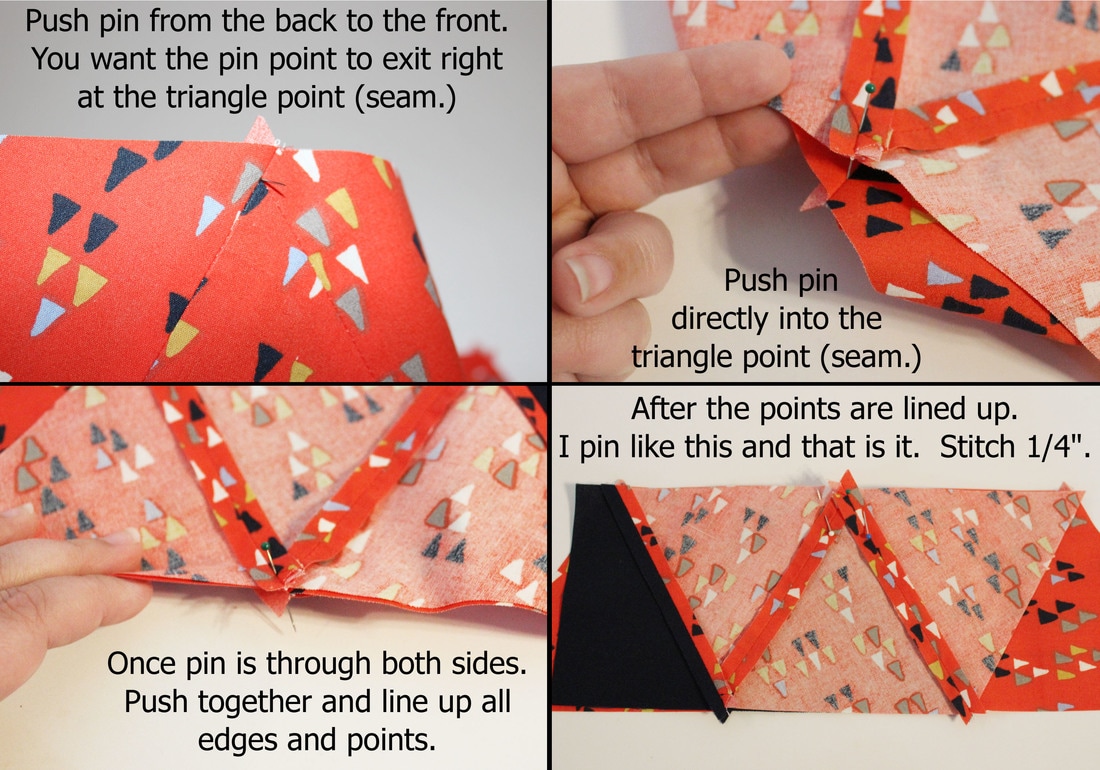
1.  You will be using a 3/8" seam throughout.  You need to mark (I use the pins) 3/8" in from each side.  Line up two pentagons, right sides together and pin them together.  Since I put these pins in at 3/8" I just stitch from pin to pin.  Another crucial feature of making these balls sturdy is to lower your stitch length.  I used 1.5, it is a small stitch.  Back stitching at both ends is crucial, don't forget to do this every time.  Remove pins.
2.  Open up the two pentagons and finger press the seam to the left.  Taking a third pentagon, right sides together, pin right where the seam is in the middle and pin the other end at 3/8".  Stitch, remembering to back stitch at both ends.
3.  Open up the three pentagons.  Now here is the tricky or neat part, you need to connect these three pentagons together.  Gently rotate the upper right pentagon over onto the upper left pentagon. As seen on the green fabric that I am holding.
4.  Now pin these two together.  3/8" in from the left side and then put a pin right where the other seam ends.  You can see I have this pin at an angle, be careful not to catch the fabric that is sandwiched in there because it is neatly tucked inside.  Stitch, back stitching at both ends in between the two pins.  Remove pins, open up and you should have three pentagons neatly stitched together like the blue one I am holding.  Congratulations if you can get this far, you can make a fabric ball and you have successfully sewn a Y seam!
Picture
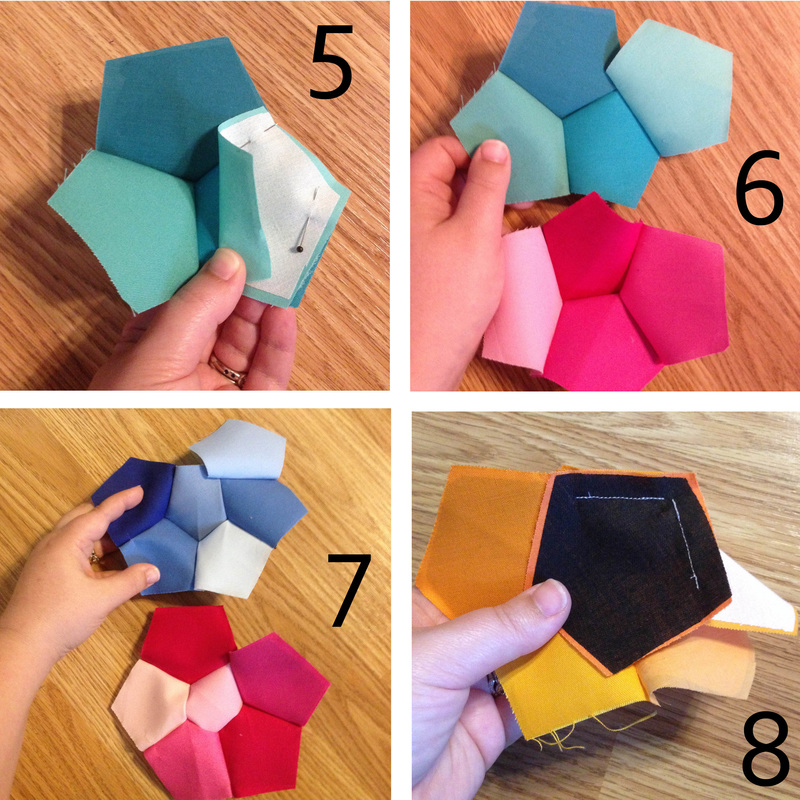
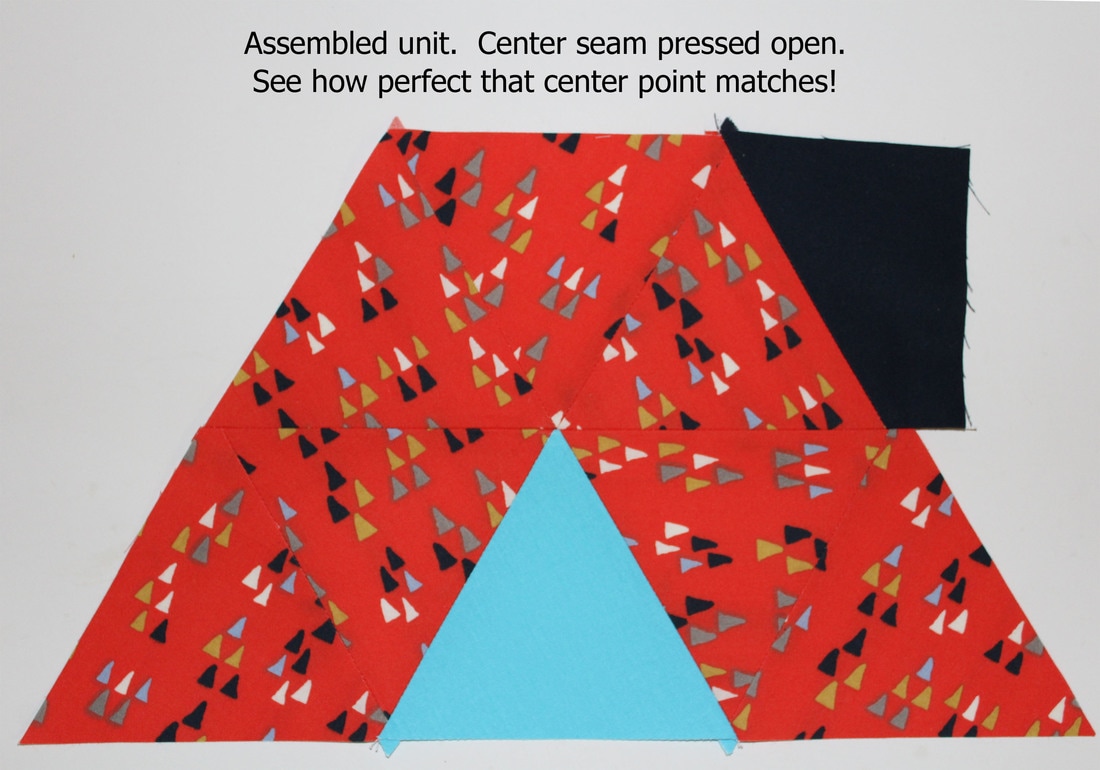
5.  Decide which pentagon you want to act as the "middle" pentagon and orient it on top.  Take a forth pentagon, pin (right sides together) right at the middle seam (finger press that seam upwards towards the top pentagon) and then pin the outer edge 3/8" in.  Stitch.
6.  Remove pins, open up and it should look like the upper aqua set that I am holding.  You will then do the same neat rotating trick (the same as step #3) and attach the newly sewn forth pentagon to the now designated middle pentagon.  Pinning and stitching in the same manner as all the others.  Remembering to always finger press that back seam out of the way and not catching any of that sandwiched fabric.  Once finished you will have 4 pentagons sewn together.
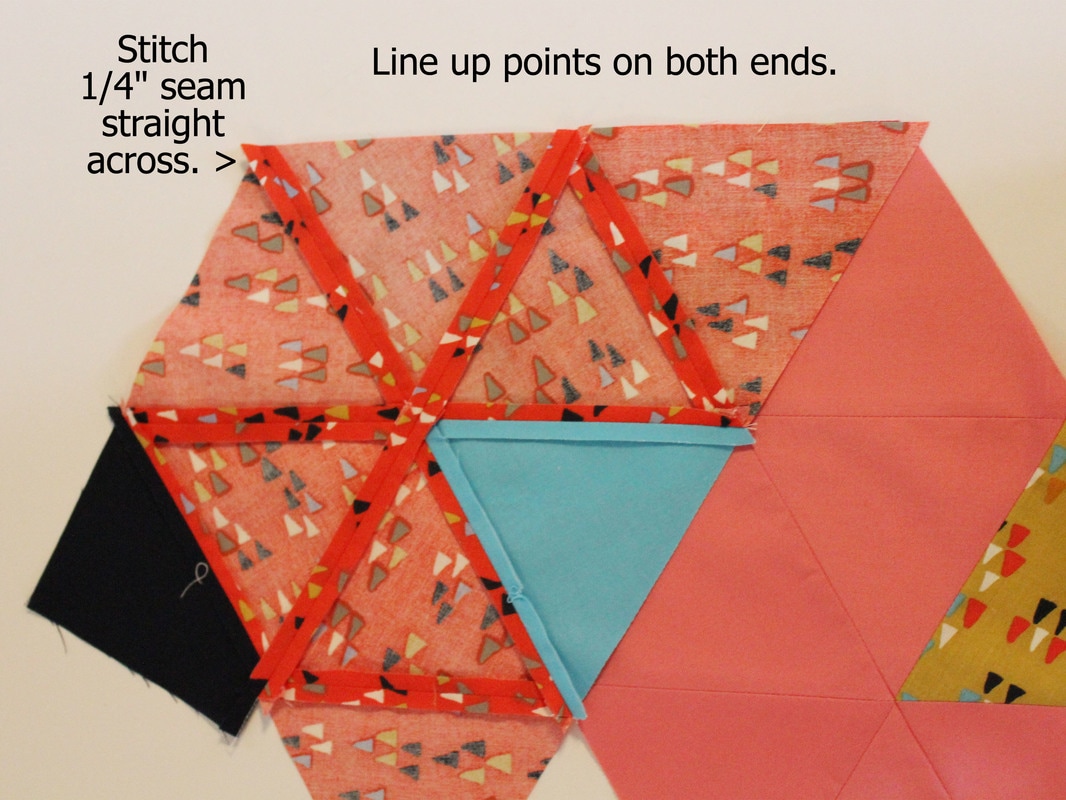
7.  Taking a fifth pentagon, add it to the top of the forth pentagon, sewing the same way as all the others.  Open it up and it will look like the top blue set.  Then repeat that neat little rotating trick to stitch it onto the middle pentagon.  You should now have a middle pentagon and 5 other pentagons attached with just one opening as shown on the bottom pink set.
8.  This is what step #7 looks like when you rotate it to stitch it onto the middle pentagon.
Picture
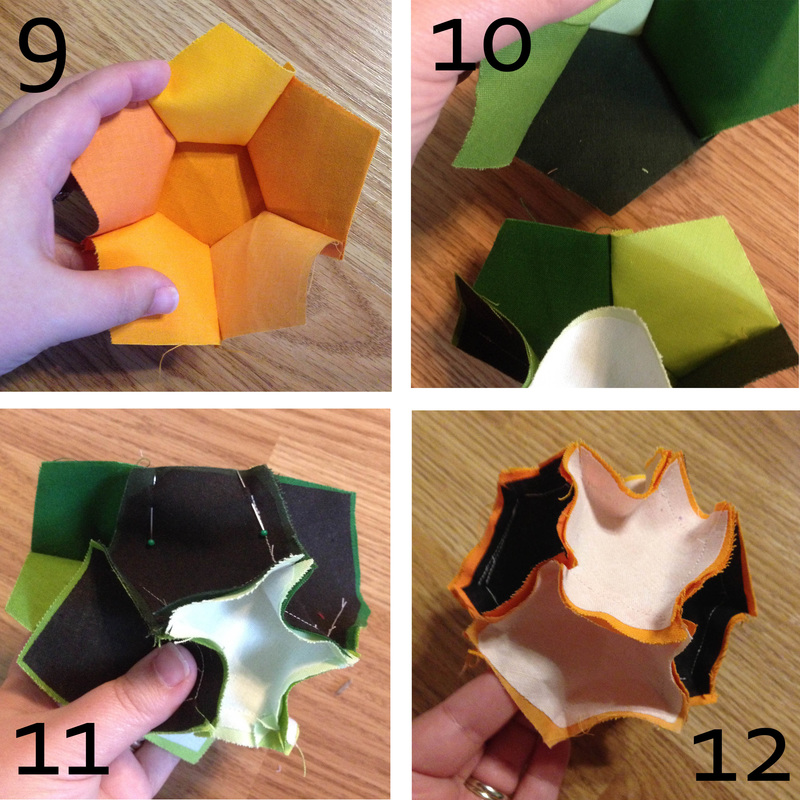
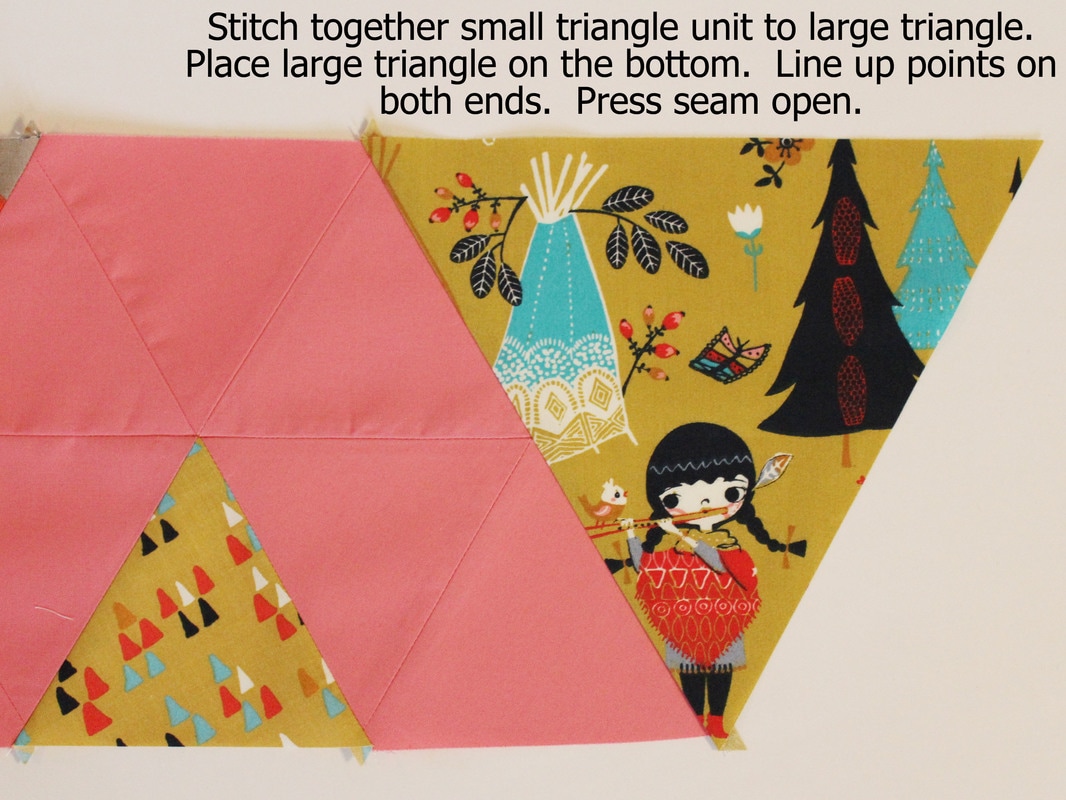
9.  Now close up that one last opening.  Rotate the right side pentagon onto the left side opening, right sides together, pin and stitch in the same manner as all the other seams.  Be careful not to catch any of the fabric or back seams.  Remove pins, open it up and it should look like this photo, which is now exactly half of the ball.  You will need to create the other half of the ball, so repeat steps 1-9.
10.  You now have 2 ball halves that you need to stitch together.  Rotate the halves around until you have no prints/same colors touching.  The key to joining the two halves together is to remember that the peaks join into the valleys as shown in the photo.  The upper half (peak) nestles into the lower half (valley.)
11.  Pin, finger pressing the left seam in the back towards the left and finger pressing the right seam to the right as shown in this photo.  Stitch. 
12.  Continue to stitch around the whole ball, one short seam at a time, finger pressing the seams out of the way.  Stitch all nine joints, leaving the tenth open.  You can see in the photo I have my finger stuck in the opening, leave it un-sewn as this is where you will turn the ball right side out.
Picture
Two techniques that I found helpful: 
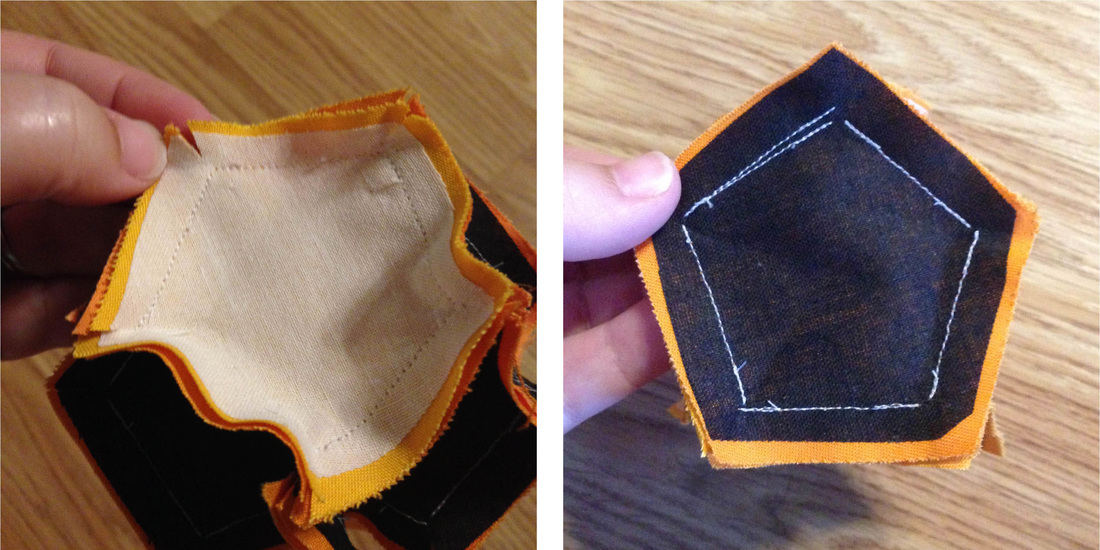
1.  Once you have sewn all your seams and are ready to turn the ball right side out.  I found clipping the corners 1/4" in on every intersection produced a smoother ball in the end.  I didn't trim the seams, it wasn't necessary.  You can see my clipped seam in the left photo above.
2.  Another key to stitching these and having a smooth ball with no tucks or puckers can be seen on the photo to the right.  When stitching each separate seam make sure you don't overlap your stitching and you don't even have to meet the adjacent stitched seam, it is better if you don't.  You can see in the photo that my seams are about an 1/8" away from each other.  I even messed up that top seam by starting out at 3/8" and then gradually shifting to 1/4" (old habits.)  You can see I just left it and restitched the seam correctly.  By leaving that little bit of space you are making sure not to catch other bits of fabric on the inside and creating tucks.  When in doubt, leave the space!  This is not the type of project where you have to be precise.
Picture
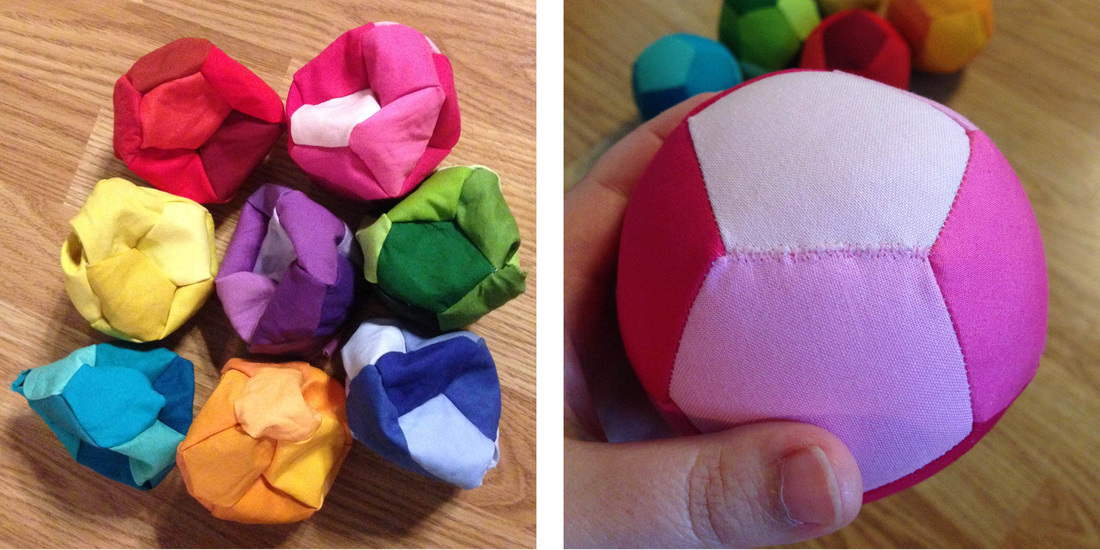
Turn the ball through that little opening (yes it requires some work, pulling and a lot of tugging but it will work.)  You can see all eight turned above and you can see the opening really well on the yellow one  Now it is time to stuff them.  Stuff them really full, I mean really full, tight as you can stuff it!  This is a great project to use up all those random batting strips and scraps you have laying around, just stuff them in.  If you don't have that, just use Fiberfill, one bag was plenty for all eight with leftovers.  Once it becomes too hard to put anymore filling inside it, you are ready to stitch it closed.  I used matching polyester thread (it is stronger) and stitched using a ladder stitch 1/8" apart just to get the opening closed.  There will be some gaping and it won't look wonderful.  I then went back over the seam a second time with a whipstitch just catching both sides and stitching as close together as I could, pulling tightly.  You can see my stitching on the right photo.  Knot off the end with your preferred method and clip the thread.  Keep in mind this is for children to play with, it doesn't need to be perfect, they won't mind.
Picture
Congratulations!  You are finished and now have a neat hand made fabric ball.  Stuff and hand stitch the remaining balls until you have a set of eight.  Play ball!
Picture
Now if you have a good eye you might notice I am missing something, the jack or pallina, which is another small ball that you throw at the beginning of the game, it serves as the target in which you are throwing your larger balls at (or as close as you can get them.)  This ball measures about 2" in diameter and is too small to sew using this method.  I plan to English Paper Piece this ball and sew it all by hand, but haven't done that yet.  In the meantime I am just going to let my kiddos use a ping pong ball or another small plastic ball that is lightweight and can't break anything or hurt anyone.  Not a big deal but I don't want you to think I forgot about it!
Picture
3 Comments

A Little Announcement

6/11/2018

1 Comment

 
Popping in today for a quick share.  I'm now a Blog Contributor for Peek-A-Boo Pages!  My first blog post went live last week (I was out of town, hence why I'm sharing late) and can be found HERE.  I'll share here whenever I have a blog post published, it will be worth a read for you guys as they will be sewing tips, general sewing information and tutorials.

My first post is how to seam rip regular, serger and coverstitch seams and it includes detailed photos and step by step directions to quickly remove these three types of seams.  I hope you will check it out.
Picture
1 Comment

A Round-up of 2017's Finish-A-Long Tutorials

4/4/2018

0 Comments

 
Hello and thank you for joining us today, Sandra and Marci here to share with you a ton of really good resources from last year.  The 2017 Finish-A-Long produced a lot of fantastic tutorials and we thought it would be a great idea to highlight them this year in one feature post.  They are categorized by subject below and all you have to do is click through to get some really great patterns, tips and techniques.

Quilts and Quilt Blocks


  • Twister Block Quilt Pattern by Sarah of Sew Me


  • Tipi Quilt Pattern and Tutorial for Sewing 60 Degree Triangles by Marci of Marci Girl Designs


  • Churn Link Block by Felicity of Felicity Quilts  
  • Improv Piano Keys - A Tutorial on Unique Curved Piecing by Marci of Marci Girl Designs

Quilting Techniques

  • How to Make Half Square Triangles (HSTs) different ways by Abigail of Cut & Alter 
  • Faced Binding by Sandra of Studio Sew of Course
  • Binding by Machine by Izzy of Dizzy Quilts

  • Taming Seam Allowances by Sandra of Studio Sew of Course

Sewing Projects and Techniques


  • Easter Bunny Bags by Judith of Just Jude Designs
  • A Polaroid Mug Rug/Snack Mat by Ella of Throw a Wench in the Works
  • Easy Framed Accent Strip by Karen of Capitola Quilter 
  • Tiny Pumpkin Pin Cushion by Nicky of Mrs. Sew & Sow


  • Cord Keeper Tutorial by Lucy of Charm About You 
  • Hump Jumpers and Jean-A-Ma-Jigs by Stacey of SLO Studio
We hope you enjoy this look back on the 2017 Finish-A-Long tutorials, there were some real gems in there. And of course we are continuing with tutorials for 2018, too. See our Finish-A-Long pages for more details and a link to this quarter's Tutorial Week post.


0 Comments

How To Link Up Your Instagram Photos to InLinkz Via Your Computer - A Tutorial

4/3/2018

5 Comments

 
This tutorial is part of the 2018 Finish-A-Long Tutorial Week.  The Quarter 1 Finishes Link-Up is currently open and you can find it HERE.  It will remain open until April 9, 11pm EST, hope you have some finishes this quarter to link up and if not, join us April 10 for Quarter 2!

The tutorial I have here today is a step-by-step photo tutorial on how to link up your Instagram photos to an Inlinkz link-up via your home computer.  Personally, I find this the easiest and quickest way to link-up Instagram photos, and maybe I'm in the minority, but it honestly only takes a minute to do this.  You do need to know how to copy (Ctrl C) and paste (Ctrl V) website addresses (or URL) in order to use this method.

A quick note - I  know this tutorial seems really simple, but every single quarter I (and the other global hosts) receive questions on how to link-up Instagram photos, so hopefully this will make it easier for everyone.
Picture
Step One - Using your home computer, open your favorite internet browser.  I'm using Firefox here but it really doesn't matter.  In the spot where you type in website addresses, seen above circled in pink you will need to go to your Instagram account.  Instagram's website is https://www.instagram.com/ and behind that you will enter your user name minus the @ symbol.  For example my user name is @Marci_Girl, so I would type in
https://www.instagram.com/marci_girl/ and ending with a forward slash.

Picture
Step Two - Now that your Instagram page is pulled up, scroll down until you see the image that you want to link-up.  My chosen image is circled above in pink.  Click on the image.

Picture
Step Three - Once you have clicked on your image it will open up and look like the screen above.  You will see your photo with the description and comments next to it.  The individualized website address attached to this image is seen up top circled in pink.  You need to copy this URL.  Highlight it and hit Ctrl C.  This URL is what you will use to link up.
Picture
Step Four - Now go to the Inlinkz link-up that you are wanting to participate in.  In my case it is the Finish-A-Long Quarter 1 link up found on my blog.  You scroll all the way to the bottom of the link-up until you see the blue button on the left that says "Add Your Link" circled above in pink.  Click on that blue button.
Picture
Step Five - Now the Inlinkz link up tool has opened and looks like the screenshot above.  There are three sections you need to fill out.  The first spot is for that URL that you copied, so paste it there with Ctrl V.  The second spot is for your title, you can put whatever you choose there or use what auto populates.  The third spot is for your email address.  This is how the Inlinkz host can contact you should you win a prize, use an email address that is something you actually check on a regular basis.  The image will also auto populate and you can crop it if you choose but normally it is good as is.  Once you are happy with everything, click on the blue DONE! button on the bottom towards the right side.

Picture
Step Six - You are officially linked-up!  I always like to go back to the link-up and double check that my image is there and sometimes I will click on it to make sure it actually works, it usually does, but if not, refresh your page and check again.  If for some reason it still isn't working, just repeat all the above steps because sometimes it will glitch, but I've only had this happen once or twice in the past 10 years.

Helpful Hint - In the above screenshot, in the pink box at the bottom it says "Collection Closes ..." this is the amount of time you have left before the Inlinkz collection closes for good, aka your deadline to finish up those projects and get them linked up!

I hope this was straight forward and helps at least someone out there, but if at any time you are still struggling to link up, don't hesitate to contact me here on my blog or via Instagram.
5 Comments

Improv Piano Keys - A Tutorial on Unique Curved Piecing

9/28/2017

11 Comments

 
This tutorial is part of the 2017 Finish Along Quarter 3 Tutorials Week.

Find the link up to the Quarter 3 Finish Along HERE or on any of the other hosts blogs.
Picture
A few years ago (November 2015 to be exact,) one of my Bee Sewcial mates, Leanne requested "No Negative Space, Maximalist" blocks in all the colors.  Above is what I designed.  At the time I had several ask how I did it and a few months later when participating in a swap I documented the process and was all prepared to give a tutorial on Instagram.  At that very same time is when Instagram switched to non-chronological order and I just couldn't stand to do a tutorial that would show in everyone's feed all out of order, so I just sat on it.  Well here we are today and I'll share this process on my blog (and I'm not sure why that never occurred to me before. LOL)  As you will see my tutorial block looks extremely different from above, but the process is the exact same, just different fabric choice, which really shows the versatility of this block.

A Few Notes:
For this tutorial I won't be giving dimensions, as you can do this technique in a variety of sizes.  The first time I made this block my "piano keys" were around 7"-8" long, for this tutorial they were around 5" long so that I could use a charm pack I had on hand.  I'm sure you could make them even smaller or a lot longer.  Play with it and have fun.

I'll also not be going into depth on the technique of sewing improv curves.  There are a ton of tutorials already in existence and you can find some good ones here -
Red Pepper Quilts - Cutting and Sewing Free Hand Curves
Gefilte Quilt - Curvy, Modern, Red, Improv Scrap Quilt
Elm Street Quilts - Improv QAL Strips and Curves

All that being stated, let's get started!
Picture
1.  Gather Supplies - Variety of scraps, strings are perfect, but smaller chunks can be pieced into longer strips.  These scraps in the upper left corner are in the 1"-2" wide and 5" long range.
Picture
2. Sew Together Smaller Scraps - I took my little scraps and sewed them randomly to each other to create at least 5" long pieces.  Press seams open. Don't trim anything at this point.
Picture
3.  Cut Piano Keys - Once you have a pretty good sized stack of scraps, start cutting "pie" shaped pieces as seen above.  Use scissors and not a rotary cutter or ruler and just make sure one end is thicker than the other end.  Make sure the smallest end is at least 3/4" wide.  You can see above I have a variety of shapes and sizes.
Picture
4.  Playing With Layout - Start laying out your "piano keys" in segments of around 5-8 pieces all with the wide ends on one side and the skinnier ends together on the other to start creating a nice curve as shown above.  I alternated solid scraps with pieced ones, or at least tried to stagger the seams.
Picture
5.  Sewing Together The Piano Keys - Once you are happy with your layout, start sewing the segments together two at a time, pressing the seams open.  I usually try to line up the narrower ends, but it doesn't really matter.
Picture
6.  Sewing Together The Larger Panel - Now that you have chunks sewn together start to play with your pieces to create a nice long "S" curve.  Sometimes you might have to add in a a larger scrap (see the tops) and sometimes you might have to add in a smaller chunk to make the curve do exactly what you want it to do.  Overall you want to have a nice meandering curve, make sure the curve doesn't change too sharply, but rather think of an extended long "S."
Picture
7.  Trimming The Piano Keys - Once you have reached your desired length and are happy with the way it looks, it is time to trim the curves to make a nice smooth piece.  Trim as little or as much as you want, but you can see above I trimmed only the bits that extended too far past the piece next to it.  You can see I kept the nice gradual curves and had very little waste or trash.
Picture
8. Cutting The Background - Now it's time for you to decide how wide you want your piece to be and cut a solid piece long and wide enough for your specifications.  As you can see on the example above to the left I lay the piano keys on top of the fabric and make sure I have plenty enough room to accommodate the curves and the seam allowance.  The piece on the right has been cut and towards the bottom you can see it gets thin in one spot, but it is still at least 1" wide (I wouldn't really go any thinner than that.)  As for cutting the background piece I just over lap the two pieces like the one on the left and literally cut the background piece following along that curved edge.  Pretty easy.
Picture
9.  Aligning The Curves - There is no exact science when sewing this long curve, but I mark all the outer and inner curves with a pin on each side and when I am sewing I aim to make those pins match.  It doesn't always work perfectly but that is my ultimate goal.
Picture
10.  Aligning The Curves 2 - Sometimes I will start in the very middle of a really long piece and actually pin right sides together where it should match.  Then I will start sewing from the middle out until I get to the end.  And then I will start on the loose end (or top) and sew (and ease) it all until I get back the middle where I first started.
Picture
11.  Clipping Curves And Ironing - Once you have your "background" sewn on the piano keys and you are happy with how flat or not flat it is, you can clip the concave and convex curves to make it lay even flatter.  I press this seam toward the background because it is a whole piece of fabric and it tends to lay better this way.
Picture
12.  How To Use This Block - The first time I made this block it was a bee block and was sent in it's entirety for the recipient to use whole, as is.  The second time I made this block was for a swap and I needed to cut it into pieces that I could mail to the recipients, you can see those above.  I just cut up the long piece into unique blocks.  You could also sew a background to the other curved side and make more of a traditional rectangle or square block.  Lots of options and fun things you can create with this design.

Thank you for joining me today and I truly hope you give this technique a try.  If you do, please tag me in your photos and use Hashtag #ImprovPianoKeys.

Picture
11 Comments

Tipi Quilt Pattern and Tutorial for Sewing 60 Degree Triangles

3/30/2017

7 Comments

 
Picture
This quilt pattern and tutorial are part of the 2017 Finish Along Quarter 1 Tutorials Week.

Find the link up to the Quarter 1 Finish Along HERE or on any of the other hosts blogs.

*Warning this is an extremely long blog post.*

Back in July 2014, so almost three years ago I posted my finished triangle quilt and you can read all about it HERE and see more photos.  Since then I have received several requests for a pattern or a "how to" and I've even seen at least one copy without a tutorial, which would have been cool if I had received credit, but whatever.  Back to the point, today is the day for the FREE pattern.  I've named this quilt the "Tipi Quilt" because of the "tipi" shape created with the triangles and to me this quilt has a real Native American feel to it.

The photo below is the new version (un-quilted) made specifically so I could write up the pattern for you guys.  The fabrics used for this version are by Miriam Bos for Birch fabrics and is named Wild Land.  I also used a variety of solids, mostly Kona.  Are you guys ready?  Below you will find the tutorial on how to make this quilt and if you aren't interested in making the quilt, in the tutorial are detailed instructions on how to sew together 60 degree triangles and that can be used in a variety of applications.  So hopefully you will find something useful.

Picture

Tipi Quilt Specifications and Fabric Requirements


Quilt Size - Wall Hanging or Baby/Toddler Quilt measuring roughly 36" x 42.5"

Fabric Requirements - Fat Quarters or 1/4 Yard Cuts
10 Busy or Focal Prints, if you use less plan to have duplicates.
15 Solids and Less Busy (optimally prints that are not directional), if you use less plan to have duplicates.
1 Background Fabric, either a solid or a blender.

The key step with this quilt pattern is fabric choice and placement.  This quilt pattern was born out of the desire to feature several larger focal prints uninterrupted (not cut up!)  Both of the quilts that I made with this pattern used one fabric line and each of these lines had great focal prints and good smaller prints, thus this quilt pattern was born.  Your very first step is going to be choosing a fabric that will fit the bill appropriately.  I can't tell you what to use, but I can show you what I've chosen and how I went about it.

In the photo below you can see I've separated the prints into two groups, less busy prints and focal/busy prints.  The focal prints will be large triangles that will be fussy cut to feature specific images (like the little Native American girl.)  On the "less busy" side I decided to add in a good handful of solids to break up all the prints (so it isn't crazy time carnival quilt) and by adding solids it gives the eye movement and you can appreciate the designs more.

I didn't separate it from the group below, but you will also need a background fabric.  This print or solid will be used along the edges, top and bottom of the quilt.  It will fill in the gaps created from the "tipi" shape and the large triangles.  In this quilt I chose the dark navy blue solid below as my background print.

Once you have decided on fabrics and divided them into three groups (large triangles, small triangles or tipi shape and the background) you are ready to get started.
Picture

Cutting Instructions


This is a Fat Quarter (FQ) friendly pattern, but you can also use 1/4 yard cuts.  The directions below are for cutting from Fat Quarters.

Large Triangles (that will be fussy cut) - 10 Prints
Cut a 9" strip.

Large Triangle "Tips" - 2 Prints, duplicates of the 10 above.
Cut a 4.75" strip or you can use scraps, you only need one triangle.

Small Triangles - 15 Prints or Solids
Cut 2 - 4.75" strips along the 18" side of the Fat Quarter.  If the print will be duplicated, cut 3 strips.

Background - 1 Print or Solid
Cut 2 - 4.75" strips.

A quick note - these cutting instructions do produce some scraps, it's inevitable, but I have tried to reduce the amount of waste or scraps as much as possible.

Step One - Cutting out the Triangles

Picture
Let's start by talking about rulers.  You don't need a fancy 60 degree triangle ruler to make this quilt, though it does make cutting easier.  All you need is a ruler that has 60 degree lines on it, both the rulers to the left and right above have these markings.
Picture
We are going to start by cutting the small triangles, so using the 2 - 4.75" strips we will cut the triangles.  Using the 60 degree marking on your ruler, line it up along the bottom of the fabric strip and cut.  After this cut, turn your ruler in the opposite direction, but still using the 60 degree marking and cut a triangle.  YOU WANT TO KEEP ALL THE POINTS.  As you can see from my triangles above, keep the points and cut full triangles, this will help with piecing, I promise!
Picture
Continue cutting the whole first strip and then onto the second strip.  You need 8 small triangles for each "tipi."  I was able to cut 6 small triangles from one strip and 2 from the second.  If you look closely on the first row above, the triangle on the left, the first in the series has a point missing.  This is ok, it is less than 1/4" and is where the fabric strip cut off or ended.  If this bothers you, then cut 5 from one strip and 3 from the next.

If you will be duplicating this print, then cut 16 small triangles from the 3 strips of fabric.  Continue cutting all the small triangles from the 15 assorted prints and solids.
Picture
You will cut one large triangle from each strip and I recommend fussy cutting it to feature exactly what you in your quilt.  Yes this produces scraps, but what fussy cutting doesn't.  The important part of this step is the cut triangle needs to have the point on the bottom and the triangle "base" at the top.  So you can see from the large triangle above, I have fussy cut so that the Native American girl is centered and the point is on the bottom.  You want your prints to be in the right direction in your finished quilt.

You also need to cut 2 large triangle "tips" from these busy focal prints.  Using either drop from above or scraps, cut 2 different 4.75" strips and cut a triangle from each, once again maintaining the triangle tip on the bottom and the base on the top of the strip.  These two tips will be on the very top row of your quilt.
Picture
Now we need to cut the background fabric.  Cut 13 small triangles just like above.  Then we need to cut 12 half triangles for the sides of the quilt.  You could just cut more small triangles, but once the quilt is pieced you will cut off this odd triangle scrap that isn't very useful, so I cut these specific side pieces in order to waste less fabric.  If you look at the photo above, you can see I have the bottom of the ruler lined up along the 60 degree line, and then slide it over on the cutting board to exactly 1" from the edge and cut.  It will produce a piece that looks like the shape in the bottom photo to the left.
Picture
Now move your ruler to cut a straight line exactly 1" from the top cut 60 degree angle. Now you have two side half triangles.  Continue cutting in this manner until you have enough.
Picture
Congratulations!  Cutting is finished.  So you can see from the above photo you should have:
10 Large Triangles
2 Large Triangle Tips
15 Sets of 8 Small Triangles
12 Background Edge/Side Triangles
13 Background Triangles

I honestly feel that once I've reached this point, the hardest part is over, so pat yourself on the back and get ready to sew.

Step Two - Basic Assembly and Design Layout

Picture
Now logic would tell you that it is time to move to the design board (or the floor) and play around with fabric placement, but I will tell you WRONG, let's do a wee bit of sewing to get our feet wet sewing triangles and this little bit of sewing will make your layout design of the quilt so much easier and a lot of the work will be done already.  So the next step will be to sew together some of the small triangles to create groupings.  You can see what we will be sewing together above on the right.

First layout the 8 triangles in the formation to the left.  We will be sewing the second row of three triangles together and then the bottom row into two groups of two.  Easy peasy!
Picture
The image above shows step by step how I sew together 60 degree triangles:

1.  Lay two triangles right sides together on top of each other.  Stitch a 1/4" seam.  I find you can use either a scant seam or a full 1/4", it doesn't matter as long as you do the same thing for the entire quilt.
2.  Press the seam open.  PRESS don't iron.  So carefully open the seam with your fingers and place the iron down and don't move it back and forth.  You don't want to stretch these bias seams.
3.  Now take a third triangle and put it right sides together on either side, I did mine to the left.  Because you kept those points, you will see that it is easy to line it up.  Just match both the points at the top and bottom.  Stitch 1/4" seam.  After this seam you will trim that one little point that is sticking out as indicated in the photo.  Trim only this point.
4.  Press this seam open.
5.  This is what the back should look like.  You still have points sticking out on the top and bottom of the grouping and this is good. 

Now repeat this three grouping for all 15 colors/prints of the small triangles and then sew together two groupings of two.  Chain piece all of this and it goes together so quickly.
Picture
One more thing to sew together and then we will get to the design board.  Taking your background pieces, sew some of them together in the above groupings.  So four sets of two and then one side triangle with the straight edge to the left and one side triangle with the straight edge to the right sewn to full triangles.  These two pieces will be the top corners of your quilt.  There will be leftover background pieces that you don't sew right now.
Picture
When you sew together your side triangles to full triangles you will line up the points just like a full triangle grouping.  Once you press the seam open it will look like the shape to the left in the above photo.  You will have some hang over from the side triangle piece.  This is fine.  Just trim it off straight across.  So once it is trimmed it will look like the shape to the right.

Now it's time to play!
Picture
You can see I don't have a design board, so I use my back hallway floor, which can be quite challenging with little kids, but hey if you work on the floor just take a lot of photos to reference in the future in case things get kicked around a bit.

Start by laying out 5 sets of the small triangles in the "tipi" shape, which is dead center above.  See why I had you sew things together, so much easier to move around chunks instead of individual triangles.  Next layout the 10 large triangles with the points at the very bottom of the "tipi."  This will create a missing row at the very top and this is where the 2 large triangle tips come in.  Put those down and then add in the background triangles that you have sewn together.
Picture
Finish laying out the remainder of the "tipi" shapes and then fill in the gaps with background fabric at the bottom and the sides.  You will have to move things around quite a bit to get it perfect but take your time, step back admire your quilt.  Take photos, look at it that way.  Ask opinions, do whatever it takes to get you to your final layout.  I spent a morning rearranging until I settled on the above photo.  For me it is about not having too many same colors or prints next to each other.  Evenly spacing the solids throughout and just overall being pleased with the final look.

Now let's sew this baby together!

Step Three - Quilt Assembly

Picture
We will start the quilt assembly by sewing together all of the small triangle groupings that are contained within two rows of the quilt.  So skip the very first row of the quilt and start with rows 2 and 3.  I have the pieces laid out in the photo above.  So on row 2 stitch the background side triangle to the 3 triangle grouping.  Trim that one point as indicated in the photo.  Press open and trim flush.  Now on row 3 sew the two triangle groupings to the different colored center triangle.  Trim that sticking out point and then press open.  Repeat this same process for all the small triangle sections.  When you are done it will look like the bottom right image above.
Picture
Now it's time to sew that "tipi" together.  This is my method for getting all those points to match on each and every row.  Taking the top three triangle grouping, push your pin from the back to the front of the point, right in the seam.  So your pin should be sticking out just like the top left photo.  Then taking your bottom row of fabric triangles push the pin directly into the right side triangle point (seam.)  So both of these points are now on the pin.  Move them carefully together until they are mated up with one another and using another pin, pin to the left side and then using another pin, pin the right side.  I do it like the bottom right photo.  Then I remove the first pin completely.  Now that the center is pinned, just line up both ends, matching points and pin if you choose to.  I do not.  I just stitch my 1/4" seam and line up as I go, it's a short seam and just saves time.
Picture
Now that the seam is stitched, open it up and make sure you like how your point looks.  If you don't, redo it.  If it looks great, carefully open up the seam and press the seam open.  Remember, press don't iron.  You don't want to stretch anything.  Once you are done pressing, the unit should look like the photo above.

Continue sewing all of your two row "tipi" units together.  Once that is complete it will be time to sew those units to the large triangles.
Picture
Placing the large triangle on the bottom, right side up, I put my "tipi" unit on top and line up the points on both ends.  I find it easier to sew with all those seams on the top.  I put a pin at both ends.  Stitch a 1/4" seam straight across.  If any of those little points are sticking out of the seam you just stitched go ahead and trim them off.  Carefully press this seam open.  Your finished unit should look like the photo below.
Picture
Picture
Sometimes (for a large variety of reasons) the large triangle may extend a wee bit from the edge.  In my case it was 1/4."  I am pointing to it above.  You want that point to end at the bottom, otherwise if you sew it as is you will end up with a blunt triangle and no point.  So we don't want that, we want pretty, perfect triangles.  So if your large triangle ends up being a tad bit too large, take a ruler and carefully trim along the side so the bottom of the triangle meets perfectly with the bottom of the "tipi."   On my example above you can see what I trimmed and that my point is now flush at the bottom.  If you do end up having to trim, you will probably have to trim every large triangle, but it only takes a second and isn't a big deal.
Picture
Keep in mind, before you press a seam open if you have any of those over hanging points, take a moment to trim them off.

Now continue sewing all of your two rows together until you have five large rows.
Picture
You can sew together that top single row at any time.  Just sewing a bunch of small triangles together.

Now let's finish this quilt up!
Picture
Starting with the top row, sew it to the row 2 and 3 grouping.  I push pins in each of my points doing one at a time down the entire row, making sure all those points match up while pinning is much easier than picking out stitches and re-doing it later.  I put row 1 on top because the large triangles will end up on the bottom (less seams) and I prefer to have more seams on top  Stitch 1/4" across the whole row, check your points on the front, if they are good, trim any sticking out points and then press the seam open.  Repeat this procedure until all the rows of your quilt are sewn together and you have a completed quilt top.
Picture
Now that the quilt top is complete, your quilt sides will look like the above left photo.  Take your ruler and line up the 1/4" mark directly on top of the corner triangle seams, as you can see on the above right photo.  Trim both sides.  When you cut 1/4" away from the corner seam, once you add your binding you will maintain those perfect triangle corners and they won't be chopped off.

Congratulations you have a finished Tipi Quilt!
Picture
I would love for you to make one and if you do please tag me in any photos and use the hashtag #TipiQuilt.

If you need any help with the pattern, don't hesitate to contact me.  Thanks for joining me today and I hope you enjoyed the pattern and tutorial.
Picture
Picture
7 Comments

Triple-Zip Pouch - An Alternate Ending Tutorial

1/31/2013

28 Comments

 
My last post showed off the two Triple-Zip Pouches that I made back in December.  At the time I figured out a different way to finish up those pouches (different from Debbie's tutorial.)  You see, the last steps of the tutorial were really hard (virtually impossible) for Debbie to photograph, so there weren't any photos, just step by step directions.  Well that is a problem for me, I'm totally a visual learner, so I was kinda like "what?"  So I stopped and I thought about it for a few days.  The more I thought about it, I started pondering a different way to finish, then decided to try it out.  Success!  It worked!  Debbie has so graciously given me permission to share my method (tutorial) with you guys here today!  I have photographed every single step of the process, and hopefully for those of you who are visual learners this alternate ending will help you finish it up!

I know that several of you have figured out this method already and have even posted basic directions in the Flickr group and online.  In no way do I mean to step on anyone's toes, and only hope to provide a visual step by step to this already great award winning tutorial.  If you have any tips or tricks in regards to this tutorial, feel free to add them in the comments section.

Triple-Zip Pouch - Alternate Ending Tutorial

Triple-Zip Pouch Tutorial by A Quilter's Table found HERE.  Use this tutorial all the way through until the last photo.  This tutorial picks up and replaces the "To Finish" section in Debbie's original tutorial.
Picture
This is a photo of the last photographed step in Debbie's tutorial.  Your pouch is inside out, all zippers and linings are sewn into the pouch and basically it is an odd looking tube.
Picture
Separate out the main (largest) lining from the main body and two other linings.  Zipper should be centered in the middle.  On the left (in this photo) is the main body fabric, and the two lower pocket linings.  On the right is the main (largest) lining.
Picture
Flatten out and pin.  Zipper should be centered.  One side will be the main lining only, the other side will be the main pouch with two other linings flat on top.
Picture
This is the same step, just the back view, pinned.  Basically if you flip it over, it should look like this.  You can see the fusible fleece on the main body of the pouch.
Picture
Using a 1/4" seam allowance.  Start sewing on one side, following the directions of the arrows in the above photo.  Stitch up to the zipper, as close as you can without going over the zipper.  Repeat for the remaining three seams.   Leave a 3"-4" opening on the bottom of the main lining.  This opening is for turning the pouch later on.

There are two main reasons for not stitching over the zipper.  First, it is easier not to stitch over all that bulk.  Second, by not stitching over the zipper, once you turn your pouch, it allows for you to push out those top corners further than you could if you had stitched over the zipper. Creating a nice square pouch.  If you choose to stitch over the zipper in one continuous line (it can be done.)  Be sure to go slowly, and to push the zipper itself towards the main body fabric and two pocket linings.  This method creates more of a "rounded corner look" when you turn the pouch later on, which some deem as a slight downfall, but it is totally up to you and your preferences.
Picture
Press the 3" - 4" open edge of the main lining in 1/4".  You can always finger press this opening, you don't have to use an iron.
Picture
Turn the pouch through the 3" - 4" opening, leaving the main lining sticking out of the pouch.  At this point, push out all your corners to get them nice and square.  Pin the opening of main lining closed.
Picture
Stitch the opening closed, very close to the edge (normally in a matching thread color.)  Push the main lining into the pouch, push out the corners, then iron to smooth out and flatten, creating a nice finished crisp look.
Picture
Congratulations, you now have a finished Triple-Zip Pouch!

A Quilter’s Table
This tutorial is part of the Triple-Zip Along hosted by Debbie over at A Quilter's Table.  The event runs from January 28, 2013 through February 15, 2013.
28 Comments

Quilt As You Go Tutorial

4/19/2011

48 Comments

 
Have you ever wondered what "quilt as you go" was?  Or how to do it?  You are in luck!  I have a great tutorial brought to you today by the lovely Leanne of she can quilt and myself!  We are guest posting today over at Lily's Quilts, click here to check out her awesome blog, full of tutorials and all sorts of goodies!

The photos below are mine, but all of the wording is Leanne (which is really the hard part, to me anyway!)  Enjoy the tutorial:
Picture
Finished Quilted Blocks
Today Leanne from she can quilt and Marci from Marci Girl Designs are blogging together as a guest post on Lily's Quilts.

To us, one of the scariest parts of a QAYG approach to quilt construction is how to join all those blocks without making a HOT MESS. Would the quilt have lumpy seams? Would the batting wad up into bumps?

One method is to leave the off the backing while you quilt the front and batting together. Then you sew together the front/batting blocks and add the backing at the end. This allows you to have a continuous backing piece but the quilting from the front will not show on it. Penny at sewtakeahike has a tutorial for this method here.

Some methods use strips applied with, or without, additional batting between the QAYG blocks. The strips can be wide or skinny and add an interesting design element to the quilt. Marianne at The Quilting Edge has tutorials here and here. Sew We Quilt @ Stash Manicure has a tutorial here. Monica at the Happy Zombie has a tutorial here.

Another interesting approach is to bring the backing fabric to the front between the QAYG blocks and use it as a sashing. There is a video by Penny Halgren showing this method here. This tutorial from Mary Ann at Rocknquilts, explains how to join the batting with an iron-on tape specially designed for batting. This idea is intriguing, but we are not certain that it would work easily in a tight spot and it requires you to purchase the special iron-on tape.

Marci and I wanted a slightly different result. We wanted:
  • a clean join on the front seam without adding any kind of design element to the front or the back of the quilt,
  • the batting securely joined so it would not shift into a lump,
  • as little hand sewing as possible,
  • no bulky seam from sewing the front and the batting together,
  • the quilting to show on the back of the quilt.
So we got into a discussion, exchanged ideas and made some impossible suggestions. That puzzle led us to think harder and come up with the method we are sharing here. Although we are both sure others have solved this problem in the same way, it was not something we had read or heard about before. We both made a small sample quilt to test this approach and we washed and dried the samples. So far, so good.

Here is our approach:
Picture
Front and Back of Quilt Blocks
Quilt your blocks with the backing fabric in place. Make sure your back fabric and batting are larger than the front block. This gives you something to hang onto while you quilt and the extra for the joining of the blocks later. Leave about 1 inch unquilted at the edges of the front fabric.
Picture
Align the two blocks and place them right sides together. Fold and pin the batting and backing fabric out of the way. If your fronts are out of line, trim them. Stitch your front fabric, right sides together with a 1/4 inch seam.
Picture
Press open the front seam. Be careful to use a heat setting on your iron suitable for your batting.
Picture
With the back of the blocks facing you, lay the piece flat and pin back the backing fabric. Carefully trim the batting with scissors so that when it is lying flat both sides of the batting touch but do not overlap. Perfection is not required here, batting is forgiving.
Picture
Fold the blocks, right sides together. Push the seamed front fabrics into the fold and pin them out of the way. Pin the batting together.

Sew the batting together using a blanket stitch ( _l_l_l_l_ ) or a short zig zag ( vvvvvv ). Stitch slowly so that the needle goes into the two pieces of batting on one side and goes over the edge of the batting into nothing on the other side.
Picture
When you are done, open the seam and smooth the batting or give it a very gentle tug to flatten it out. The idea is similar to a flatlock that you can do with a serger. You may want to test this out on some scrap pieces of batting to get the best size of stitch to achieve this with your sewing machine.

The goal is to secure the pieces of batting together without creating an overlap or lumpy seam.
Picture
The last step matches some of the tutorials mentioned earlier. Trim the backing fabric if needed so that the pieces overlap about 1/2 inch when smoothed out. On one side, fold and iron under 1/4 inch of backing fabric. You may want to hang one side over the ironing board to make this easier. Then place the back fabric with the turned-under side on top, smooth, pin and hand sew it in place. The photo below shows this sample after it was finished, washed and dried.

Repeat for all your blocks, horizontally row by row and then vertically row by row.

We are going to use this method on our huge Dresden blocks from Lily's Quilts QAL. If you decide to give this a try, let us know how it works out.

Best,

Leanne and Marci
Picture
Washed and Dried Sample
Thanks so much to Lynne for having us today!  A huge Thanks to Leanne for all the hard work!  I have so enjoyed working with you on this three country collaboration! It is amazing to me that a gal from Louisiana, Britain and Canada can work together (without ever having met) to come up with something so useful!  Thanks ladies, it has been fun!
48 Comments

Baby Shower Week - Corsage Semi-Tutorial

11/10/2010

1 Comment

 
Why a Semi-Tutorial you ask?  What does it mean?  Basically, I am going to walk through what I did to create this item, but I don't have step by step photos, so to me that makes it a semi-tutorial!
Picture
I wanted the mother to be to have a corsage, but wasn't sure real flowers was the route I wanted to take, so after much deliberation I decided to make her corsage.  At first I thought about faux flowers, but thought that it wouldn't create the look I wanted, then it dawned on me...fabric, my medium of choice!  In the end, I thought it turned out pretty darn cute, and the mother to be can keep her corsage forever!  Here is how I created this single flower corsage:

Fabric Flower Corsage Tutorial

Supplies: 7 (2" x 2") Scraps of Fabric, Assorted Ribbon (Various Sizes and Colors), 2 Scrap Pieces of Felt, 1 (3/4") Fabric Covered Button, Card Stock, Scrap of Cardboard, Metal Pin Back

Tools: Hot Glue Gun, Sewing Needle and Thread, Sewing Machine, Fabric Covered Button Tool, Scissors, Pinking Shears, Fray Check, Elmers Glue, Computer and Printer

Instructions: I used a book that had instructions on how to make a Kanzashi Flower, and honestly the instructions were not very good at all and I struggled (Big Time.)  The good news is, I have found an online tutorial that is GREAT!  Just make the petals smaller using the 2" x 2" fabric scraps and make only six petals.  I didn't use starch either, didn't feel like I needed it, and hold off on attaching the fabric covered button for now.  OK, here is the step-by-step:

1.  Go to Bitty Bits and Pieces for directions on how to make the fabric flower itself.  This tutorial is great!  Use six (2" x 2") fabric scraps, either all one color, or a matching set of scraps.
2.  Make the fabric covered button with the last fabric scrap, I used a piece of fabric that had an owl image, and just centered it on the button.  Set aside for later.
3.  Cut two or three types and colors of ribbon into 2" and 2.5" pieces. Neatly cut one of the ends at either an angle or a "V" shape.  Using a tiny amount of fray check, seal the neatly cut edges of the ribbon.  Set aside to dry.  I used 6 pieces of 1/2" white ribbon that was 2.25" in length and cut in a "V", and around 12 pieces of 1/8" blue ribbon in 2" lengths cut at an angle.  I also used 6 short 1/2" lengths of the same blue ribbon around the center button.
4.  Cut a 6" - 7" piece of ribbon, I used a 1/4" blue ribbon.  The length of this piece can vary depending on how low you want the saying underneath to hang.  Play with the length to get it just right for your corsage.
5.  Using your computer and printer, create a simple saying (It's A Boy, It's A Girl, or Congratulations) and print it on card stock, then trim it to a rectangle around 2" x 3". I printed the text in blue, and then put a light blue box around it, then when I trimmed the card stock, I left a slight white border around the blue box.
6.  Using the cut out card stock as a template, take a piece of felt (in my case blue) and using pinking shears, cut around the felt to have a border all around the card stock, the felt ended up being roughly 2.5" x 3.5".
7.  Cut a 2" circle out of the scrap of Cardboard.
8.  Take the 6" - 7" piece of ribbon, and fold it in half into a upside down "V".  Using Elmers glue, carefully glue the loose ends to the backside of the printed card stock.  Let dry.  Once dry take the card stock and felt and place the felt on the backside (creating of sandwich of felt, glued ribbon, then printed card stock) and using a sewing machine carefully sewing around the card stock, roughly 1/4" from the edge, this will hold all the layers together.
9.  Time for Final Assembly!  Preheat the glue gun.  Carefully glue the longer ribbon strips (unfinished edges in the center) to the back side of the fabric flower.  Glue the little strips (unfinished edges in the center) to the front of the flower and then hot glue the fabric covered button into the very center, covering up all unfinished edges and hot glue. Flip the flower over to the backside and carefully hot glue the 2" piece of cardboard in the center of the flower, covering up all unfinished edges and hot glue.  Hot glue the pin back to the top of the cardboard circle, and hot glue the top point of the "V" (of the felt, ribbon, card stock sandwich) to the bottom of the cardboard circle.
10.  Almost Done!  Carefully cut another scrap of felt (2.5" circle) this piece is to cover the cardboard and any showing hot glue.  Once you have the size right, because you don't want the felt to show on the front, cut a slit that the pin back can be pushed through, and using Elmers glue, glue the felt to the cardboard, pushing the metal pin back through the felt, so that the mother to be, can attach it to her clothing. 
You are now finished and ready to give this lovely corsage to the Mother to be!


Picture
Picture
1 Comment

Sweet Little Easter Bunnies

4/1/2010

2 Comments

 
Picture
These guys are the absolute cutest, aren't they?  These two little friends will be Easter gifts to my two nieces...I sure hope they like them, I think they are the best and oh so cute and easy.  Want to whip them up for an Easter gift, it really is only a one hour project, and uses just scraps of fabric, thread and fiberfill.  I stumbled across this tutorial on My Little Mochi's website and thought the bunnies were too cute to pass up.  The tutorial is titled "Chibi Kitty and Rabbit" (link below) check it out...too cute!  I changed one thing from the original tutorial, on the bottom of the bunnies, I folded in the bottom corners and stitched them down to give the bottom a more rounded effect instead of pointy corners.  The funny part is, that if I had made one of these for my son, he would have cared less, but because they aren't for him, he has been desperate to get his hands on them!  Go figure! 

Chibi Kitty and Rabbit Tutorial:  http://mylittlemochi.typepad.com/my_little_mochi/2006/07/chibi_kitty_and.html
Picture
2 Comments

    Marci Girl

    A feisty mom designing, sewing and blogging her way through everyday life!

    Subscribe
    Follow on Bloglovin
    Picture
    Follow on Bloglovin


    Categories

    All
    2017 Finish A Long
    2018 Finish A Long
    2019 Finish A Long
    Bee Sewcial
    Book Reviews
    Clothing
    Everyday Life
    Giveaways
    Handbags
    Handstitched Class
    Inspirational Projects
    Marci Girl Designs
    Projects
    Quilt Along
    Quilting Bees
    Quilts
    Random Thoughts
    Recipes
    Sew Along
    Sewvivor
    Style Stitches
    Swaps
    The Penny Sampler Class
    Tutorials
    Wip Wednesday


    Happily
    Participating In:

    Picture
    Picture
    Picture
    Picture
    Picture
    Picture

    Picture


    Archives

    January 2020
    November 2019
    October 2019
    July 2019
    April 2019
    March 2019
    February 2019
    January 2019
    December 2018
    October 2018
    August 2018
    July 2018
    June 2018
    May 2018
    April 2018
    March 2018
    February 2018
    January 2018
    December 2017
    November 2017
    October 2017
    September 2017
    August 2017
    July 2017
    June 2017
    May 2017
    April 2017
    March 2017
    February 2017
    January 2017
    April 2016
    March 2016
    February 2016
    January 2016
    September 2015
    July 2015
    October 2014
    September 2014
    August 2014
    July 2014
    June 2014
    May 2014
    April 2014
    March 2014
    February 2014
    January 2014
    November 2013
    October 2013
    September 2013
    August 2013
    July 2013
    June 2013
    May 2013
    April 2013
    March 2013
    February 2013
    January 2013
    November 2012
    October 2012
    September 2012
    August 2012
    July 2012
    June 2012
    May 2012
    April 2012
    March 2012
    January 2012
    December 2011
    November 2011
    October 2011
    September 2011
    August 2011
    July 2011
    June 2011
    May 2011
    April 2011
    March 2011
    February 2011
    January 2011
    December 2010
    November 2010
    September 2010
    August 2010
    July 2010
    June 2010
    May 2010
    April 2010
    March 2010
    February 2010

    Picture

    RSS Feed

Powered by Create your own unique website with customizable templates.