• Home
  • Blog
  • 2020 Finish - A - Long
  • 2019 Finish - A - Long
  • 2018 Finish - A - Long
  • Contact
  • 2017 Finish - A - Long
  • Shop
Marci Girl Designs

2016 Finish-A-Long - Quarter Two

4/14/2016

1 Comment

 
Already the second quarter of the year, oh my!  I'm going to try and keep this short and sweet.  I picked three quilts, two new and one carryover for my Finish-A-Long list.  I know I will not finish them all, but if I can just work on each a little bit it will be an accomplishment for me.  So here we go:
Picture
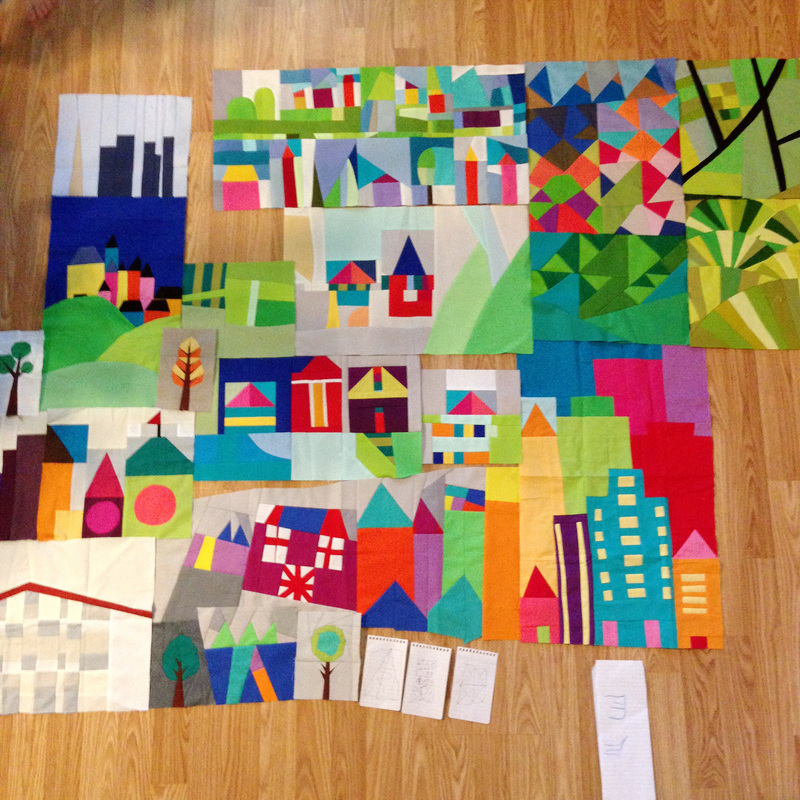
1.  Little Houses Bee Sewcial Quilt - These were the blocks I received from the first round of the quilting bee Bee Sewcial.  I keep wavering on how I want to approach this quilt top.  One big top or maybe an array of mini quilts that would all be hung together?  What do you think?  I know i will be making blocks and filler for this quilt before it can become a quilt top.
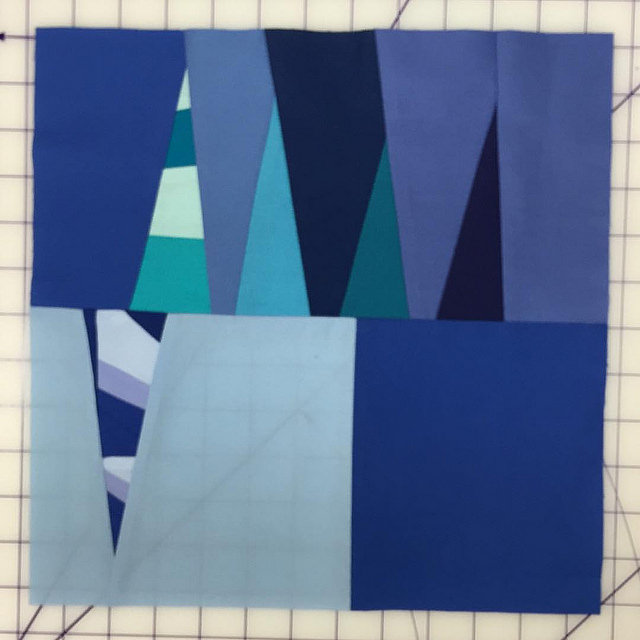
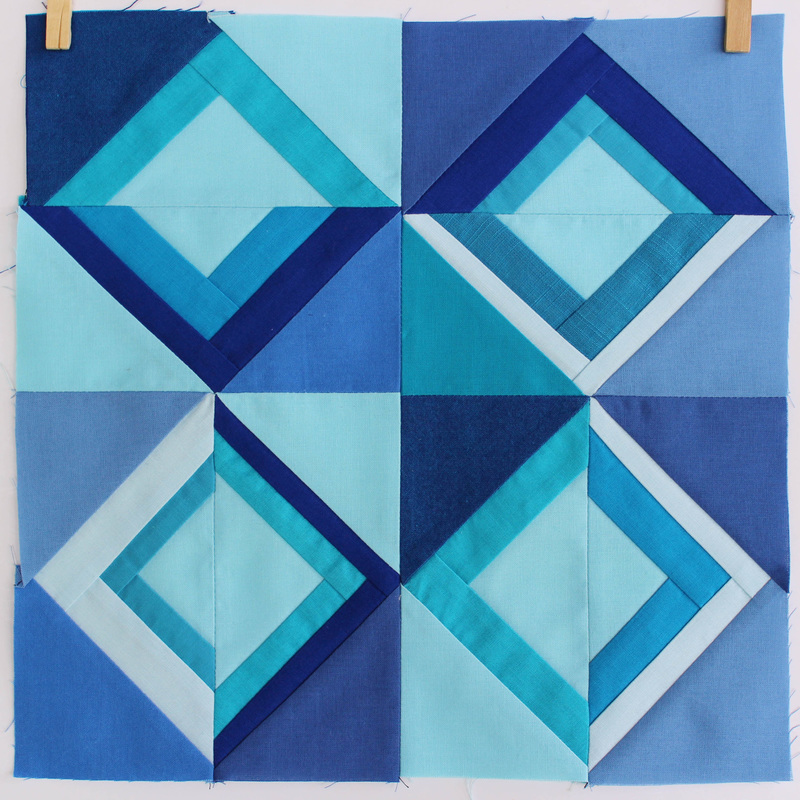
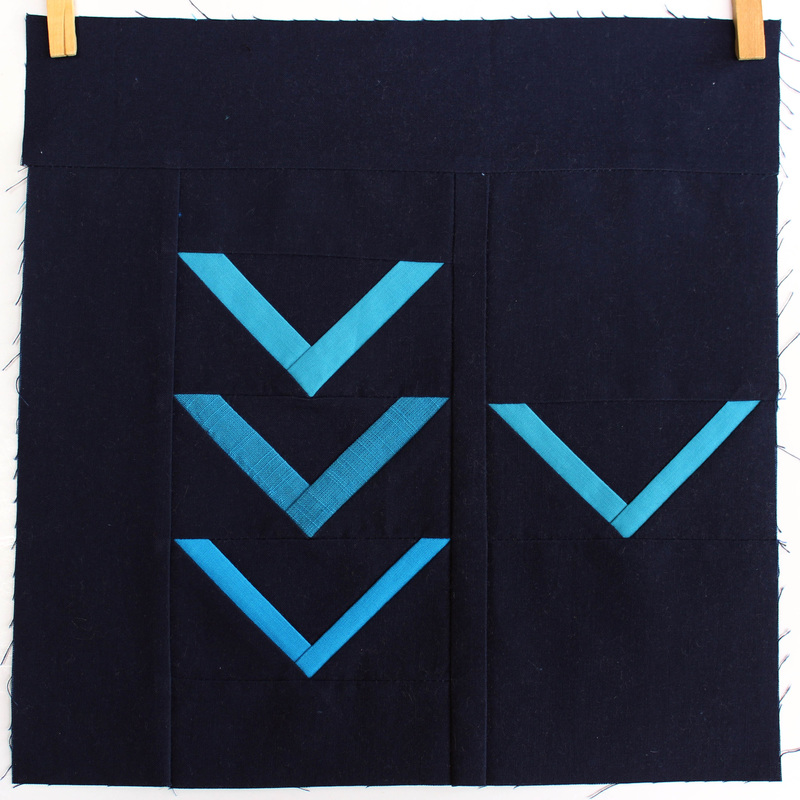
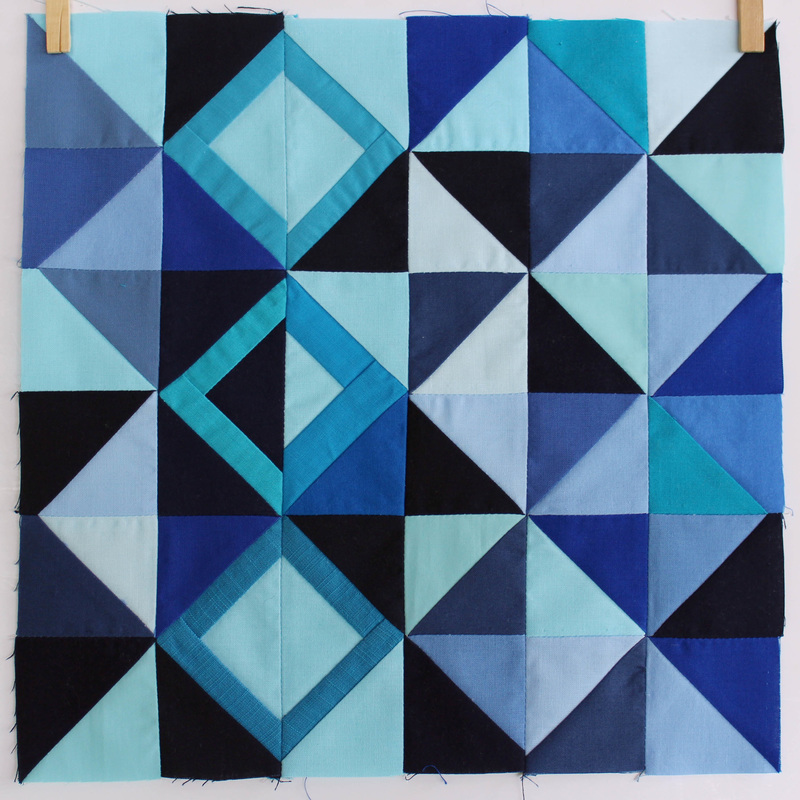
2.  Blue Triangles Bee Sewcial Quilt - Here is my wild card, I don't even have these blocks in my possession yet (most aren't even made!)  So right now I currently have three blocks that I have sewn and the premise of this bee is that the bee members have 6 weeks to get them to me, so by mid May I should have them all.  I would really like to start construction on this as soon as I have them all as to not lose momentum.
Picture
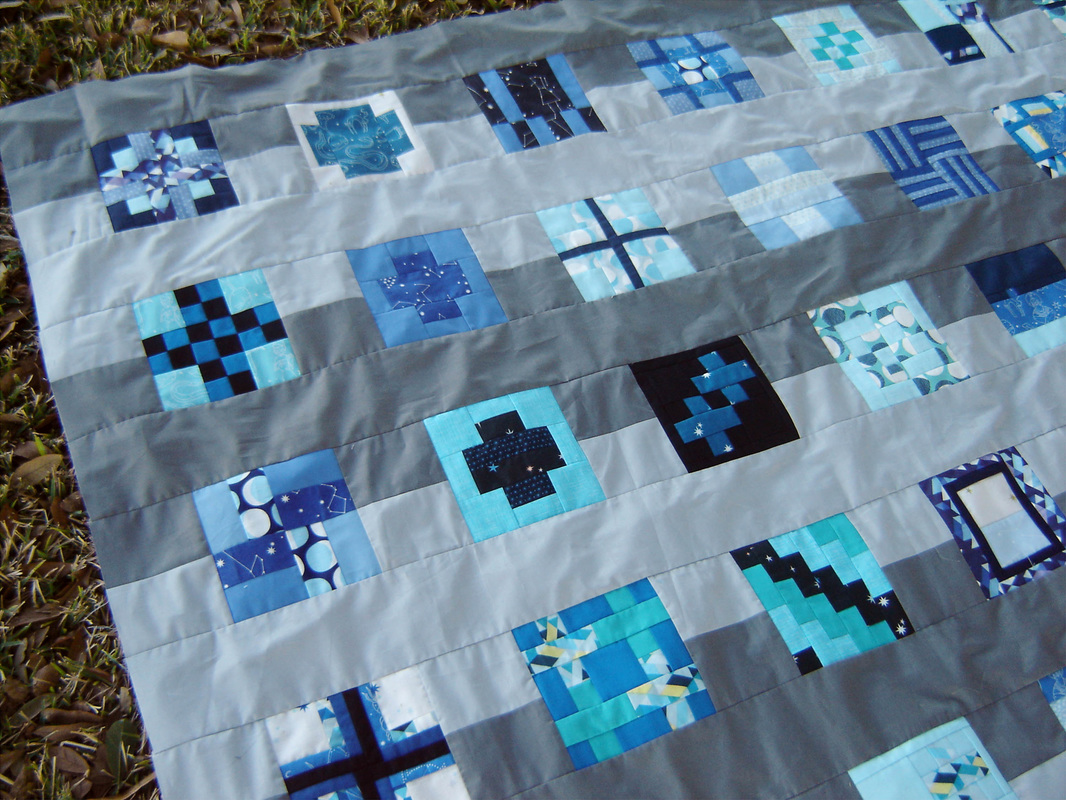
3.  Constellations City Sampler Quilt - The carryover quilt.  I'm sad to say I didn't even touch this one last quarter, just didn't have the time.  So hopefully I can carve out a few weeks for quilting this king sized quilt.

Linking up to the Second Quarter of the 2016 Finish-A-Long.  You can find all of the details HERE.  You sill have time to join in!
Picture
1 Comment

The Postcards Quilt

4/7/2016

3 Comments

 
Picture
Quite a while ago, June 2014 to be exact, Debbie at A Quilter's Table hosted a Postcard Quilt Along based on her free tutorial.  With all the good intentions in the world I planned to actually participate and finish up with everyone else, but alas my intentions didn't pan out and even though I finished up most of the blocks (and I think a quilt top) it sat un-quilted for over a year.  At the beginning of this year, I added this quilt (along with one other) to my 2016 Finish-A-Long list.  Now was the time to finish it up and I'm pleased to say that I did!
Picture
For the "postcard image" side of the block I used my stash of Japanese and Kawaii fabrics and chose prints that were scenes or images that might be found on a postcard.  I also tried to keep the scale of these prints the same throughout and picked scenes I thought would fit the month they would be associated with.  For example the June block above has an image of woodland animals at a carnival or fair, which I envision you would do in the month of June.

The "written" side of the postcard started with a Japanese calendar fabric that I currently owned and thought would be a fun addition to this quilt.  I fussy cut the months and then added a pieced red/white/blue/white strip to mimic the printing you see on postcards/envelopes.  I added a simple black divider and then on the right side fussy cut "stamps" (above, it is the flower) and then used a text print below the stamp to mimic the writing on a postcard.

I love rainbow quilts, so I added a solid border around each postcard bundle and then I had a completed top, which I intend for this to be a fun wall hanging.
Picture
I have had this great sewing themed fabric in my stash for quite some time and I thought it would be the perfect backing for this quilt.  Just as colorful and loud as the front, haha.  The quilt was small enough that a one yard piece did the trick.
Picture
I love the look of grid quilted quilts and have quilted one baby quilt in the past with this technique without much success (puckering at every intersection) so obviously I was hesitant to use this method.  In the end I decided to go for it and though it is far from perfect I do love the look and I didn't have the puckering problem with this one.  I used my Juki and decided to forgo the walking foot and just quilt it with the normal foot that comes with the machine.  I reduced the foot pressure to the lowest setting and lengthened the stitch to around a 3.5.  I used a white 40 weight Aurifil thread and started quilting by stitching in the ditch around each block.  So straight down the middle and then along the top and bottom of each block going all the way across.  This may have not been the best approach or I should have tried really hard at this point to get things super straight but I didn't.  I had a lot of bias cut fabrics in these blocks so some of the blocks ended up pretty distorted.  I didn't realize until I was about halfway done and by that point I wasn't ripping it all out, so I just went with it and smoothed everything as much as I could.  I quilted a 1" grid over the whole quilt working vertically first and then finishing horizontally.  I didn't have any puckering (or only one or two spots because of the bias.)  So even though it is far from perfect I still love the overall affect. Each block was exactly 6" tall so the math fell just right with the 1" grid and if you ever choose to quilt a grid do the math first to make sure the lines fall where you want them to.
Picture
Once this one was quilted, I trimmed and squared it up, which was rather surprisingly easy considering my bias problems.  Yeah!  I had a solid blue binding already made for this quilt but misplaced it and after searching for quite some time I gave up and cut new binding from this fantastic striped rainbow print that I think was perfectly appropriate. Now I just have to decide where to hang this one in our house!  Fun!
Picture
Linking up at the very last minute, my one finish for the first quarter of the Finish-A-Long.  Though I 'm sad I never even got a chance to touch the other quilt I had hoped to finish, I am thrilled that I at least completed one, took photos and blogged about it!  Insert crazy happy jazz hands right here!  I'll be back in a few days with my goals for Quarter 2. 
Picture
3 Comments

BeeSewcial April 2016 - Time to Play

4/1/2016

4 Comments

 
It is my turn to be Queen Bee in the quilting group BeeSewcial for 2016 and it is time to announce this month's theme!  I want to start by saying I would like for you all to keep it simple, play and have fun.  No stressing about the blocks this month, just make them, don't over think it.

Ok, are you ready?  Here we go:
Triangles, Repeating Patterns, and the Color Blue
Simple, right?  I hope so.
Picture
Specifications:

Block Size: 2 - 12.5" square blocks or 8 - 6.5" square blocks, please trim them and send them in this size only.  This is the only thing I am asking that is "picky" this month.

Colors:  All shades and variants of blue, including shades of turquoise and similar greenish blues.  Please include either a dark navy or black in each block.  No white or creams, if you want lighter shades just use light blues.

Texture:  I am letting you play outside of Kona Solids.  Want to use a textured solid in your stash, go for it, I did with my examples.  If it is an Art Gallery Solid, use it.  Doesn't matter to me, in fact I prefer those textured solids, so use them up.  But you don't have to.  Use what you own, and use up those triangle scraps.

Construction:  Normal piecing, improv or even more traditional.  Please no applique of any kind.  I don't want you to feel like this has to be an exercise in matching points either.  If you look at my blocks most of them aren't perfect/matching and are cut off.  I don't care about perfect points, at all.

Primary Theme:  Focus on making triangles of any kind -
                              Half Square Triangles
                              Half Rectangle Triangles
                              Flying Geese
                              60 Degree Triangles
                              Equilateral Triangles
                              Even a shape that hints at or creates a triangle.
Do not feel you are stuck making a "traditional" block, if you want to create an improv wonky triangle that can't be copied exactly, then make ten of them and just think about the secondary theme below.

Secondary Theme:  Focus on repeating pattern.  This shouldn't be random but rather create a shape and then repeat it throughout the block.  You can see by my examples that this doesn't have to fill the whole block, negative space is fine and welcome.  Just consciously think about pattern and placement.

I didn't create a Pinterest board of inspiration this time, didn't feel it was necessary and honestly I think with my three example blocks you can get a good feel of what I am talking about and I tried to make three very distinctly different quilt blocks.

Got it?  I hope so, I really intend for this to be playful and fun.
             
Picture
Now that we have the details, I will explain how this theme came to be and why we are making these blocks and hopefully that will help you create this month.

A few years ago I made a Half Square Rectangle based traditional star block that was based on this same color scheme.  Blues, with a bit of turquoise and a nice solid black.  My husband saw this block and (I think the only time) commented, "Are we keeping this?"  I replied, "No." He replied, "Well this is my favorite block you have made."  "Really, why?"  He replied, "The colors.  It is my favorite color scheme, blues, turquoise and that pop of black just makes everything stand out."  Since that day I knew I wanted to make him a quilt based with this color scheme.  My husband is a "fixer" if it is broken, he can fix it.  With literally everything.  He is very scientific based and has that type of brain.  He isn't a big lover of the random improv, he likes structure and reason.  And this is why my concept of repeating pattern comes into play.  So if you can help me make structured thoughtful blocks in his favorite color scheme, then I can turn this baby into a lap quilt just for him!  And since he doesn't really read my blog, I don't have to worry about him seeing this or any of your blocks as they are created.  Win win for everyone.  If you have any questions, don't hesitate to ask.

Make sure to tag all of your work #BeeSewcial if you are a Bee Mate and for any of you that wish to play along at home, use the #InspiredbyBeeSewcial hashtag so I can find your work in either Instagram or Ello.  I really hope you decide to play along, it is a great exercise in creativity every single month and I can honestly say I learn something every month too.  What is better than that?


Picture
4 Comments

    Marci Girl

    A feisty mom designing, sewing and blogging her way through everyday life!

    Subscribe
    Follow on Bloglovin
    Picture
    Follow on Bloglovin


    Categories

    All
    2017 Finish A Long
    2018 Finish A Long
    2019 Finish A Long
    Bee Sewcial
    Book Reviews
    Clothing
    Everyday Life
    Giveaways
    Handbags
    Handstitched Class
    Inspirational Projects
    Marci Girl Designs
    Projects
    Quilt Along
    Quilting Bees
    Quilts
    Random Thoughts
    Recipes
    Sew Along
    Sewvivor
    Style Stitches
    Swaps
    The Penny Sampler Class
    Tutorials
    Wip Wednesday


    Happily
    Participating In:

    Picture
    Picture
    Picture
    Picture
    Picture
    Picture

    Picture


    Archives

    January 2020
    November 2019
    October 2019
    July 2019
    April 2019
    March 2019
    February 2019
    January 2019
    December 2018
    October 2018
    August 2018
    July 2018
    June 2018
    May 2018
    April 2018
    March 2018
    February 2018
    January 2018
    December 2017
    November 2017
    October 2017
    September 2017
    August 2017
    July 2017
    June 2017
    May 2017
    April 2017
    March 2017
    February 2017
    January 2017
    April 2016
    March 2016
    February 2016
    January 2016
    September 2015
    July 2015
    October 2014
    September 2014
    August 2014
    July 2014
    June 2014
    May 2014
    April 2014
    March 2014
    February 2014
    January 2014
    November 2013
    October 2013
    September 2013
    August 2013
    July 2013
    June 2013
    May 2013
    April 2013
    March 2013
    February 2013
    January 2013
    November 2012
    October 2012
    September 2012
    August 2012
    July 2012
    June 2012
    May 2012
    April 2012
    March 2012
    January 2012
    December 2011
    November 2011
    October 2011
    September 2011
    August 2011
    July 2011
    June 2011
    May 2011
    April 2011
    March 2011
    February 2011
    January 2011
    December 2010
    November 2010
    September 2010
    August 2010
    July 2010
    June 2010
    May 2010
    April 2010
    March 2010
    February 2010

    Picture

    RSS Feed

Powered by Create your own unique website with customizable templates.