All of my kiddos will be in school for the first time starting late August so there is hope that after that takes place I'll once again find a groove and be able to quilt again. So here is my list...
|
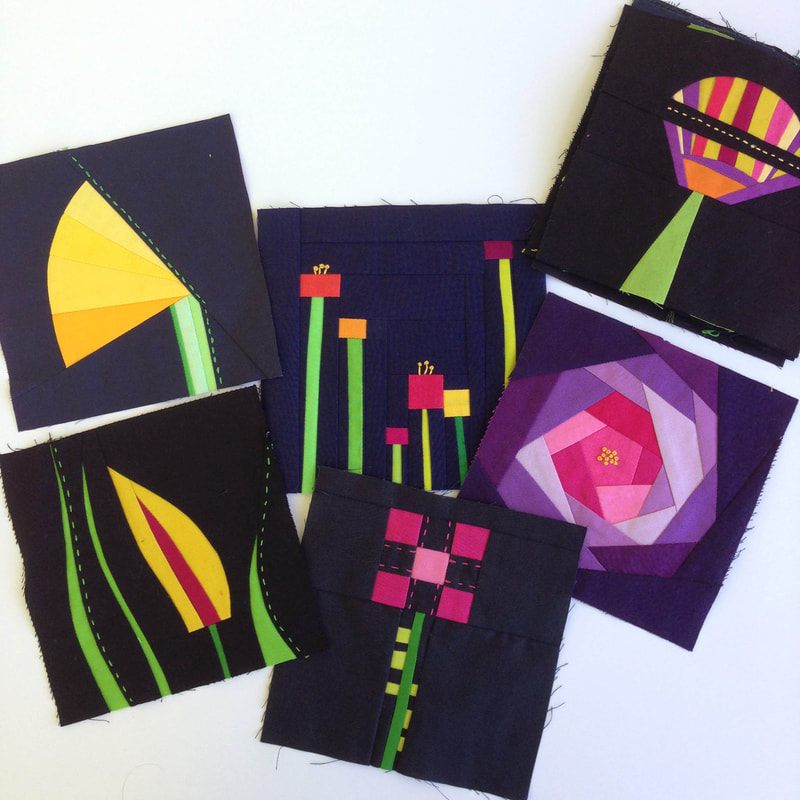
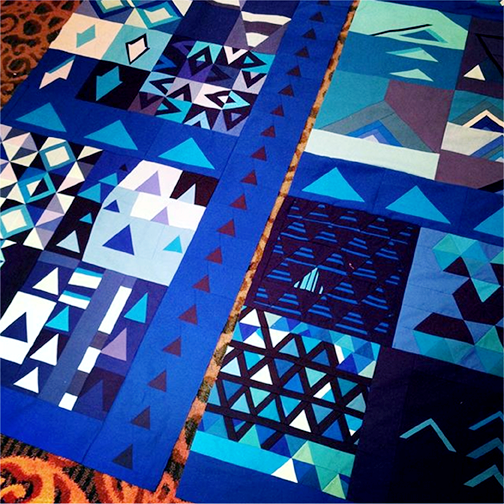
Popping in quickly today to make my list before the link-up closes. Real life has been so crazy lately I honestly didn't even have a chance to touch my list last quarter. Didn't even think about much less work on them. It makes me sad. All of my kiddos will be in school for the first time starting late August so there is hope that after that takes place I'll once again find a groove and be able to quilt again. So here is my list... 1. Bee Sewcial Flowers - I had been slowly chipping away at the embroidery so hopefully I'll be working on them again soon. 2. Bee Sewcial Triangles - It's a quilt top with a half made back. I so want to finish this project. That's it for this time. I want to thank all of you playing along, we have such a great community here. You still have a little time to link up, if you want to participate in Q3 then make that list!
4 Comments
Hello everyone! It is time for Quarter 3 of the Finish-A-Long (FAL)! As you can see, a new quarter of the Finish-A-Long is starting today. If you missed participating the first half of the year, you can join us now for a brand new start. Those of you who did join us for the first and second quarter, thank you and I do hope you finished some things and plan to continue on with us for Q3. So let's get to it! You can now link up your list of projects that you want to finish in Quarter 3 of 2019. We are hoping that the FAL community will inspire you to work on your unfinished projects this quarter, and to get them finished! Our 2019 Finish-A-Long HostsThe 2019 FAL is hosted by a great community of bloggers. This year our hosts are:
For those of you who are new to the FAL, here is an explanation: The Finish-A-Long is a community aiming to motivate and encourage each other to complete those unfinished projects that are hanging around, sometimes for far too long. At the start of the quarter you post and link up a list of projects you hope to finish in the next three months. Then, at the end of the quarter, you link up each successful finish from your original list. Each linked up finish is an entry into the draw for wonderful prizes from our sponsors. There is no penalty for not finishing a listed project, so feel free to make your list as long or as short as you wish. The 2019 Schedule and Rules for the FAL are on my permanent 2019 FAL page, let me know if you have any questions. Our 2019 Finish-A-Long SponsorsHere are the fantastic and generous sponsors for Q3 of the Finish-A-Long. you can see each of their prizes listed under their logo. Please think about visiting them and saying thank you for their their support of the FAL.
Make your Q3 List of Unfinished ProjectsSo now it is time to sort out the projects/UFOs/WIPs that you want to finish over the next three months. Take a photo of each one and make your list. If you like you can use our Finish-A-Long Planner to list your projects and keep track of progress. It also has all link-up dates for the year, and the hashtags that we would use. Or use any method that works for you. Please ensure that you have at least STARTED your projects - pulled fabric with a pattern is considered a project started - and remember it is only a FINISHED project that will get you an entry toward the above listed prizes. So while we love to see your bee blocks, the "finish" is when they are a completed, usable project. Post Your Q3 ListPost your list either on your blog, on Instagram, or on Flickr if you prefer. If posting on social media (Flickr, Instagram), it will be very helpful if you tag your list with #2019FALQ3yourname (where yourname is unique to you). Using the same hashtag over the quarter when sharing project progress or finishes helps the host to make the connection to your original list quickly and easily. IMPORTANT: Don't forget to link up your finishes at the end of the quarter! We will be posting a reminder on the blog and on Instagram, but do keep an eye out... Link-up Your Q3 ListThe 2019 Q3 link for your list of proposed finishes is now open below, on my blog and on each of the hosting blogs. You need only link your list once, on ONE host blog, and the link will show up on all the host blogs. If you are using Flickr or Instagram, post a mosaic of your projects and put your list in the description. Don't forget to include your unique hashtag. If you need a little help, Katy of The Littlest Thistle has a great tutorial on how to link up if you need it, and Marci has a post on how to link up from Instagram. Join the FAL CommunityWe also ask that you become part of the FAL community. Please check out the links of others - visit and comment on their lists. We all need encouragement to get those finishes done, so please share some of your own too. If you want you can follow us on Facebook: Finish-A-Long and/or on Instagram: @finishalong, too. We'll post encouragement during the quarter and reminders when the finishes link up opens at the end of the quarter. When creating your list there is one thing to remember - No deductions for not completing something so - Aim High! Nothing to lose!! Well now, get that list together and get linked up. LET THE FUN BEGIN!Feel free to use and share the FAL button at the top and this one too: Remember: you only need to link up at ONE hosting blog and it will automatically show up on all hosting blogs. Today I'm popping in for a quick reminder that the Quarter 2 link up for all your finishes closes on Tuesday, July 9, 2019 at 11 pm EST. So you still have a few more days to finish that project or two and link them up to be eligible for prizes. The link up can be found HERE or on any of the 2019 FAL hosts blogs. A few reminders for linking up:
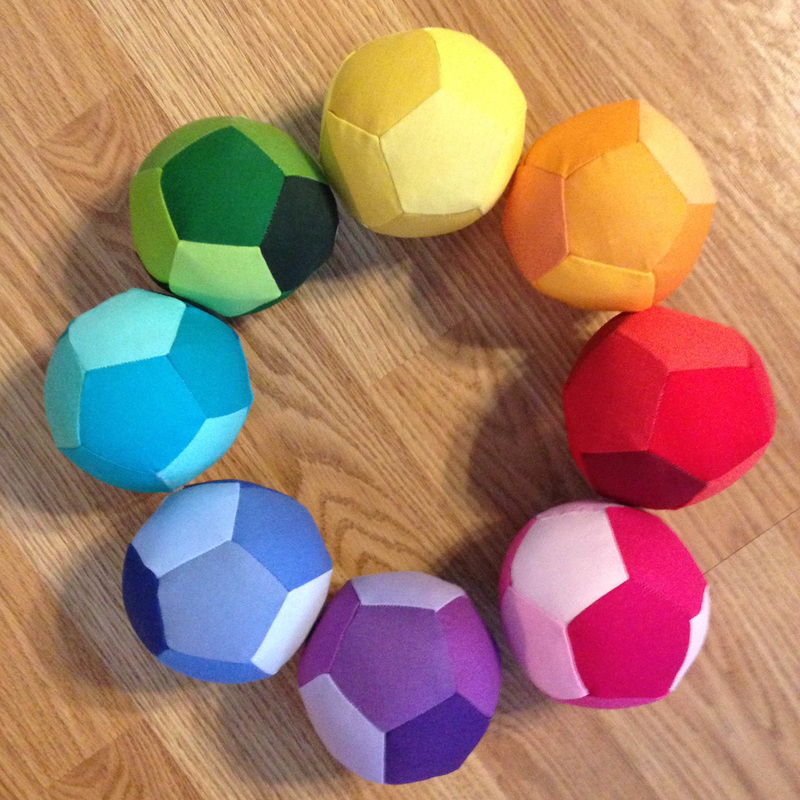
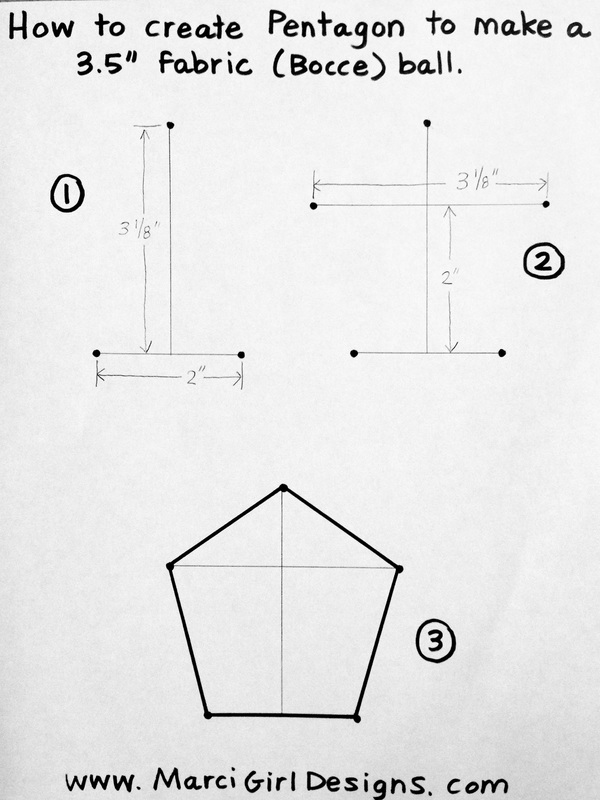
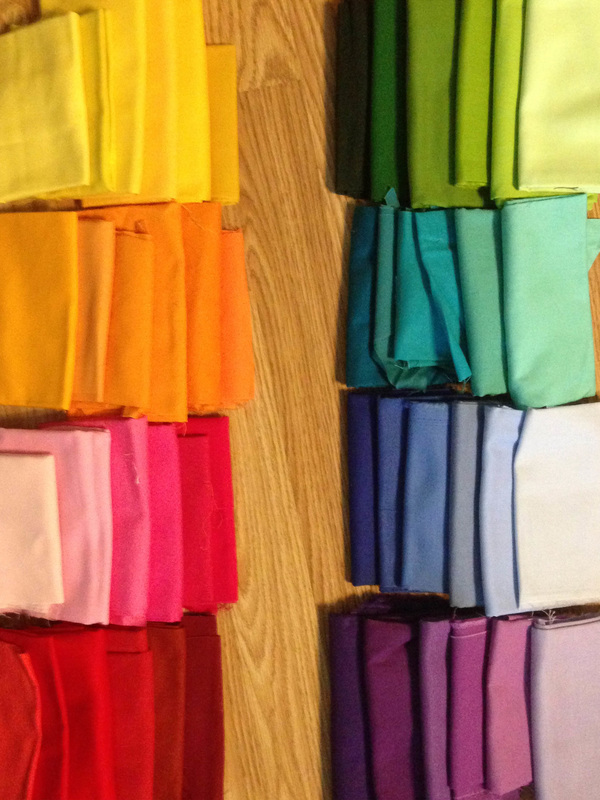
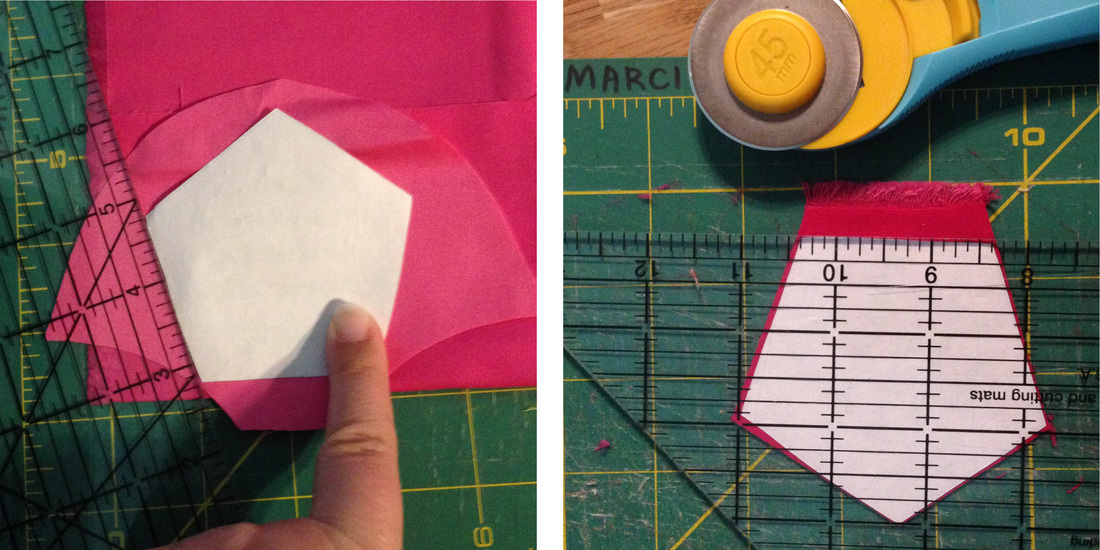
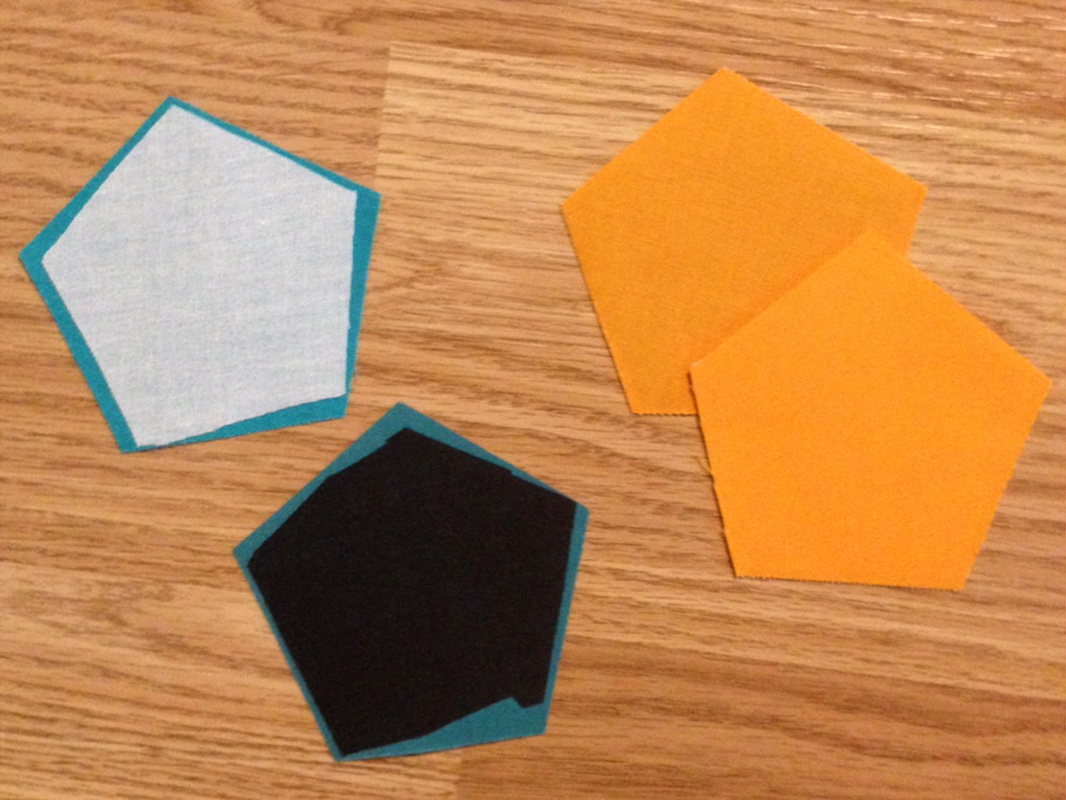
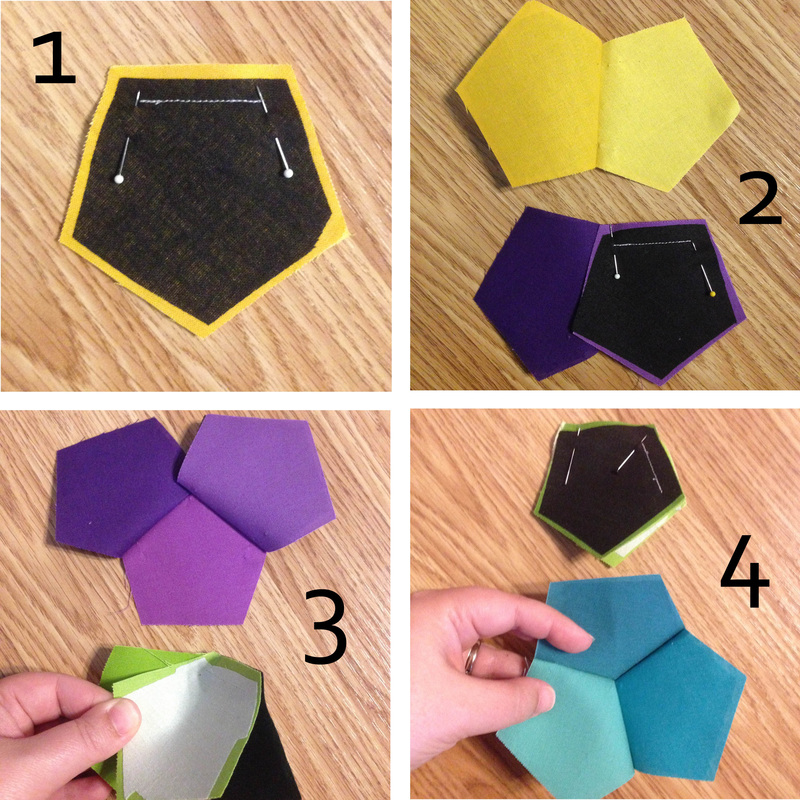
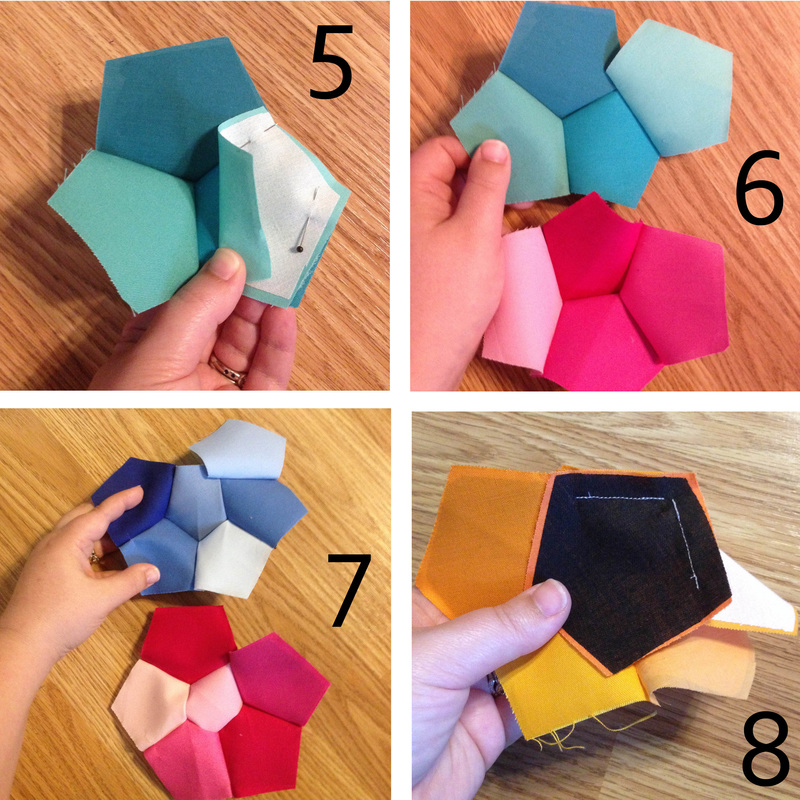
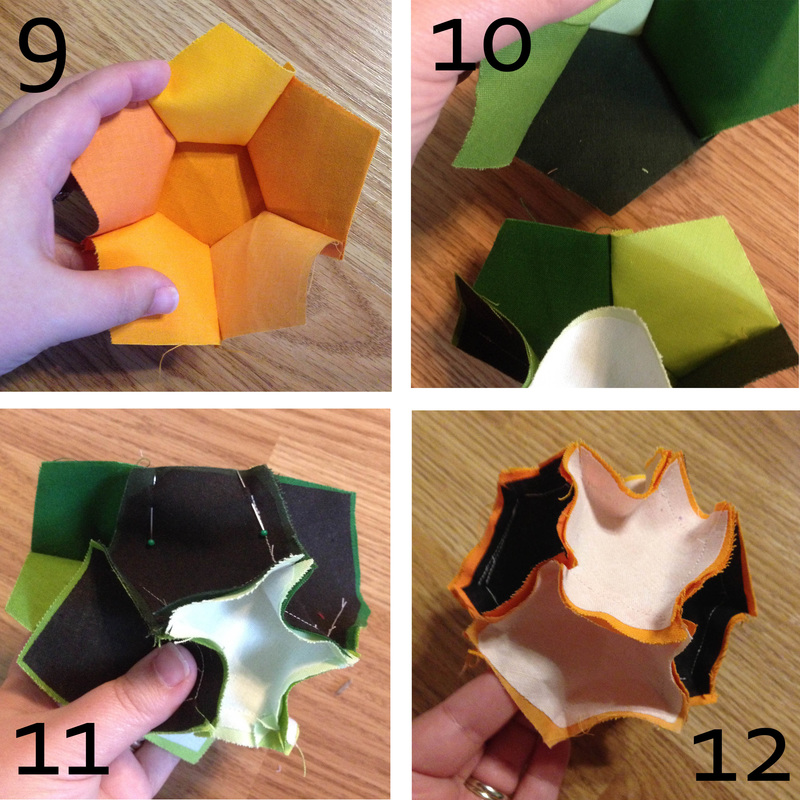
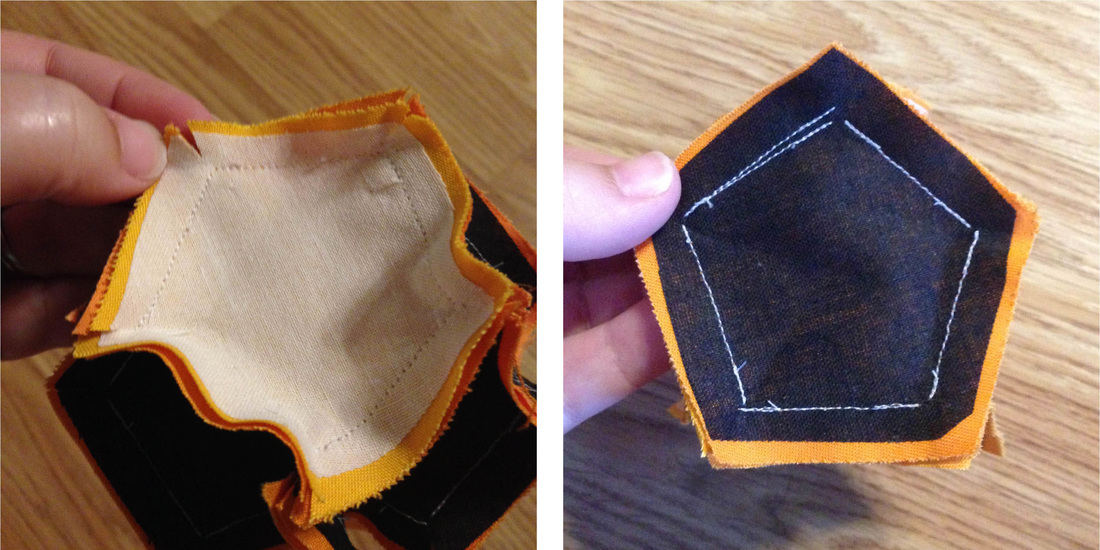
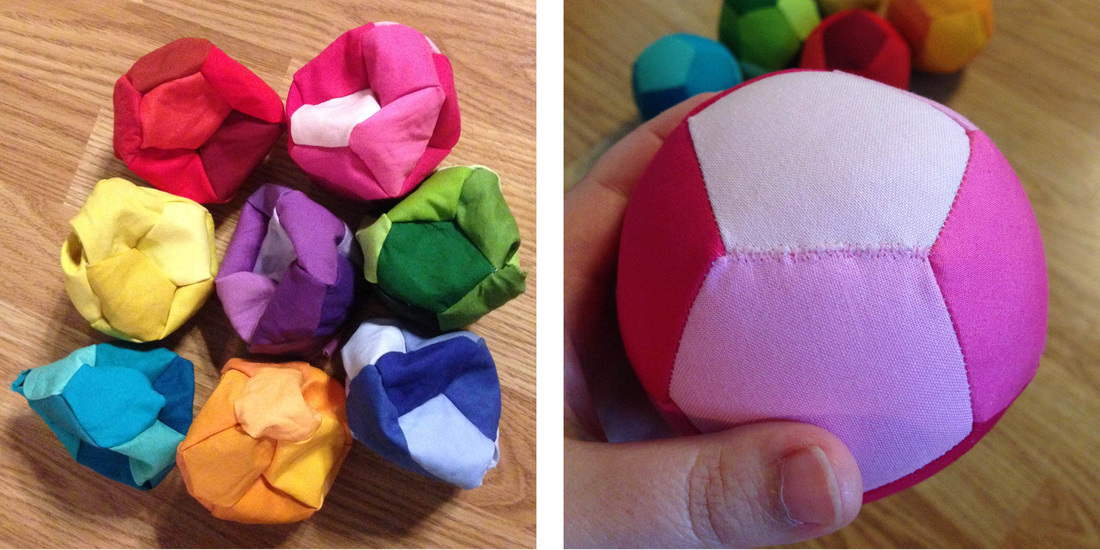
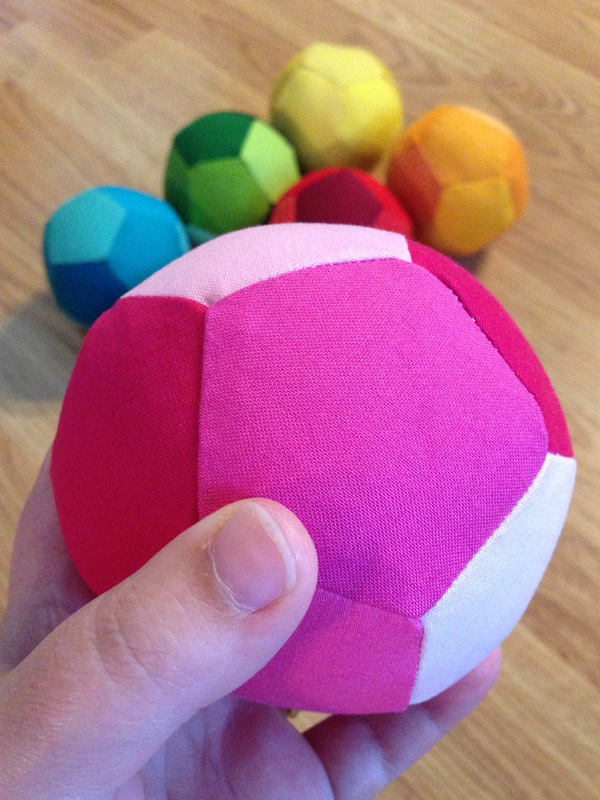
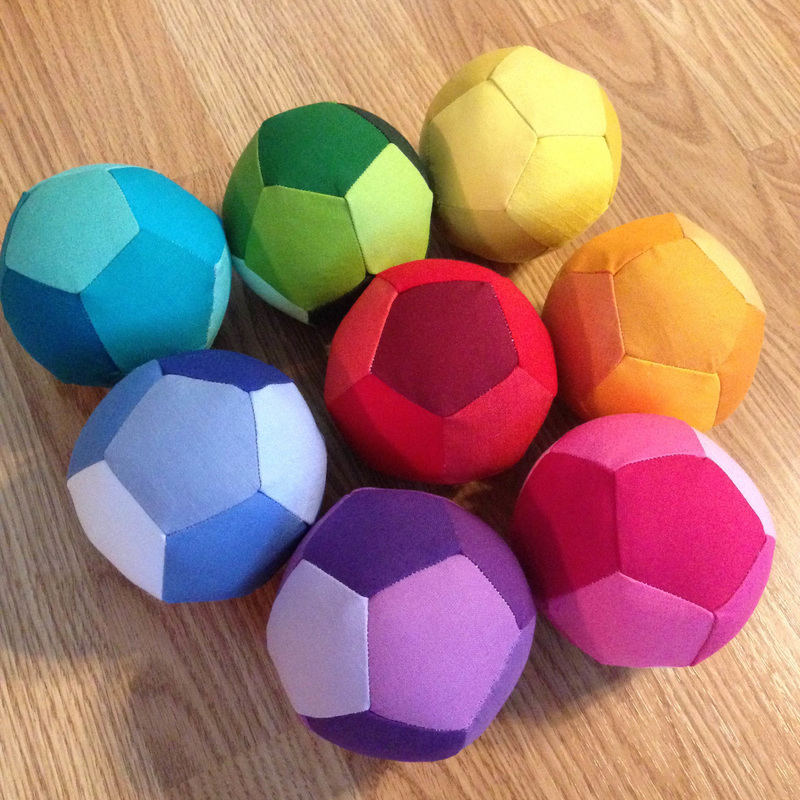
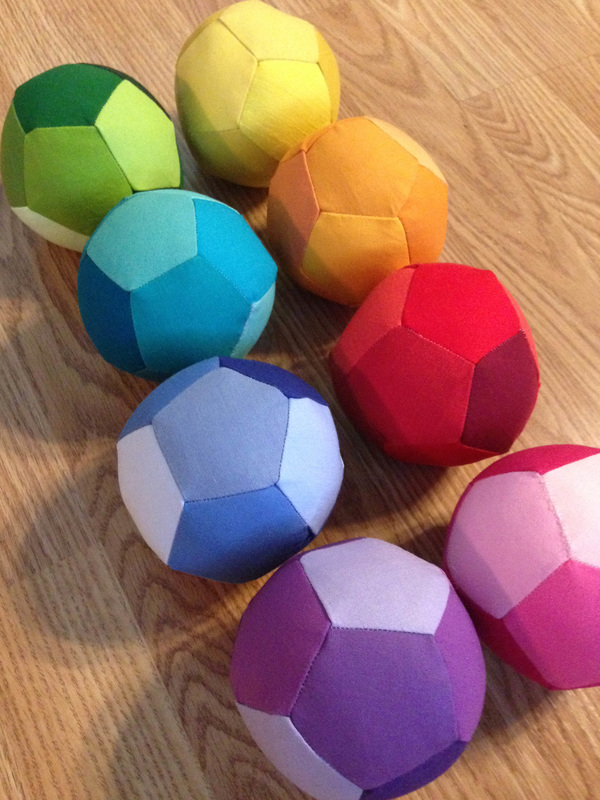
This post was originally part of I'm Feeling Crafty's Sew Ready to Play yearly event back in 2015. I was into Bocce Ball big time with my husband and decided to create a tutorial for fabric Bocce Balls so my kids could play along too without hurting anyone or breaking anything. I thought now would be a good time to bring the tutorial back home and that the Finish-A-Long participants may enjoy it and find it useful. For any of you not familiar with Bocce Ball or want to know the rules of the game, click HERE for the basics and images of how the game plays. This tutorial can be used to make a variety of sizes of fabric balls, just increase the size of the starting Pentagon and your ball will be larger. I drew the original Pentagon and then enlarged it on my copier. This resulted in a ball just large enough for babies to play with. Insert a small rattle or bell along with the stuffing and baby will have fun hours! 3.5" Fabric Bocce Ball Tool and Supply Lists Tools Needed: Paper, Pen, Sewing Machine, Thread, Pins, Scissors, Ruler, Rotary Cutter, Self Healing Cutting Mat Supplies Needed: Drafted template onto paper. 6 fabric prints/solids for each ball, cutting 2 pentagons from each fabric for a total of 12 for each ball. Iron on interfacing scraps, I used Pellon SF-101 in both black and white. Fiberfill or Batting Scraps How to Draft the Pentagon Template I wanted to include a pdf download template file for you guys, but alas my scanner decided to HATE me and isn't working right now, but that is ok because I can easily show you how to draft the template yourself. All you need is a piece of paper, pen and a ruler (preferably a quilters ruler that has both parallel and perpendicular lines on it.) 1. Draw a dot, which will be the top of the pentagon. Draw a line straight down from the dot that measures 3 1/8." Next draw a perpendicular line at the bottom that measures 2". This line should be centered with 1" on either side. Draw two dots, one on each end of this line. 2. Measure up 2" from the bottom line and draw a line that is perpendicular with the center line. This line should measure 3 1/8" and should be centered just like the bottom line. Since this measurement is a bit odd, I just measured over 1 1/2" and then marked 1/16" over from that. Do that on both sides and then check to make sure the overall line measures 3 1/8". Draw two dots, one on each end of this line. 3. Now that you have 5 dots, ignore everything else and just connect the dots. Voila! You now have a finished pentagon template. To double check and make sure everything is the correct size, each side of the pentagon should measure right at 2". Trust me, if the measurement is a little off, you will still be fine. Now cut out the template and move on to the next step. 3.5" Fabric Bocce Ball Cutting and Interfacing Instructions In order to play Bocce Ball, you need 8 balls, 4 for each player. In a normal set, 4 of the balls are red and 4 of the balls are green. I decided to change things up and instead made a cool color and warm color set. Originally I thought of using prints but in the end thought solids would be fun and less distracting. You can see in the above photo my fabric pull for the 8 balls. You need to have 6 different colors for each ball if you don't want any duplicate colors or prints touching each other. I didn't worry with making the template on card stock, as long as you don't cut the actual paper, it will be fine, you don't have to be super accurate when cutting out the pentagons, just close enough. The above left photo shows that I am using scraps. I then line up my ruler along the edge of the template and cut with a rotary cutter. Continue for each side just making sure not to cut the paper. You can see on the right photo that I'm not even that close to the paper. You need to cut 12 pentagons for each ball, ideally in 6 different prints/solids. The next step is key to getting a nice sturdy, tough and smooth ball. You need to interface each piece. So I used Pellon Shapeflex 101, which is an iron on interfacing. As you can see I used scraps, they don't have to be perfect and it is better to cut the pieces about 1/8" smaller than the fabric. This is also beneficial when Ironing as you have less chance of getting glue on your iron or ironing board. I used both black and white interfacing. White on the light colors and dark on the dark colors. I also used the interfacing to create a subtle difference between solids that are really close in color. For example the two orange pentagons were very close in color, the top has black interfacing and the bottom has white interfacing. Notice how it creates a greater color difference between the two, subtle but different. Now that cutting and interfacing are finished let's get to sewing these babies! 3.5" Fabric Bocce Ball Sewing Tutorial 1. You will be using a 3/8" seam throughout. You need to mark (I use the pins) 3/8" in from each side. Line up two pentagons, right sides together and pin them together. Since I put these pins in at 3/8" I just stitch from pin to pin. Another crucial feature of making these balls sturdy is to lower your stitch length. I used 1.5, it is a small stitch. Back stitching at both ends is crucial, don't forget to do this every time. Remove pins. 2. Open up the two pentagons and finger press the seam to the left. Taking a third pentagon, right sides together, pin right where the seam is in the middle and pin the other end at 3/8". Stitch, remembering to back stitch at both ends. 3. Open up the three pentagons. Now here is the tricky or neat part, you need to connect these three pentagons together. Gently rotate the upper right pentagon over onto the upper left pentagon. As seen on the green fabric that I am holding. 4. Now pin these two together. 3/8" in from the left side and then put a pin right where the other seam ends. You can see I have this pin at an angle, be careful not to catch the fabric that is sandwiched in there because it is neatly tucked inside. Stitch, back stitching at both ends in between the two pins. Remove pins, open up and you should have three pentagons neatly stitched together like the blue one I am holding. Congratulations if you can get this far, you can make a fabric ball and you have successfully sewn a Y seam! 5. Decide which pentagon you want to act as the "middle" pentagon and orient it on top. Take a forth pentagon, pin (right sides together) right at the middle seam (finger press that seam upwards towards the top pentagon) and then pin the outer edge 3/8" in. Stitch. 6. Remove pins, open up and it should look like the upper aqua set that I am holding. You will then do the same neat rotating trick (the same as step #3) and attach the newly sewn forth pentagon to the now designated middle pentagon. Pinning and stitching in the same manner as all the others. Remembering to always finger press that back seam out of the way and not catching any of that sandwiched fabric. Once finished you will have 4 pentagons sewn together. 7. Taking a fifth pentagon, add it to the top of the forth pentagon, sewing the same way as all the others. Open it up and it will look like the top blue set. Then repeat that neat little rotating trick to stitch it onto the middle pentagon. You should now have a middle pentagon and 5 other pentagons attached with just one opening as shown on the bottom pink set. 8. This is what step #7 looks like when you rotate it to stitch it onto the middle pentagon. 9. Now close up that one last opening. Rotate the right side pentagon onto the left side opening, right sides together, pin and stitch in the same manner as all the other seams. Be careful not to catch any of the fabric or back seams. Remove pins, open it up and it should look like this photo, which is now exactly half of the ball. You will need to create the other half of the ball, so repeat steps 1-9. 10. You now have 2 ball halves that you need to stitch together. Rotate the halves around until you have no prints/same colors touching. The key to joining the two halves together is to remember that the peaks join into the valleys as shown in the photo. The upper half (peak) nestles into the lower half (valley.) 11. Pin, finger pressing the left seam in the back towards the left and finger pressing the right seam to the right as shown in this photo. Stitch. 12. Continue to stitch around the whole ball, one short seam at a time, finger pressing the seams out of the way. Stitch all nine joints, leaving the tenth open. You can see in the photo I have my finger stuck in the opening, leave it un-sewn as this is where you will turn the ball right side out. Two techniques that I found helpful: 1. Once you have sewn all your seams and are ready to turn the ball right side out. I found clipping the corners 1/4" in on every intersection produced a smoother ball in the end. I didn't trim the seams, it wasn't necessary. You can see my clipped seam in the left photo above. 2. Another key to stitching these and having a smooth ball with no tucks or puckers can be seen on the photo to the right. When stitching each separate seam make sure you don't overlap your stitching and you don't even have to meet the adjacent stitched seam, it is better if you don't. You can see in the photo that my seams are about an 1/8" away from each other. I even messed up that top seam by starting out at 3/8" and then gradually shifting to 1/4" (old habits.) You can see I just left it and restitched the seam correctly. By leaving that little bit of space you are making sure not to catch other bits of fabric on the inside and creating tucks. When in doubt, leave the space! This is not the type of project where you have to be precise. Turn the ball through that little opening (yes it requires some work, pulling and a lot of tugging but it will work.) You can see all eight turned above and you can see the opening really well on the yellow one Now it is time to stuff them. Stuff them really full, I mean really full, tight as you can stuff it! This is a great project to use up all those random batting strips and scraps you have laying around, just stuff them in. If you don't have that, just use Fiberfill, one bag was plenty for all eight with leftovers. Once it becomes too hard to put anymore filling inside it, you are ready to stitch it closed. I used matching polyester thread (it is stronger) and stitched using a ladder stitch 1/8" apart just to get the opening closed. There will be some gaping and it won't look wonderful. I then went back over the seam a second time with a whipstitch just catching both sides and stitching as close together as I could, pulling tightly. You can see my stitching on the right photo. Knot off the end with your preferred method and clip the thread. Keep in mind this is for children to play with, it doesn't need to be perfect, they won't mind. Congratulations! You are finished and now have a neat hand made fabric ball. Stuff and hand stitch the remaining balls until you have a set of eight. Play ball! Now if you have a good eye you might notice I am missing something, the jack or pallina, which is another small ball that you throw at the beginning of the game, it serves as the target in which you are throwing your larger balls at (or as close as you can get them.) This ball measures about 2" in diameter and is too small to sew using this method. I plan to English Paper Piece this ball and sew it all by hand, but haven't done that yet. In the meantime I am just going to let my kiddos use a ping pong ball or another small plastic ball that is lightweight and can't break anything or hurt anyone. Not a big deal but I don't want you to think I forgot about it!
We have reached the end of Quarter 2 of the 2019 Finish-A-Long already!! Of course, that means it is now time to link up those finishes from the list you linked up in April. We hope that you have been able to complete a bunch of the UFOs on your list and if you haven't, we'll do it all over again for Quarter 3... The 2019 FAL is hosted by a great community of bloggers. This year our hosts are:
Each finish you link up will be in the draw for great prizes, so let's give a huge thank you to our fantastic sponsors:
The 2019 Quarter 2 link for your finishes is now open below on my blog and on each of the hosting blogs - you only need to link on one blog for your finish to appear on all host blogs.
Link-up "Rules":
Add one link for each finish. If you want to link a round up post of all your finishes, use that link to enter one of your finishes and then link the rest of your finishes separately. Please, only one link per finish, as your link is an entry into the randomly drawn prize draws.
Please ensure that the photo (Instagram or Flickr) or blog post you link up contains a link or reference back to your original list so that we can verify your entry (make sure it is from the appropriate quarter, too). On Instagram the best way to do that is to tag your photos with #2019FALQ2yourname (where yourname is unique to you), this makes it easier for us to match your finishes with your list, which also should have this tag.
Please become part of the FAL community. Check out the links of others and leave a comment. We all need encouragement so let's applaud each other. The 2019 FAL Facebook page is HERE and you can follow us on Instagram @finishalong.
Our hosts will also link up their finishes to share in the community but they are not eligible for any of the prizes.
The Q2 Finishes link will stay open from now thru 11 pm, EST, Tuesday, July 9, 2019 - as we are global, you might want to check your time zone to determine your last possible time to link. You can also see how much time is left below the linked up images on the right. It is best to link up your finishes early and if you have a last minute one, add that one later so you don't miss out. The prizes will be awarded as soon as we can verify all the entries and do the drawings. We will post the winners on each host's blog.
Lastly, don't forget to start making your Q3 list as the next LIST link opens on Wednesday, July 10, 2019.
2019 Q2 Finishes Link Up:
|
Marci GirlA feisty mom designing, sewing and blogging her way through everyday life!
|













 RSS Feed
