• Home
  • Blog
  • 2020 Finish - A - Long
  • 2019 Finish - A - Long
  • 2018 Finish - A - Long
  • Contact
  • 2017 Finish - A - Long
  • Shop
Marci Girl Designs

The 2019 Finish-A-Long - My Q2 List

4/13/2019

3 Comments

 
Howdy folks!  Here we are starting up the second quarter of the year and I'm ready to make my list and I think I'm going to set some self imposed deadlines.  I have to be honest, if I have deadlines, then I get the projects done.  If I don't...well they languish forever, so deadlines it is.  Simple enough, right?

This being said, I'm keeping my list short and sweet because I don't want either of these to be carried over next quarter!
Picture
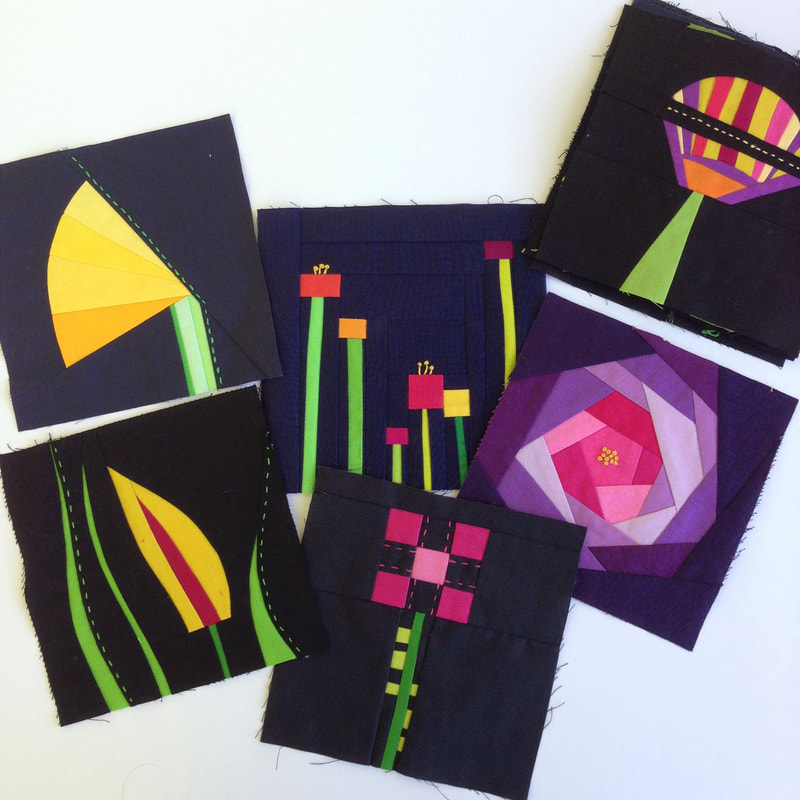
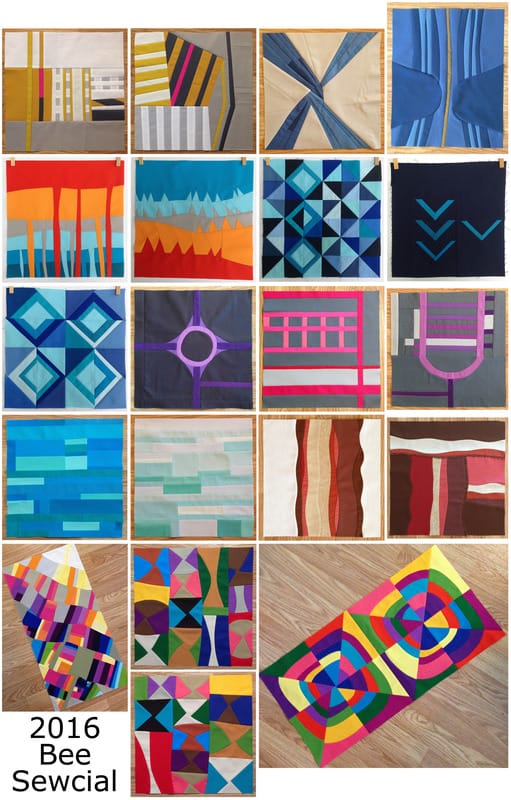
1.  Bee Sewcial Flower Quilt - I have about half embroidered, so I need to finish with the hand stitching and then put this baby together.  My self imposed deadline is June 17, 2019.

Picture
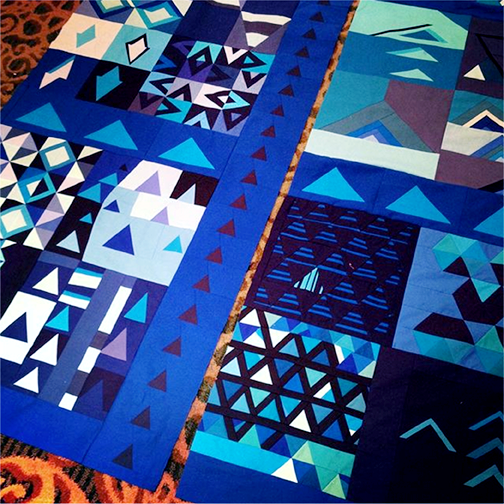
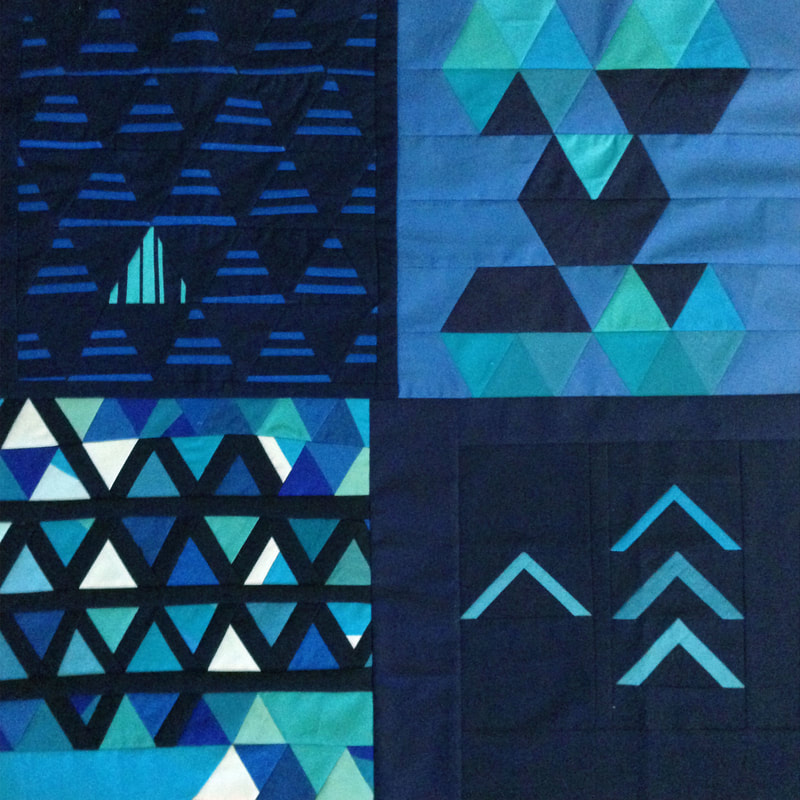
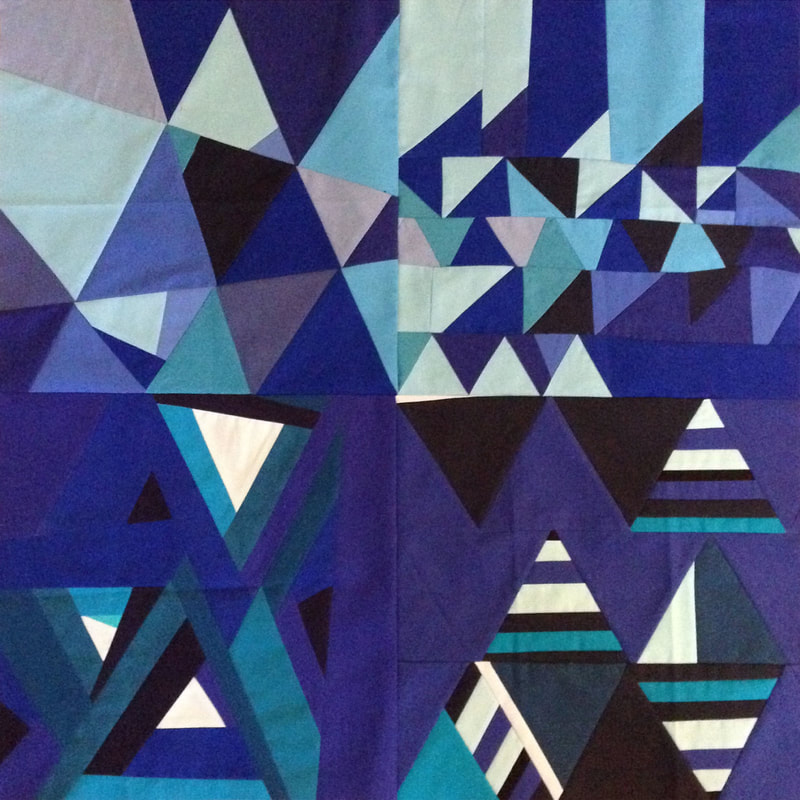
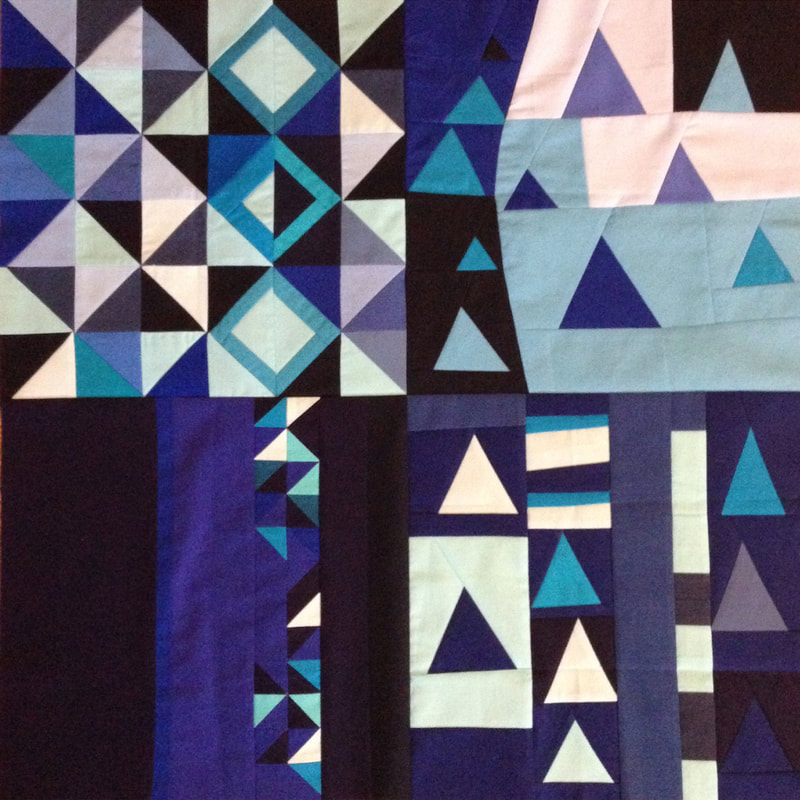
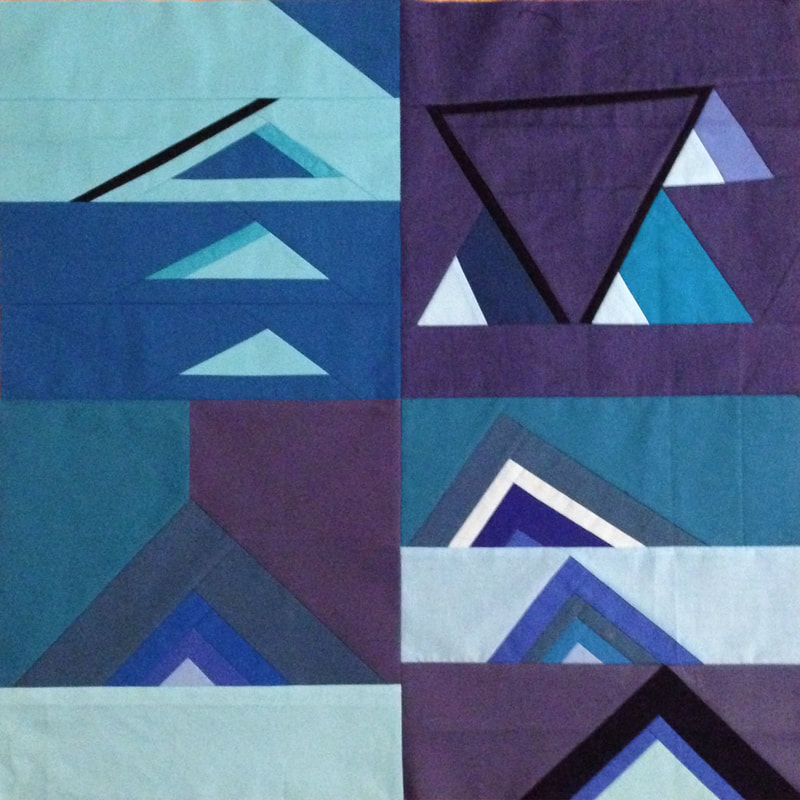
2.  Triangle Bee Sewcial Quilt - The top is finished, need the back finished and then quilting.  My self imposed deadline is May 31, 2019.

Two quilts seem doable, right?  Well we shall see, the key will be to focus on actually working on these projects and not adding anything new!

Have you made your list and linked up yet?  If not, you still have plenty of time, the linky is open for 5 more days and you can find it HERE.  We would love to have you, even if it is your first time playing along.

Picture
3 Comments

Q1 Finish-A-Long - How Did I Do?

4/9/2019

6 Comments

 
Hey Ya'll!  Every quarter I like to check in and hold myself accountable to the Finish-A-Long.  So how did I do?  Oh first let me remind you that I and none of the hosts are eligible for prizes so we play along just because we love the Finish-A-Long.  Ok so now that is out of the way, back to how I did.  Well I bet you can guess, whomp whomp another quarter goes by that I don't finish anything.

BUT...I did make progress and that is something..
Picture
I worked on embroidering each of these improv flower blocks from my Bee Sewcial members.  This has been my in-between project, you know sitting at the Dr. office, riding in a car.  So I've been slowly adding stitching to these blocks.  I think I'm about half way done with them.  I'm approaching it like, "slow and steady wins the race." 

So there you have it, worked on one, didn't touch the others.  I do hope you had a more successful quarter than I did.  The link up is still open for a few more hours so don't forget to link up all of your finishes!  You can find the link up HERE.

Even if you didn't have a successful quarter (like me) then join us for Q2!  Make your list and link up starting tomorrow.  Even if you have never played before or a seasoned veteran, we would love to have you.

Picture
6 Comments

Bee Sewcial March Prompt

3/1/2018

2 Comments

 
March is my month to choose a prompt for my fellow bee-mates and after seeing a Spoonflower design challenge a little over a month ago, I knew instantly what I wanted to do.  Honestly I had never even heard of Kilim, so after seeing that Spoonflower challenge, I did some research and below is the basics of what I learned and then following is my prompt. 

Curious to play along?  Read through all the way to the bottom for more details.
Picture

Kilim

Definition - A kilim is a flat tapestry-woven carpet or rug traditionally produced in countries of the former Ottoman Empire, Iran, Azerbaijan and Turkic countries of Central Asia. Kilims can be purely decorative or can function as prayer rugs. Modern kilims are popular floor-coverings in Western households.  Created with a basic tapestry weave, warp and weft strands, therefore having no pile  The technique used today is almost identical to how they were produced in the fourth or fifth century.
Picture
What will we be making?  A mini decorative “rug” or quilt block based on the geometric stylings of modern day kilim tapestries.  Using either traditional motifs found in traditional kilim or purely your own design in a geometric improv style.  Here is a link to my Pinterest board that is for design inspiration and not color inspiration- HERE.  You will see in my pins lots of various styles, some very geometric and uniform but the rugs I love the most are very improv friendly with lots of “images” or designs, hence what I would like my finished to quilt to look like. In the end this will be a quilt and in no way an actual rug.  Your block does not have to feature multiple things, you can pick/design one thing and make your “rug.”  I’m hoping that my finished quilt will have a lot of large blocks that will be constructed to look like an overall rug, not a quilt that has a lot of mini individual rugs.  

Picture
Size - The block should measure 14.5” x 20.5”, which is slightly smaller than the equivalent of (2) 12.5” blocks.
                                       
Amount - One block only.

Techniques - Improv piecing, paper piecing
Picture
Color - The photo below is a picture by Stephanie Ruyle (@spontaneousthreads) and is my color inspiration.  Bright vibrant colors set off with any and all shades of neutrals.  Limit country/western colors, think rust, tans, brown, anything that might make a rug appear dirty or aged.  Bright, happy and clean is how I would like the end product to appear.

Picture
Thanks for hanging in there to the end.  Curious to play along?  Using my prompt, create a quilt block for yourself to keep, then post a photo on Instagram using the hashtag #inspiredbybeesewcial and if you want me to see it quickly, tag me in the photo @Marci_Girl.  We would love for you to join us, this month or any month.  These monthly prompts are a great way to play around with improv, learn new skills and have fun sewing!  Hope you join us!
2 Comments

My 2017 Finish-A-Long Quarter 4 List

10/4/2017

1 Comment

 
Here we are at the last quarter of the year, which absolutely blows my mind.  I know I say it all the time but where did the year go, my goodness!  I'm keeping my list short and simple this quarter, so here it is:
1.  Bee Sewcial Triangle Quilt - You can see some of my progress above.  The quilt is in nine sections and I have half of the back done.  I am currently waiting on yardage to arrive so I can finish up the quilt front and back.  Very excited about this one.

Picture
2.  Christmas Pajamas - Surprised this one carried over?  I doubt it, obviously I want to get these made for my kiddos for Christmas this year.

Picture
3.  Women's Waterfall Raglan - I really want to get this pattern made because I really want to have this shirt and hopefully I'll love the fit and want to make lots more.

Picture
4.  Moana Halloween Costume - New this quarter, I started making tassels last month and have the majority of my supplies and I have a plan.  Since this one is for Halloween this year I better get cracking!

That's it folks!  Four projects, hopefully doable so I can finish out the year with a bang.  You still have a few days to make your list and link up, please do, we would love to have you!  Find the link up HERE.
Picture
1 Comment

Improv Piano Keys - A Tutorial on Unique Curved Piecing

9/28/2017

12 Comments

 
This tutorial is part of the 2017 Finish Along Quarter 3 Tutorials Week.

Find the link up to the Quarter 3 Finish Along HERE or on any of the other hosts blogs.
Picture
A few years ago (November 2015 to be exact,) one of my Bee Sewcial mates, Leanne requested "No Negative Space, Maximalist" blocks in all the colors.  Above is what I designed.  At the time I had several ask how I did it and a few months later when participating in a swap I documented the process and was all prepared to give a tutorial on Instagram.  At that very same time is when Instagram switched to non-chronological order and I just couldn't stand to do a tutorial that would show in everyone's feed all out of order, so I just sat on it.  Well here we are today and I'll share this process on my blog (and I'm not sure why that never occurred to me before. LOL)  As you will see my tutorial block looks extremely different from above, but the process is the exact same, just different fabric choice, which really shows the versatility of this block.

A Few Notes:
For this tutorial I won't be giving dimensions, as you can do this technique in a variety of sizes.  The first time I made this block my "piano keys" were around 7"-8" long, for this tutorial they were around 5" long so that I could use a charm pack I had on hand.  I'm sure you could make them even smaller or a lot longer.  Play with it and have fun.

I'll also not be going into depth on the technique of sewing improv curves.  There are a ton of tutorials already in existence and you can find some good ones here -
Red Pepper Quilts - Cutting and Sewing Free Hand Curves
Gefilte Quilt - Curvy, Modern, Red, Improv Scrap Quilt
Elm Street Quilts - Improv QAL Strips and Curves

All that being stated, let's get started!
Picture
1.  Gather Supplies - Variety of scraps, strings are perfect, but smaller chunks can be pieced into longer strips.  These scraps in the upper left corner are in the 1"-2" wide and 5" long range.
Picture
2. Sew Together Smaller Scraps - I took my little scraps and sewed them randomly to each other to create at least 5" long pieces.  Press seams open. Don't trim anything at this point.
Picture
3.  Cut Piano Keys - Once you have a pretty good sized stack of scraps, start cutting "pie" shaped pieces as seen above.  Use scissors and not a rotary cutter or ruler and just make sure one end is thicker than the other end.  Make sure the smallest end is at least 3/4" wide.  You can see above I have a variety of shapes and sizes.
Picture
4.  Playing With Layout - Start laying out your "piano keys" in segments of around 5-8 pieces all with the wide ends on one side and the skinnier ends together on the other to start creating a nice curve as shown above.  I alternated solid scraps with pieced ones, or at least tried to stagger the seams.
Picture
5.  Sewing Together The Piano Keys - Once you are happy with your layout, start sewing the segments together two at a time, pressing the seams open.  I usually try to line up the narrower ends, but it doesn't really matter.
Picture
6.  Sewing Together The Larger Panel - Now that you have chunks sewn together start to play with your pieces to create a nice long "S" curve.  Sometimes you might have to add in a a larger scrap (see the tops) and sometimes you might have to add in a smaller chunk to make the curve do exactly what you want it to do.  Overall you want to have a nice meandering curve, make sure the curve doesn't change too sharply, but rather think of an extended long "S."
Picture
7.  Trimming The Piano Keys - Once you have reached your desired length and are happy with the way it looks, it is time to trim the curves to make a nice smooth piece.  Trim as little or as much as you want, but you can see above I trimmed only the bits that extended too far past the piece next to it.  You can see I kept the nice gradual curves and had very little waste or trash.
Picture
8. Cutting The Background - Now it's time for you to decide how wide you want your piece to be and cut a solid piece long and wide enough for your specifications.  As you can see on the example above to the left I lay the piano keys on top of the fabric and make sure I have plenty enough room to accommodate the curves and the seam allowance.  The piece on the right has been cut and towards the bottom you can see it gets thin in one spot, but it is still at least 1" wide (I wouldn't really go any thinner than that.)  As for cutting the background piece I just over lap the two pieces like the one on the left and literally cut the background piece following along that curved edge.  Pretty easy.
Picture
9.  Aligning The Curves - There is no exact science when sewing this long curve, but I mark all the outer and inner curves with a pin on each side and when I am sewing I aim to make those pins match.  It doesn't always work perfectly but that is my ultimate goal.
Picture
10.  Aligning The Curves 2 - Sometimes I will start in the very middle of a really long piece and actually pin right sides together where it should match.  Then I will start sewing from the middle out until I get to the end.  And then I will start on the loose end (or top) and sew (and ease) it all until I get back the middle where I first started.
Picture
11.  Clipping Curves And Ironing - Once you have your "background" sewn on the piano keys and you are happy with how flat or not flat it is, you can clip the concave and convex curves to make it lay even flatter.  I press this seam toward the background because it is a whole piece of fabric and it tends to lay better this way.
Picture
12.  How To Use This Block - The first time I made this block it was a bee block and was sent in it's entirety for the recipient to use whole, as is.  The second time I made this block was for a swap and I needed to cut it into pieces that I could mail to the recipients, you can see those above.  I just cut up the long piece into unique blocks.  You could also sew a background to the other curved side and make more of a traditional rectangle or square block.  Lots of options and fun things you can create with this design.

Thank you for joining me today and I truly hope you give this technique a try.  If you do, please tag me in your photos and use Hashtag #ImprovPianoKeys.

Picture
12 Comments

Bee Sewcial April 2017 - Let's Get Creative

4/1/2017

3 Comments

 
Happy April everyone!  I'm the queen bee this month in Bee Sewcial and I get to pick our monthly prompt and like always I feel like I have to stretch our boundaries!  Hope it's a good thing.

This month we are making miniatures!

My idea this month comes from the concept that I don't need a ton of large quilts in my house and I would really like some quilt art to hang on my walls, so why not have everyone make smaller blocks that I can turn into a series of mini art works for my house.

What will we be making?  Florals, miniature improv floral pieces.  One large flower, one small flower,  a bouquet, a field of wildflowers.  Doesn't matter,  Just make some improv flowers.  I created an abstract painting pinterest board to get the ideas flowing.  I felt if you looked at abstract art of flowers that would better translate into improv flowers.  Maybe?  Hope so.  You can see the Pinterest board below or HERE.


Details -
Size - The blocks should measure 6.5" x 6.5" square. 

Amount - I am asking for 2 - 4 blocks per person depending on your comfort level of making these small scale blocks.  If it takes you 4 hours to make 1 block, then by all means only make 2.  But if you can whip up 4 blocks quickly and this isn't challenging then send 4.

Color - I made a Pinterest board for overall color inspiration, but here are the specifics.  I want the background to be black or very dark blue, think midnight, the darkest blue you have.  The flowers, foliage, vase or foreground should be bright, festive, saturated colors, check out my Pinterest board HERE or see it below but I think it is pretty clear.  So no pastels, tans, greys and neutrals.  You can use white but just little touches of it.

Techniques - Any and all, everything goes, regular improv, paper piecing, applique.  Feel free to add any embroidery or stitched on details, but certainly not required.

Overall Vision - I've added this new category to give you an idea of what I see in my head.  The color inspiration Pinterest board is almost exclusively Spanish/Mexican art/design/styling, I love it.  The black background with the saturated florals will hopefully create a folk art styled piece.  Bold florals on black.  Think miniature black velvet painting of flowers.  Ready, set, go!


I plan to make blocks soon and as soon as I do I'll blog about them and post to Flickr and Instagram.

Remember this isn't just for the Bee Sewcial ladies, we would love for you to play along.  Just follow the monthly prompt and post on Instagram using the hashtag #inspiredbyBeeSewcial.
3 Comments

Bee Sewcial - February's Blocks

3/2/2017

1 Comment

 
Picture
I know we are in March, but here are February's Bee Sewcial blocks for Karen aka Capitola Quilter.  I did finish these in February but didn't get to show them off until yesterday as my oldest got pink eye (gross and ironic) and I didn't want to risk any germs getting on her blocks, so I literally didn't touch them for a week and they just sat patiently awaiting their photos to be taken.  Anyway I'm getting away from myself, let's back this gravy train up and start at the beginning.

Karen was the queen bee and posted her prompt HERE,  A summary of her prompt is simply EYES in all shades of bright and clear blues and greens with just a touch of white and black.  Easy enough and fun!  The top block started by making a 6.5" improv paper pieced eye.  I cut a square of paper, roughly drew an eye and then paper pieced it, kinda making it up as I went.  It actually turned out better than I thought but took around 4 hours.  I had planned to make 3 more to make the block and after the 4 hours decided against it.  I stewed for a day and then it came to me, a "God's Eye!"  You know those yarn things from the 70's that everyone made and hung in their homes.  So I created "yarn" rings around the center eye and made an eye in a God's Eye.  Corny or clever?  Not sure but I liked the finished product.
Picture
The second block is completely different and a sort of visual break from the busy first block.  I started with that little center eye, all improv curves and then did an eye within an eye within an eye.  I added stubby eyelashes and called it a day.  It reminds me of an Egyptian eye or a cat eye or a combination of both.  They were both fun and last month's prompt was really a great one.

March's queen bee is Felicity aka Felicity Quilts and she has posted her prompt HERE.  If you would like to play along (this month or last) feel free to join us, just make sure to use the hashtag #inspiredbybeesewcial.  Give it a try, I think you will love it!
1 Comment

Bee Sewcial - January's Block

1/24/2017

3 Comments

 
Picture
I finished my Bee Sewcial block last week and decided I would like to share them each month here (and upload them to Flickr like I'm supposed too.)  This was the first month in our new year together (year 3) and January started with Stephanie aka Spontaneous Threads.  Stephanie posted her prompt at the beginning of the month and you can read all about it HERE.  The heart of her prompt was for us to create around the theme Resolution, as in New Year's Resolutions, more specifically our own.  We were given the color constraints of blues, grays, whites, off whites and if we wanted a little pop of color.

Here is my design.  It is long (she requested long landscape style blocks) and it measures 8.5" x 37.5."  I made my own bias strips and using a bit of trial and error figured out how I wanted to construct the look I was going for (or what was in my head.)  It turned out exactly as I envisioned, which is not always the case, but really nice when it happens.

The photo below is the back so you can have a peek at how I constructed it, it is not applique but rather sewn by machine, I would say traditional piecing but nothing about this was traditional. It isn't overly bulky as the majority of the pieced on strips are 3 layers thick and only in the intersections (the obvious gray squares below) are they 5 or 6 layers thick.  Not too bad in my opinion.  I hope Stephanie thinks so when she receives it.
Picture
I mentioned that the theme was Resolution, so let me explain what this block was about.  If you know me in person you are aware that I am a hypochondriac, every little ache and pain is a "what if" in my head.  A good portion of my day is wasted on these thoughts and honestly I'm tired of it.  One of my resolutions this year was to worry less and that's what I intend to do, worry less about every little ache and pain and just live.  I know it won't be easy but I hope by consciously trying to stop I'll be able to and honestly since I started at the beginning of the year I find it is slowly working.  Anytime those "what if it's cancer or what if it's a blood clot" thoughts come into my head, I stop myself and move on.  Maybe it will be something I can teach myself to stop doing, or at least that is what I hope.

Back to my design, the dark blue/dark gray section is the negativity, bad thoughts the hectic swirling thoughts and then slowly they fade away and a lighter happier place emerges.  Eventually the hectic crazy fades away and only the stuff that matters is left.  The light and healthy stuff and that swirling crazy is gone.  At least that is my interpretation and what I was aiming for in this block.  So what do you think, did I accomplish it?

If you want to know more about Bee Sewcial or to play along each month just check out the hashtags on Instagram, #inspiredbybeesewcial and #beesewcial.
Picture
3 Comments

Hello 2017 and a Peek Back at 2016!

1/3/2017

3 Comments

 
Hello All!  Happy New Year, hope you had a great one and a fantastic Christmas as well.  I am easing back into the world of blogging now that normal routines are resuming and hope to be better at it than I was last year.  So I may not always be wordy, but I do hope to share photos of works in progress and finishes and in the next few days I'll be helping to host a pretty big event, so stay tuned for that.

One of the most positive things that took place in 2016 for me was my second year participating in Bee Sewcial.  I am lucky enough to be in a bee with a bunch of great ladies and every single one of them produces creative work and prompts throughout the year.  You can see below I created a mosaic of all the blocks I created last year, January through November (we take August and December off.)  It is so nice to see them all in one place.  At least three of these sets have been turned into finished quilts and are living out there being enjoyed.
Picture
Our little group invites anyone interested to play along with us each month.  The prompts can be found on Instagram or on the Queen Bee's blog.  The easiest way to play along each month would be to search the hashtag #inspiredbyBeeSewcial on Instagram and you can find everyone and all the information there, but don't hesitate to contact me if you want to play along and are a little lost.  We work with solids only and create modern improv quilt blocks.  Our themes or prompts last year included, improv lines, circles, triangles, transitions and even bacon!  So if you would like to have some fun, try your hand at creative improv or just follow along, we would love to have you.  Here is to a creative 2017!
3 Comments

    Marci Girl

    A feisty mom designing, sewing and blogging her way through everyday life!

    Subscribe
    Follow on Bloglovin
    Picture
    Follow on Bloglovin


    Categories

    All
    2017 Finish A Long
    2018 Finish A Long
    2019 Finish A Long
    Bee Sewcial
    Book Reviews
    Clothing
    Everyday Life
    Giveaways
    Handbags
    Handstitched Class
    Inspirational Projects
    Marci Girl Designs
    Projects
    Quilt Along
    Quilting Bees
    Quilts
    Random Thoughts
    Recipes
    Sew Along
    Sewvivor
    Style Stitches
    Swaps
    The Penny Sampler Class
    Tutorials
    Wip Wednesday


    Happily
    Participating In:

    Picture
    Picture
    Picture
    Picture
    Picture
    Picture

    Picture


    Archives

    January 2020
    November 2019
    October 2019
    July 2019
    April 2019
    March 2019
    February 2019
    January 2019
    December 2018
    October 2018
    August 2018
    July 2018
    June 2018
    May 2018
    April 2018
    March 2018
    February 2018
    January 2018
    December 2017
    November 2017
    October 2017
    September 2017
    August 2017
    July 2017
    June 2017
    May 2017
    April 2017
    March 2017
    February 2017
    January 2017
    April 2016
    March 2016
    February 2016
    January 2016
    September 2015
    July 2015
    October 2014
    September 2014
    August 2014
    July 2014
    June 2014
    May 2014
    April 2014
    March 2014
    February 2014
    January 2014
    November 2013
    October 2013
    September 2013
    August 2013
    July 2013
    June 2013
    May 2013
    April 2013
    March 2013
    February 2013
    January 2013
    November 2012
    October 2012
    September 2012
    August 2012
    July 2012
    June 2012
    May 2012
    April 2012
    March 2012
    January 2012
    December 2011
    November 2011
    October 2011
    September 2011
    August 2011
    July 2011
    June 2011
    May 2011
    April 2011
    March 2011
    February 2011
    January 2011
    December 2010
    November 2010
    September 2010
    August 2010
    July 2010
    June 2010
    May 2010
    April 2010
    March 2010
    February 2010

    Picture

    RSS Feed

Powered by Create your own unique website with customizable templates.