
This quilt pattern and tutorial are part of the 2017 Finish Along Quarter 1 Tutorials Week.
Find the link up to the Quarter 1 Finish Along HERE or on any of the other hosts blogs.
*Warning this is an extremely long blog post.*
Find the link up to the Quarter 1 Finish Along HERE or on any of the other hosts blogs.
*Warning this is an extremely long blog post.*
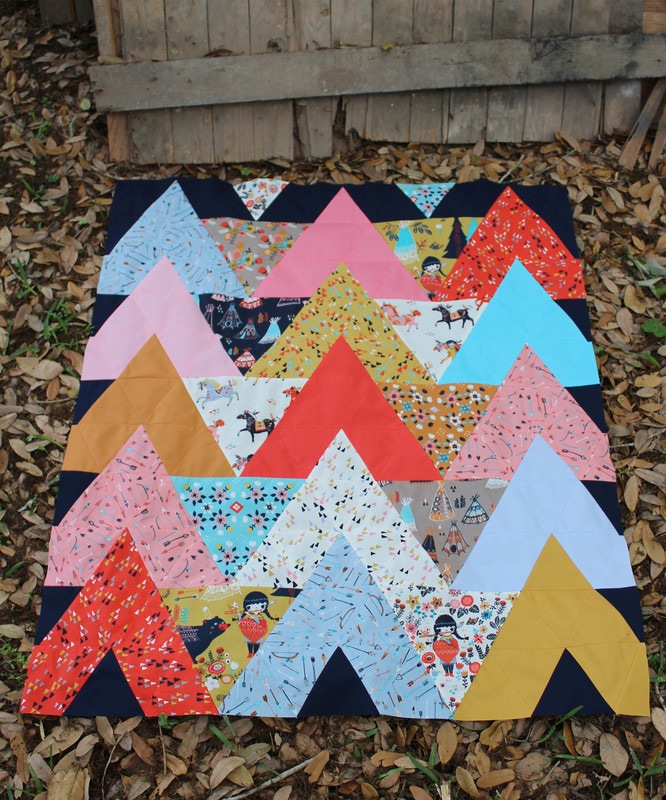
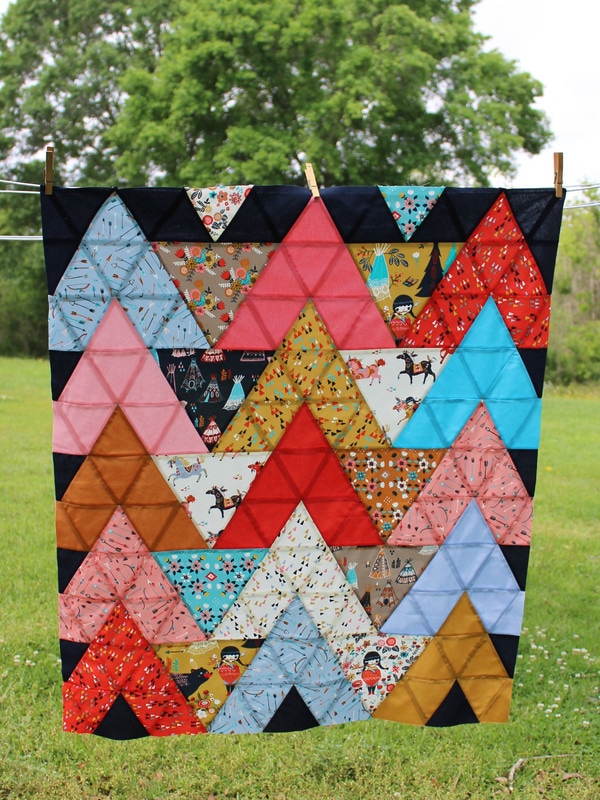
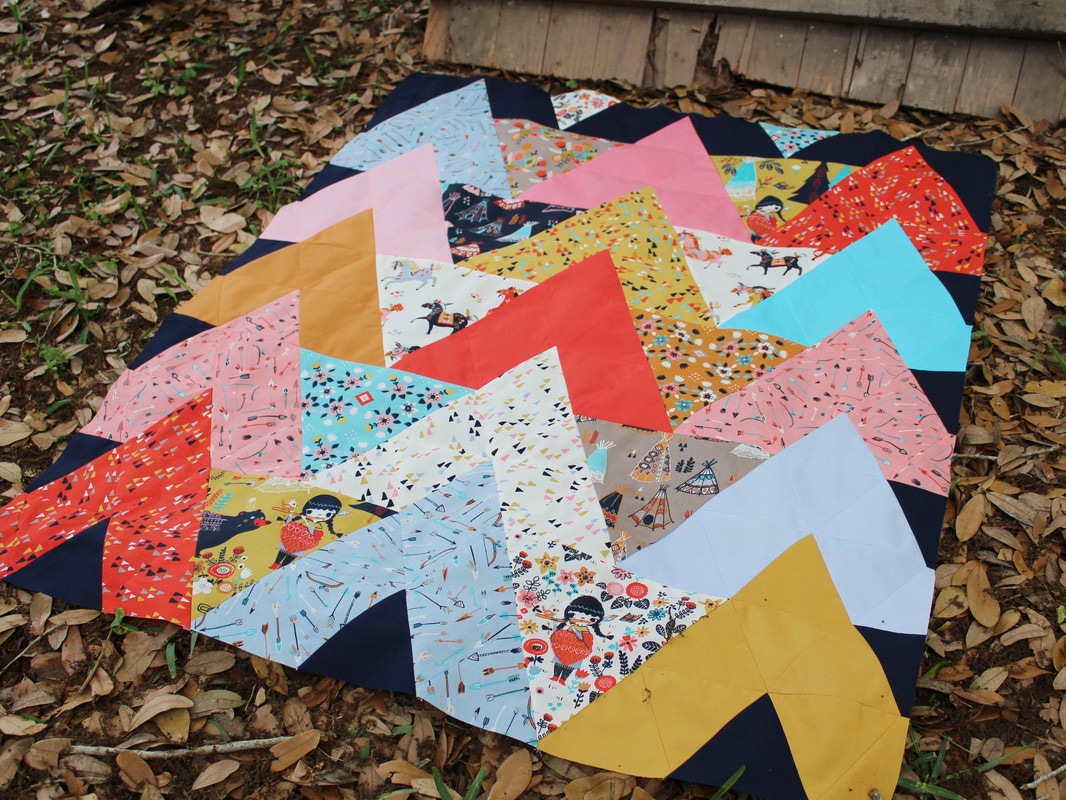
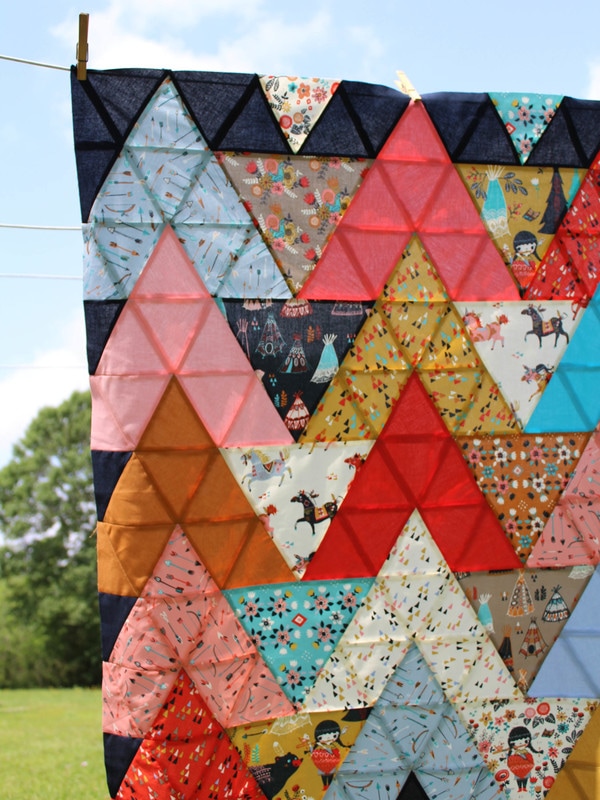
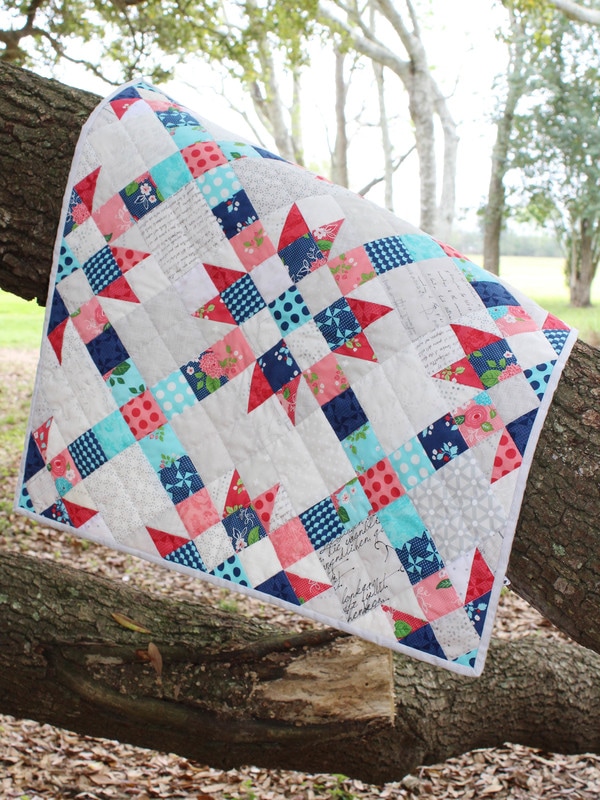
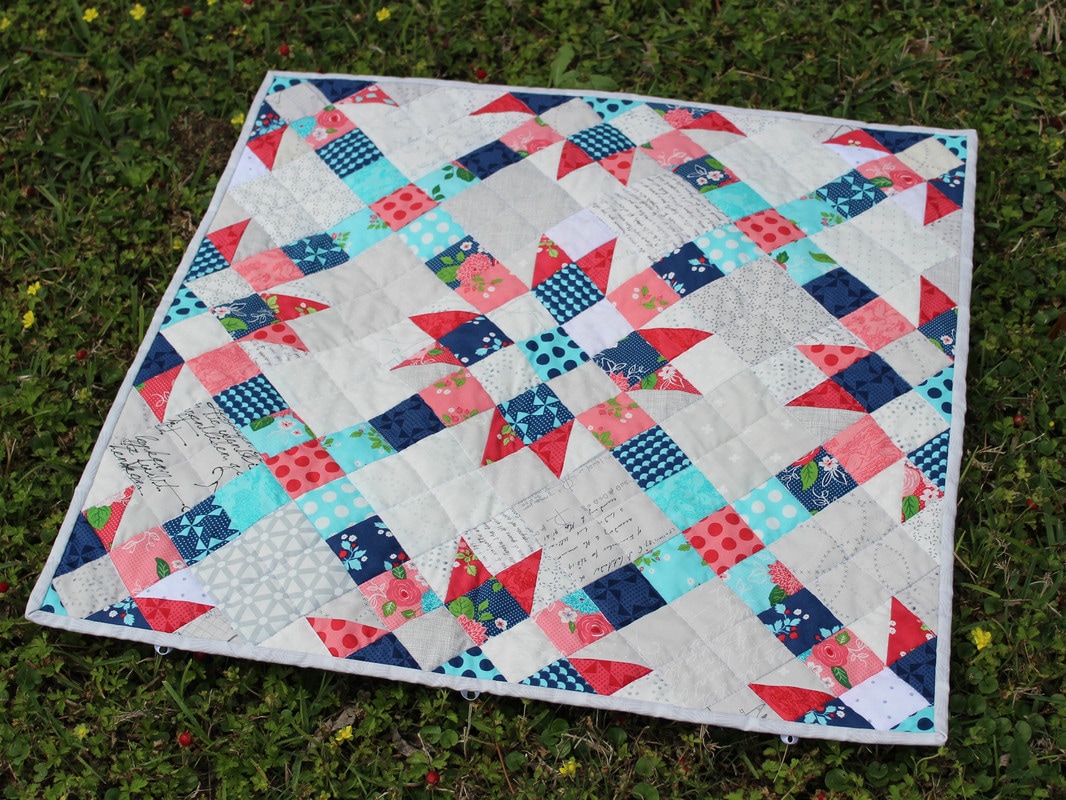
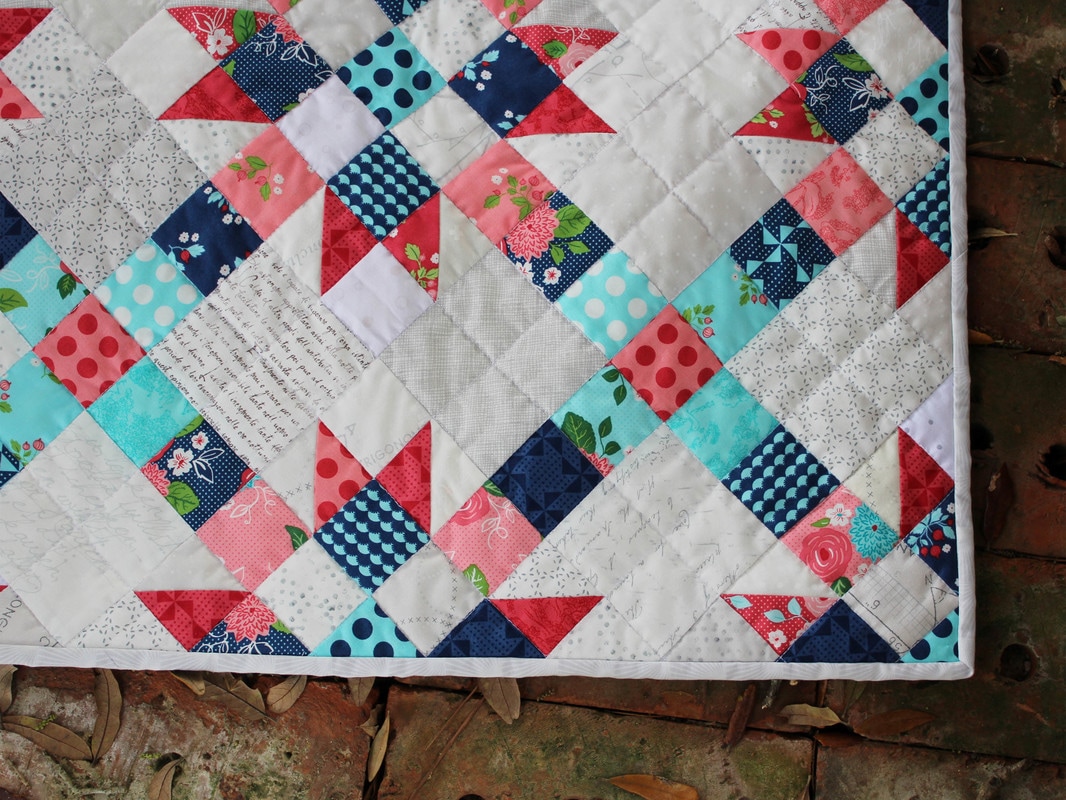
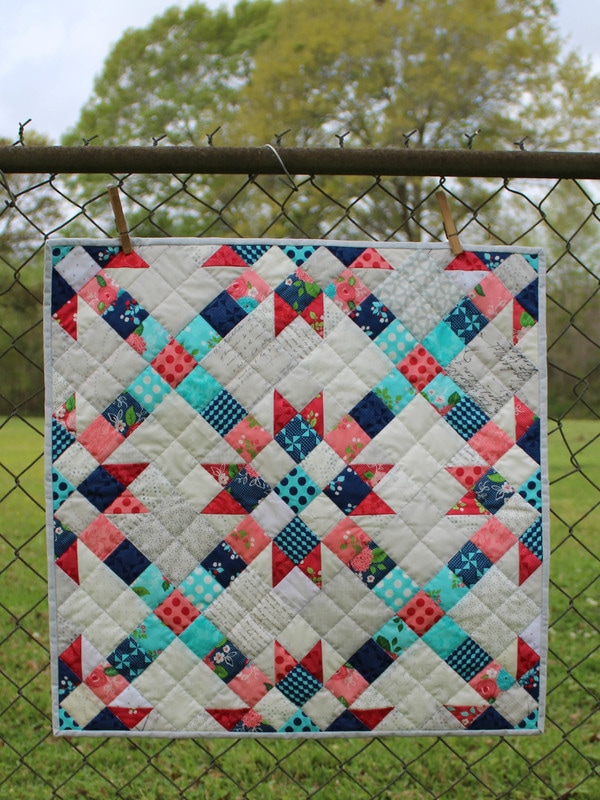
Back in July 2014, so almost three years ago I posted my finished triangle quilt and you can read all about it HERE and see more photos. Since then I have received several requests for a pattern or a "how to" and I've even seen at least one copy without a tutorial, which would have been cool if I had received credit, but whatever. Back to the point, today is the day for the FREE pattern. I've named this quilt the "Tipi Quilt" because of the "tipi" shape created with the triangles and to me this quilt has a real Native American feel to it.
The photo below is the new version (un-quilted) made specifically so I could write up the pattern for you guys. The fabrics used for this version are by Miriam Bos for Birch fabrics and is named Wild Land. I also used a variety of solids, mostly Kona. Are you guys ready? Below you will find the tutorial on how to make this quilt and if you aren't interested in making the quilt, in the tutorial are detailed instructions on how to sew together 60 degree triangles and that can be used in a variety of applications. So hopefully you will find something useful.
The photo below is the new version (un-quilted) made specifically so I could write up the pattern for you guys. The fabrics used for this version are by Miriam Bos for Birch fabrics and is named Wild Land. I also used a variety of solids, mostly Kona. Are you guys ready? Below you will find the tutorial on how to make this quilt and if you aren't interested in making the quilt, in the tutorial are detailed instructions on how to sew together 60 degree triangles and that can be used in a variety of applications. So hopefully you will find something useful.
Tipi Quilt Specifications and Fabric Requirements
Quilt Size - Wall Hanging or Baby/Toddler Quilt measuring roughly 36" x 42.5"
Fabric Requirements - Fat Quarters or 1/4 Yard Cuts
10 Busy or Focal Prints, if you use less plan to have duplicates.
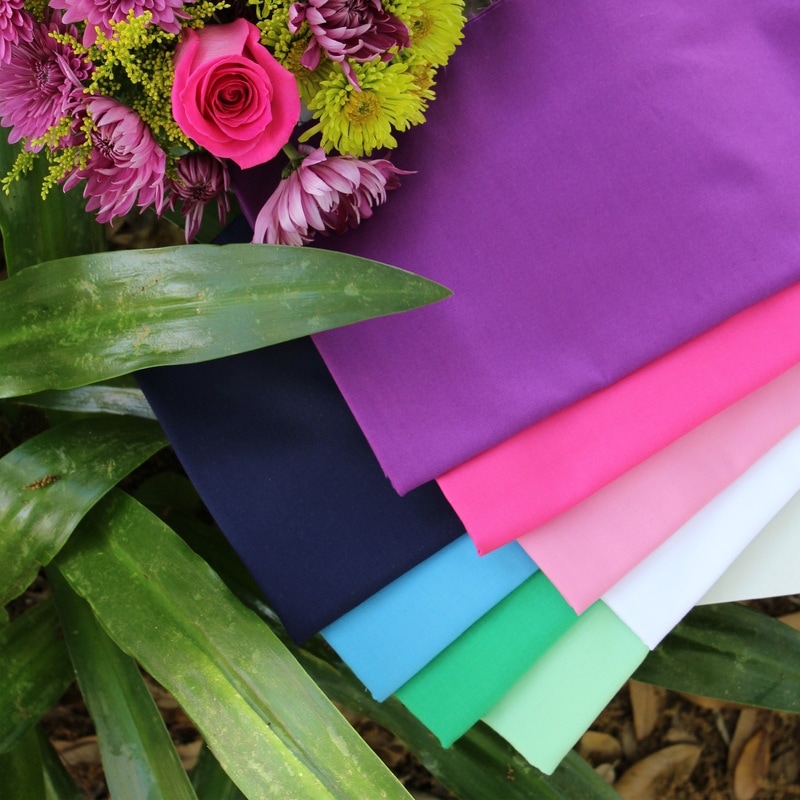
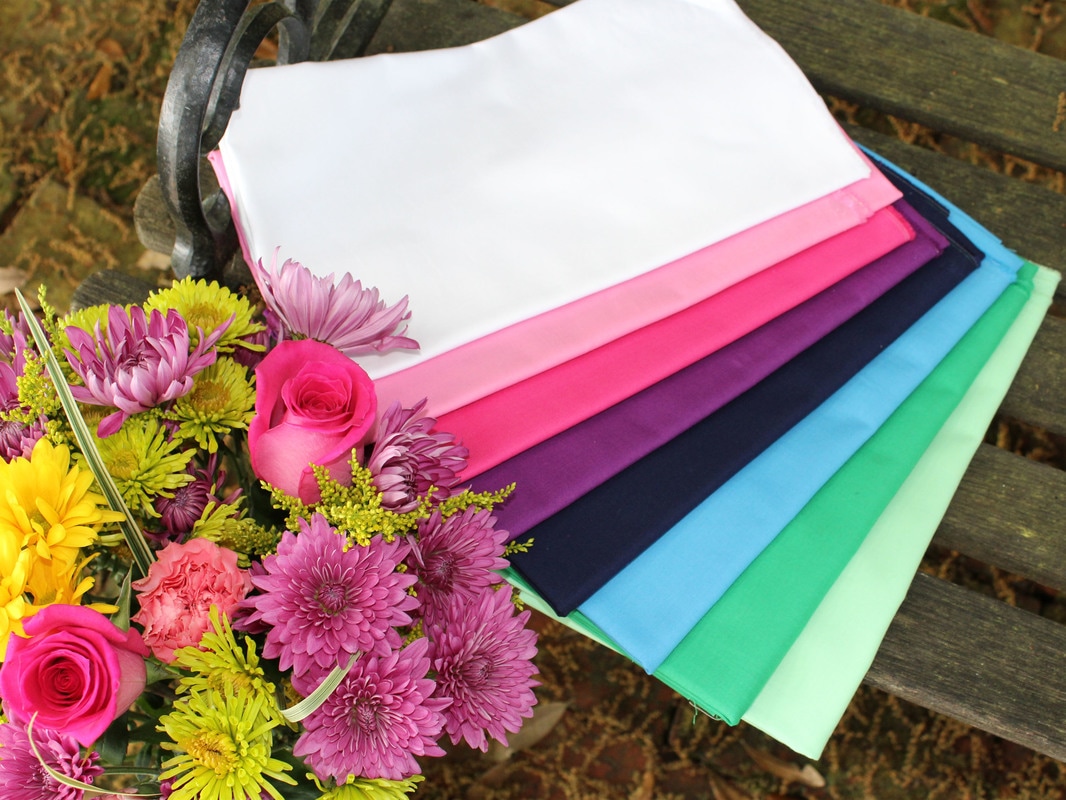
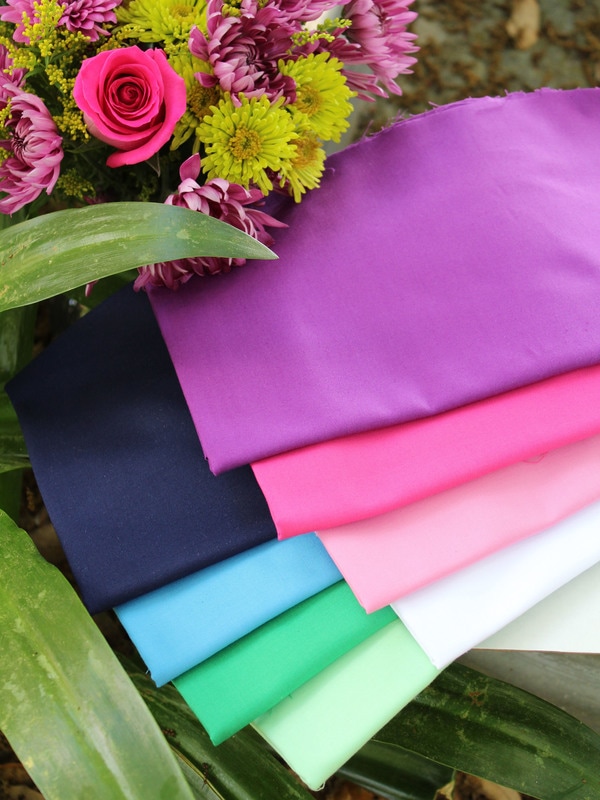
15 Solids and Less Busy (optimally prints that are not directional), if you use less plan to have duplicates.
1 Background Fabric, either a solid or a blender.
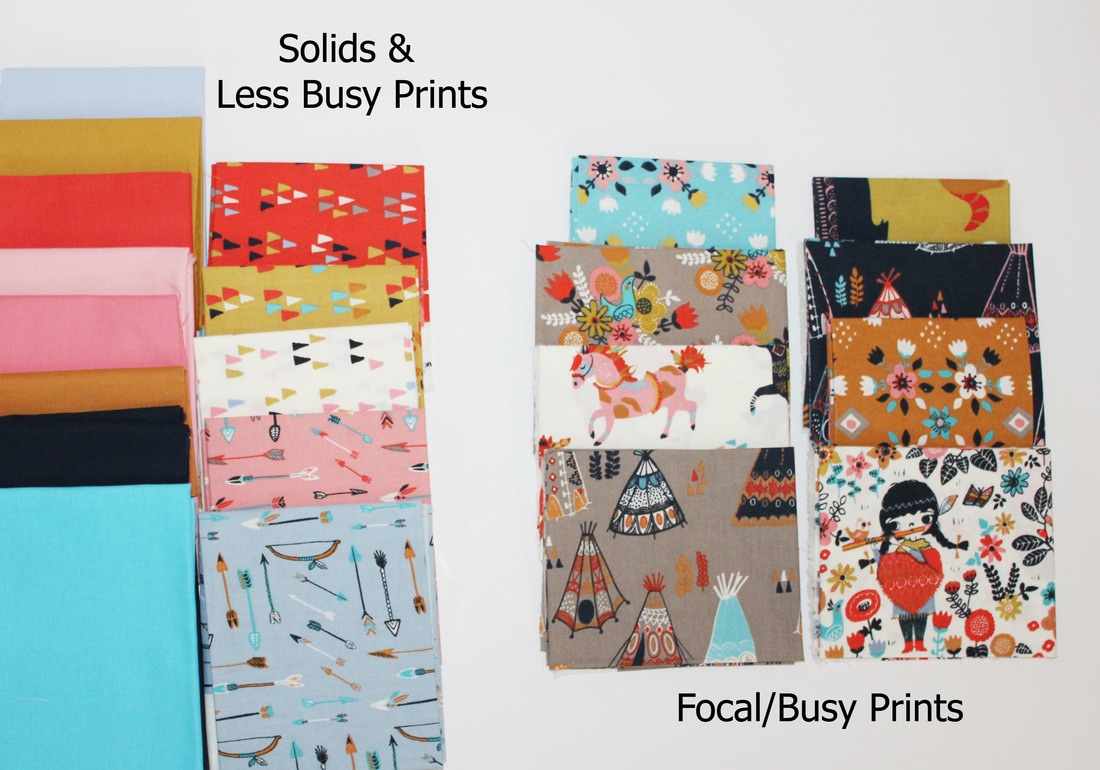
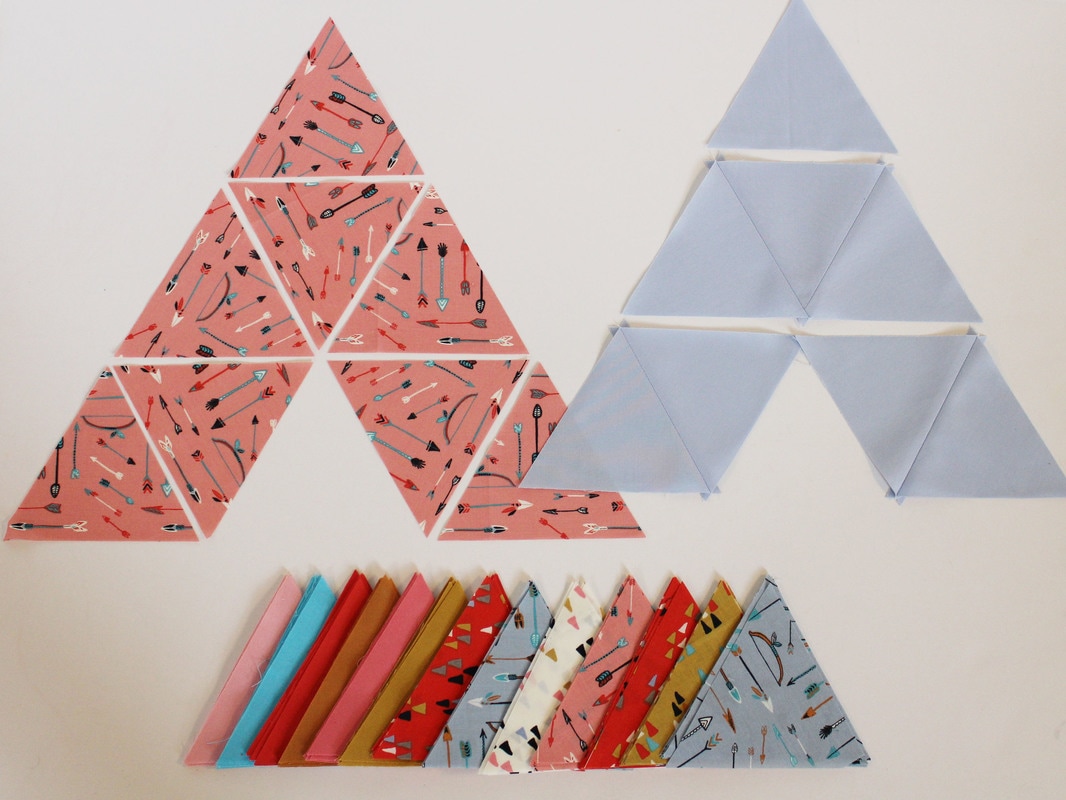
The key step with this quilt pattern is fabric choice and placement. This quilt pattern was born out of the desire to feature several larger focal prints uninterrupted (not cut up!) Both of the quilts that I made with this pattern used one fabric line and each of these lines had great focal prints and good smaller prints, thus this quilt pattern was born. Your very first step is going to be choosing a fabric that will fit the bill appropriately. I can't tell you what to use, but I can show you what I've chosen and how I went about it.
In the photo below you can see I've separated the prints into two groups, less busy prints and focal/busy prints. The focal prints will be large triangles that will be fussy cut to feature specific images (like the little Native American girl.) On the "less busy" side I decided to add in a good handful of solids to break up all the prints (so it isn't crazy time carnival quilt) and by adding solids it gives the eye movement and you can appreciate the designs more.
I didn't separate it from the group below, but you will also need a background fabric. This print or solid will be used along the edges, top and bottom of the quilt. It will fill in the gaps created from the "tipi" shape and the large triangles. In this quilt I chose the dark navy blue solid below as my background print.
Once you have decided on fabrics and divided them into three groups (large triangles, small triangles or tipi shape and the background) you are ready to get started.
Cutting Instructions
This is a Fat Quarter (FQ) friendly pattern, but you can also use 1/4 yard cuts. The directions below are for cutting from Fat Quarters.
Large Triangles (that will be fussy cut) - 10 Prints
Cut a 9" strip.
Large Triangle "Tips" - 2 Prints, duplicates of the 10 above.
Cut a 4.75" strip or you can use scraps, you only need one triangle.
Small Triangles - 15 Prints or Solids
Cut 2 - 4.75" strips along the 18" side of the Fat Quarter. If the print will be duplicated, cut 3 strips.
Background - 1 Print or Solid
Cut 2 - 4.75" strips.
A quick note - these cutting instructions do produce some scraps, it's inevitable, but I have tried to reduce the amount of waste or scraps as much as possible.
Step One - Cutting out the Triangles
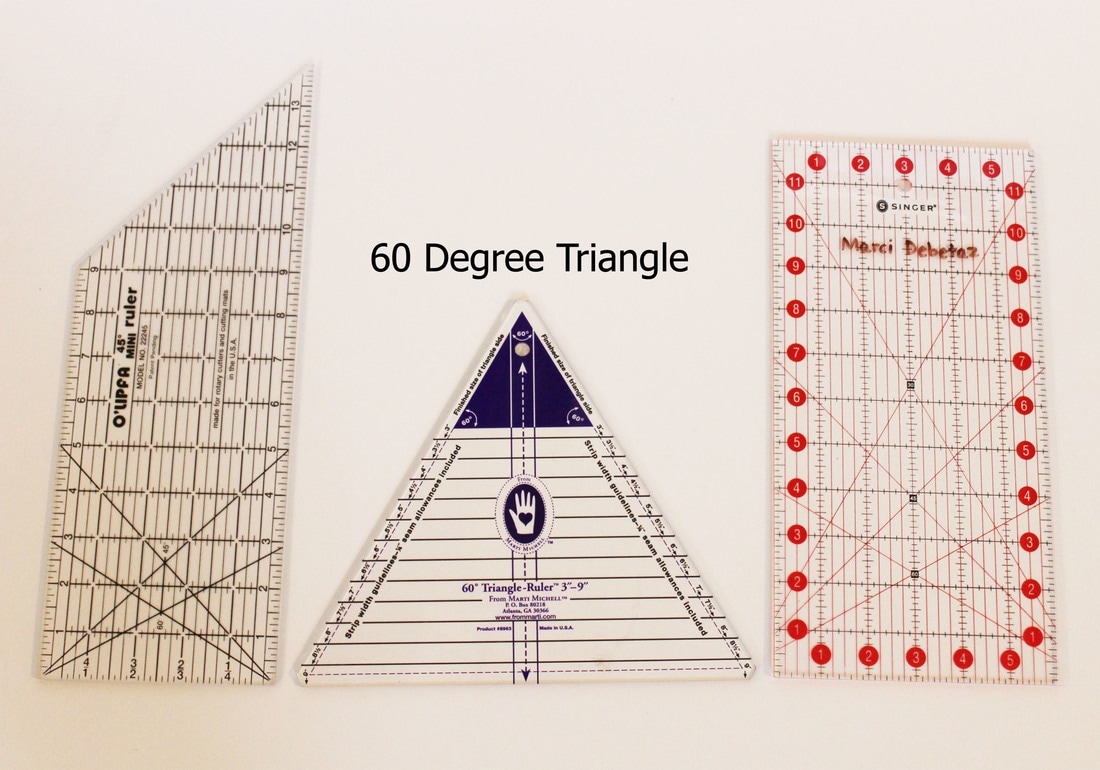
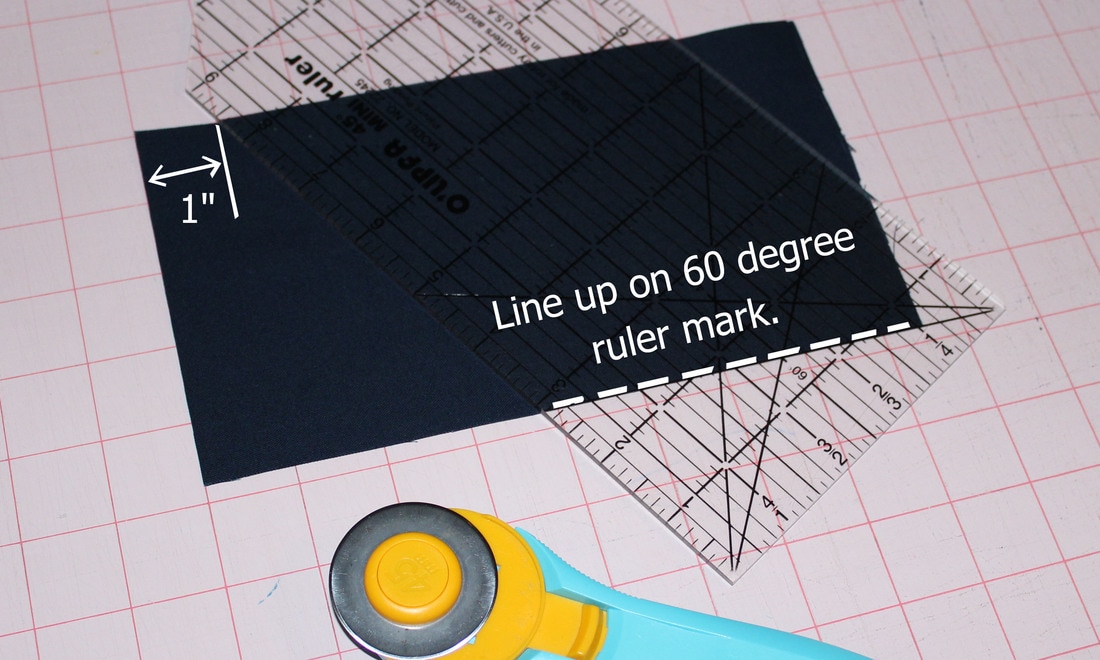
Let's start by talking about rulers. You don't need a fancy 60 degree triangle ruler to make this quilt, though it does make cutting easier. All you need is a ruler that has 60 degree lines on it, both the rulers to the left and right above have these markings.

We are going to start by cutting the small triangles, so using the 2 - 4.75" strips we will cut the triangles. Using the 60 degree marking on your ruler, line it up along the bottom of the fabric strip and cut. After this cut, turn your ruler in the opposite direction, but still using the 60 degree marking and cut a triangle. YOU WANT TO KEEP ALL THE POINTS. As you can see from my triangles above, keep the points and cut full triangles, this will help with piecing, I promise!
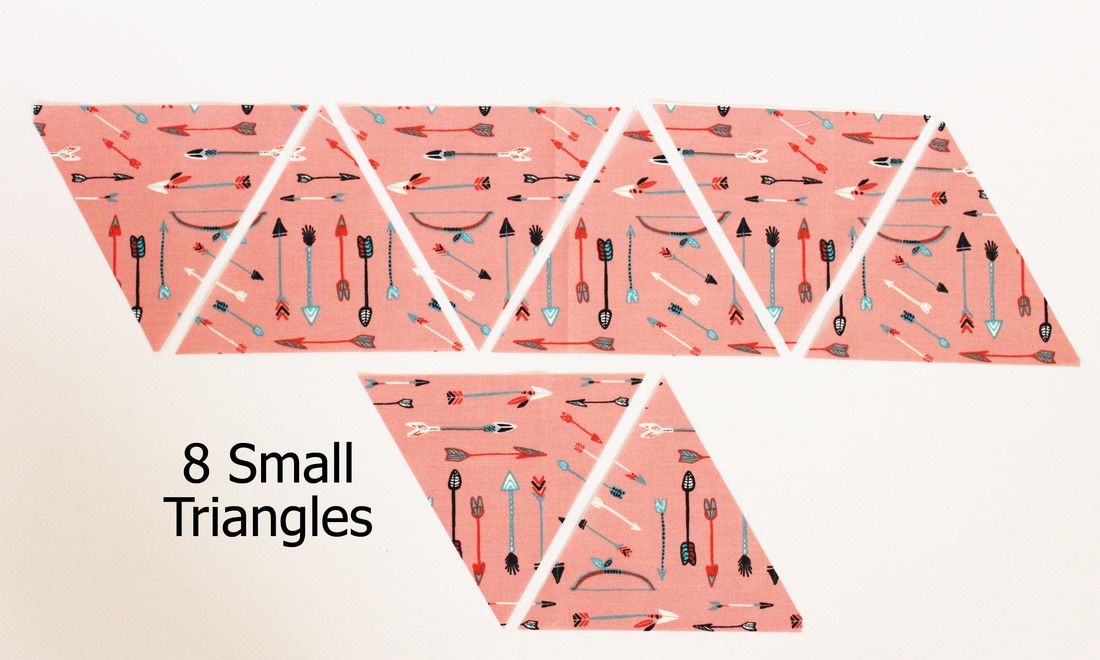
Continue cutting the whole first strip and then onto the second strip. You need 8 small triangles for each "tipi." I was able to cut 6 small triangles from one strip and 2 from the second. If you look closely on the first row above, the triangle on the left, the first in the series has a point missing. This is ok, it is less than 1/4" and is where the fabric strip cut off or ended. If this bothers you, then cut 5 from one strip and 3 from the next.
If you will be duplicating this print, then cut 16 small triangles from the 3 strips of fabric. Continue cutting all the small triangles from the 15 assorted prints and solids.
If you will be duplicating this print, then cut 16 small triangles from the 3 strips of fabric. Continue cutting all the small triangles from the 15 assorted prints and solids.
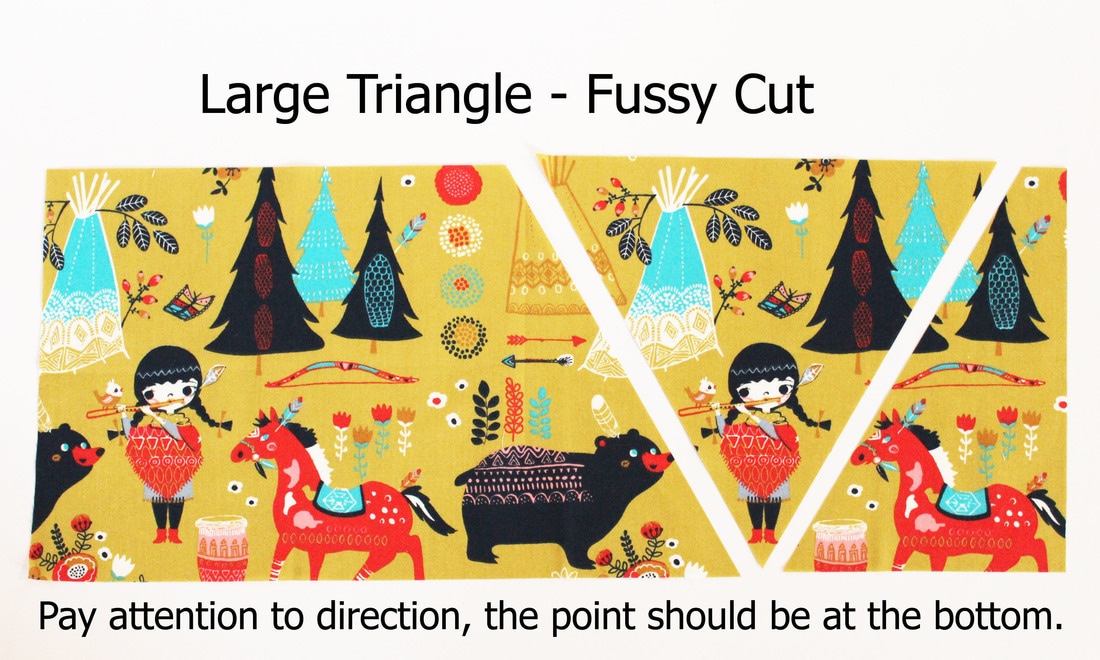
You will cut one large triangle from each strip and I recommend fussy cutting it to feature exactly what you in your quilt. Yes this produces scraps, but what fussy cutting doesn't. The important part of this step is the cut triangle needs to have the point on the bottom and the triangle "base" at the top. So you can see from the large triangle above, I have fussy cut so that the Native American girl is centered and the point is on the bottom. You want your prints to be in the right direction in your finished quilt.
You also need to cut 2 large triangle "tips" from these busy focal prints. Using either drop from above or scraps, cut 2 different 4.75" strips and cut a triangle from each, once again maintaining the triangle tip on the bottom and the base on the top of the strip. These two tips will be on the very top row of your quilt.
You also need to cut 2 large triangle "tips" from these busy focal prints. Using either drop from above or scraps, cut 2 different 4.75" strips and cut a triangle from each, once again maintaining the triangle tip on the bottom and the base on the top of the strip. These two tips will be on the very top row of your quilt.
Now we need to cut the background fabric. Cut 13 small triangles just like above. Then we need to cut 12 half triangles for the sides of the quilt. You could just cut more small triangles, but once the quilt is pieced you will cut off this odd triangle scrap that isn't very useful, so I cut these specific side pieces in order to waste less fabric. If you look at the photo above, you can see I have the bottom of the ruler lined up along the 60 degree line, and then slide it over on the cutting board to exactly 1" from the edge and cut. It will produce a piece that looks like the shape in the bottom photo to the left.
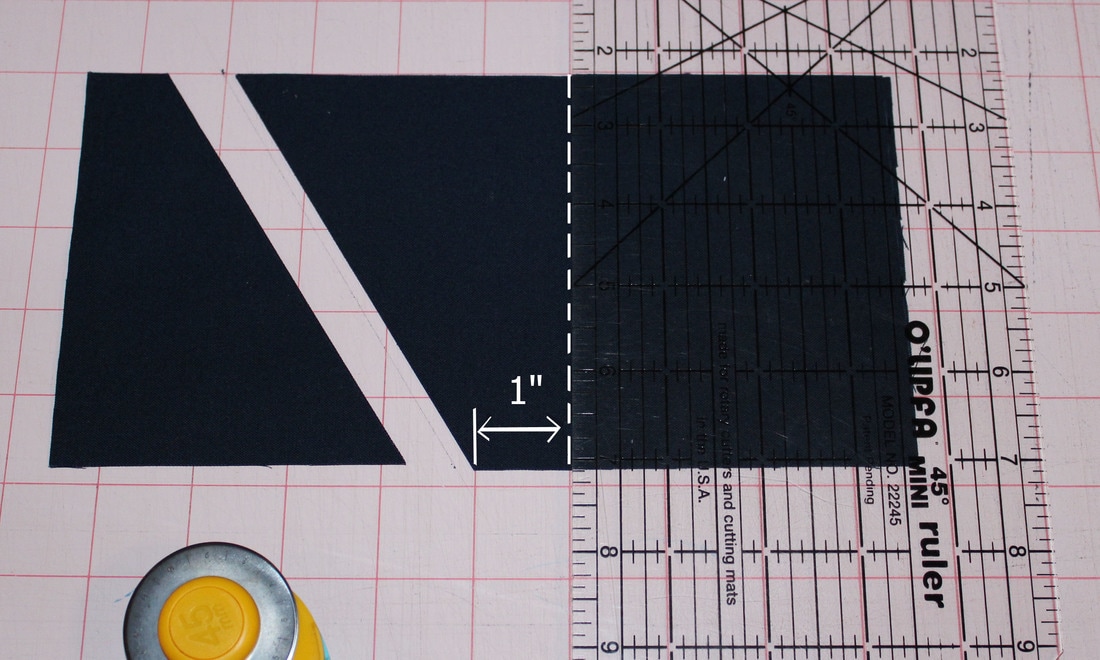
Now move your ruler to cut a straight line exactly 1" from the top cut 60 degree angle. Now you have two side half triangles. Continue cutting in this manner until you have enough.
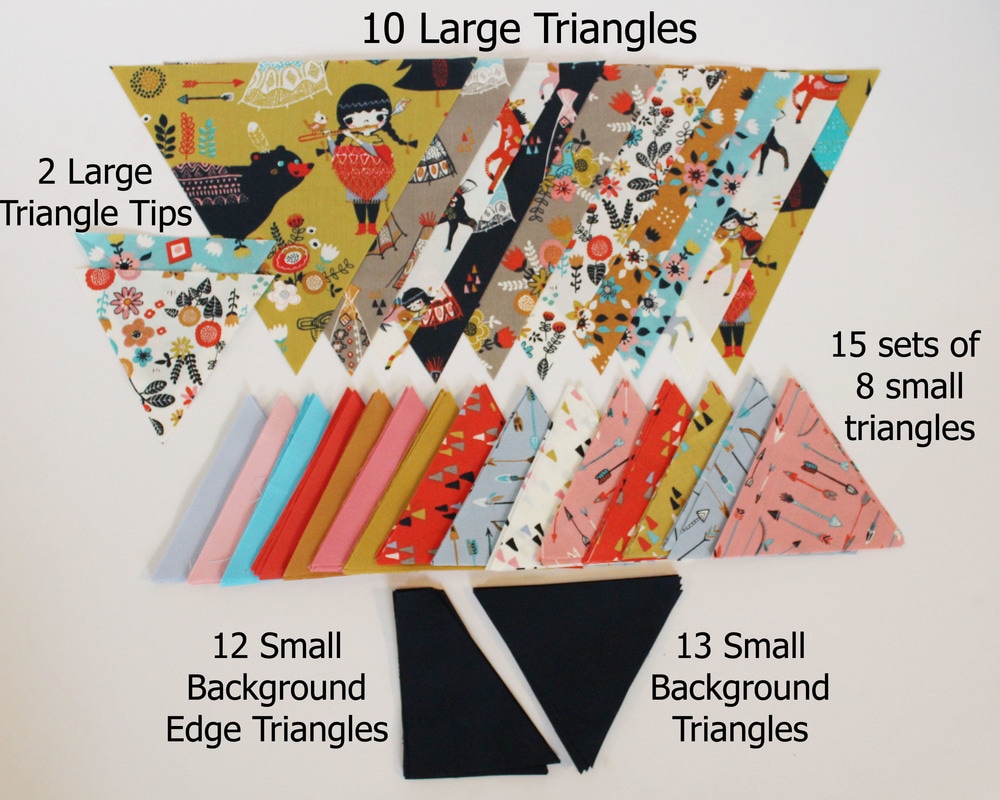
Congratulations! Cutting is finished. So you can see from the above photo you should have:
10 Large Triangles
2 Large Triangle Tips
15 Sets of 8 Small Triangles
12 Background Edge/Side Triangles
13 Background Triangles
I honestly feel that once I've reached this point, the hardest part is over, so pat yourself on the back and get ready to sew.
10 Large Triangles
2 Large Triangle Tips
15 Sets of 8 Small Triangles
12 Background Edge/Side Triangles
13 Background Triangles
I honestly feel that once I've reached this point, the hardest part is over, so pat yourself on the back and get ready to sew.
Step Two - Basic Assembly and Design Layout
Now logic would tell you that it is time to move to the design board (or the floor) and play around with fabric placement, but I will tell you WRONG, let's do a wee bit of sewing to get our feet wet sewing triangles and this little bit of sewing will make your layout design of the quilt so much easier and a lot of the work will be done already. So the next step will be to sew together some of the small triangles to create groupings. You can see what we will be sewing together above on the right.
First layout the 8 triangles in the formation to the left. We will be sewing the second row of three triangles together and then the bottom row into two groups of two. Easy peasy!
First layout the 8 triangles in the formation to the left. We will be sewing the second row of three triangles together and then the bottom row into two groups of two. Easy peasy!
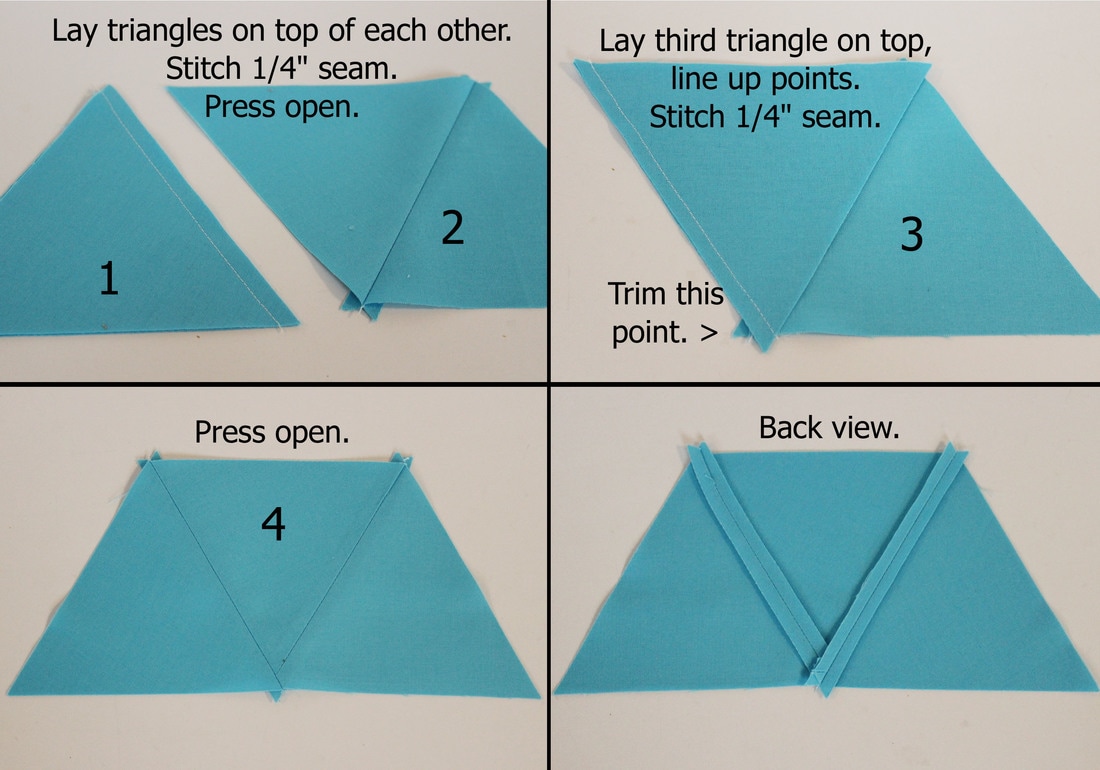
The image above shows step by step how I sew together 60 degree triangles:
1. Lay two triangles right sides together on top of each other. Stitch a 1/4" seam. I find you can use either a scant seam or a full 1/4", it doesn't matter as long as you do the same thing for the entire quilt.
2. Press the seam open. PRESS don't iron. So carefully open the seam with your fingers and place the iron down and don't move it back and forth. You don't want to stretch these bias seams.
3. Now take a third triangle and put it right sides together on either side, I did mine to the left. Because you kept those points, you will see that it is easy to line it up. Just match both the points at the top and bottom. Stitch 1/4" seam. After this seam you will trim that one little point that is sticking out as indicated in the photo. Trim only this point.
4. Press this seam open.
5. This is what the back should look like. You still have points sticking out on the top and bottom of the grouping and this is good.
Now repeat this three grouping for all 15 colors/prints of the small triangles and then sew together two groupings of two. Chain piece all of this and it goes together so quickly.
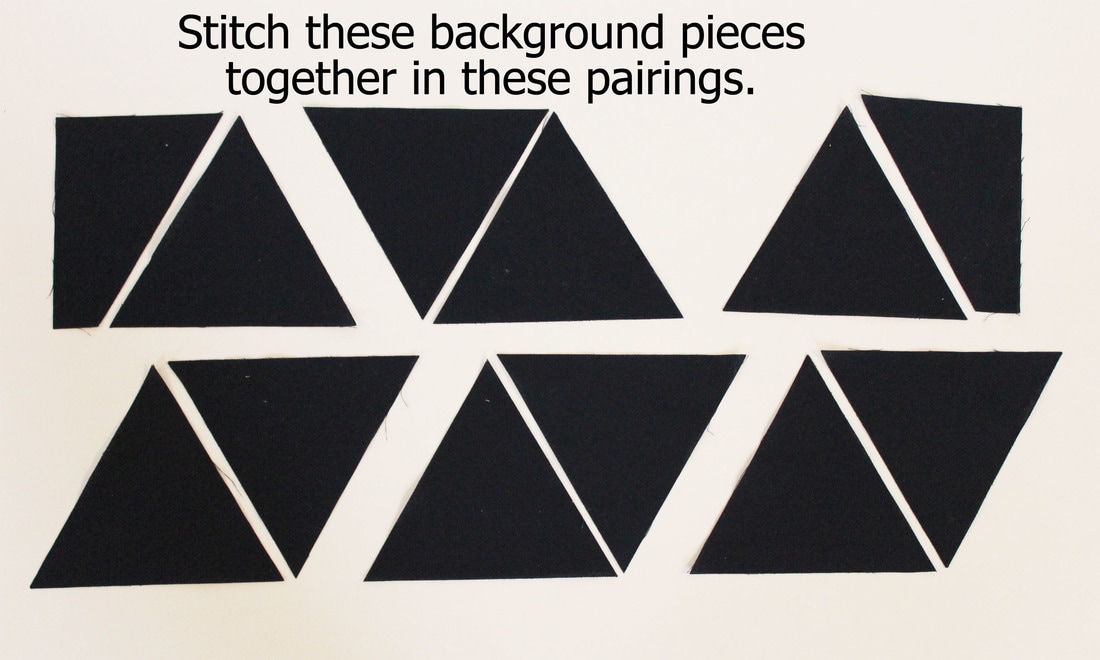
One more thing to sew together and then we will get to the design board. Taking your background pieces, sew some of them together in the above groupings. So four sets of two and then one side triangle with the straight edge to the left and one side triangle with the straight edge to the right sewn to full triangles. These two pieces will be the top corners of your quilt. There will be leftover background pieces that you don't sew right now.
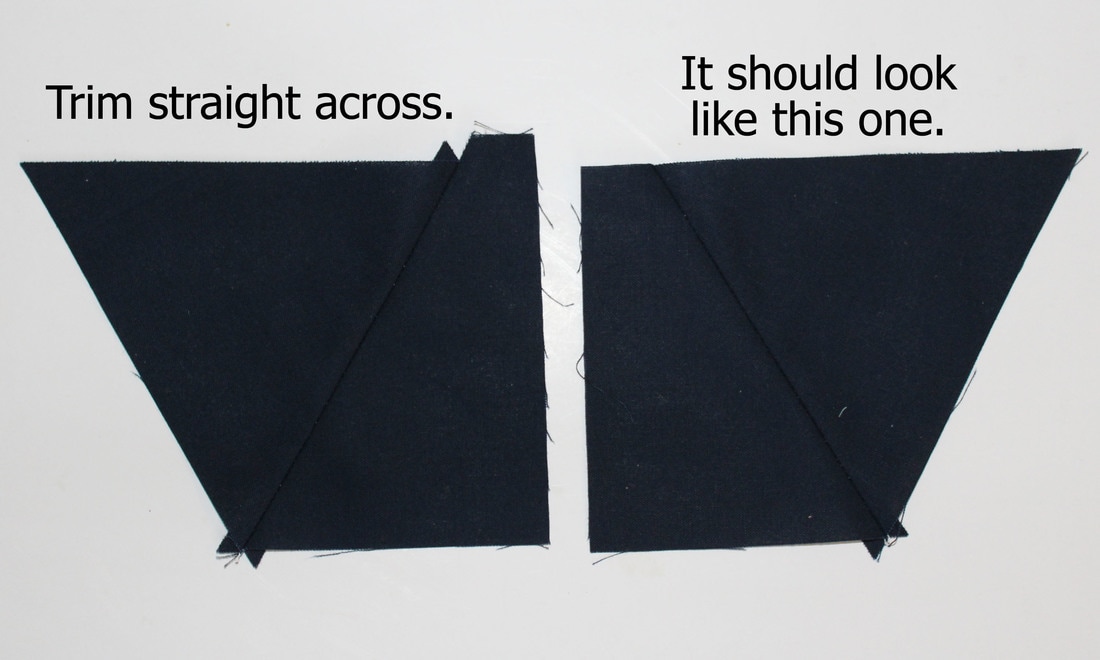
When you sew together your side triangles to full triangles you will line up the points just like a full triangle grouping. Once you press the seam open it will look like the shape to the left in the above photo. You will have some hang over from the side triangle piece. This is fine. Just trim it off straight across. So once it is trimmed it will look like the shape to the right.
Now it's time to play!
Now it's time to play!
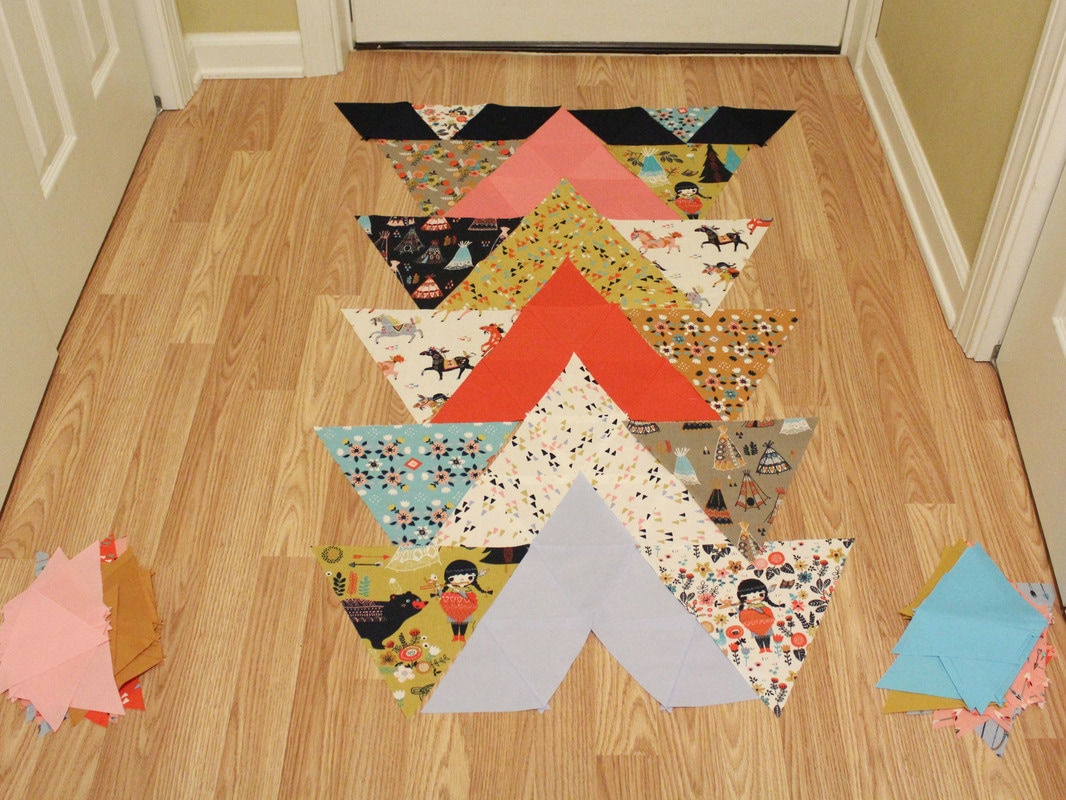
You can see I don't have a design board, so I use my back hallway floor, which can be quite challenging with little kids, but hey if you work on the floor just take a lot of photos to reference in the future in case things get kicked around a bit.
Start by laying out 5 sets of the small triangles in the "tipi" shape, which is dead center above. See why I had you sew things together, so much easier to move around chunks instead of individual triangles. Next layout the 10 large triangles with the points at the very bottom of the "tipi." This will create a missing row at the very top and this is where the 2 large triangle tips come in. Put those down and then add in the background triangles that you have sewn together.
Start by laying out 5 sets of the small triangles in the "tipi" shape, which is dead center above. See why I had you sew things together, so much easier to move around chunks instead of individual triangles. Next layout the 10 large triangles with the points at the very bottom of the "tipi." This will create a missing row at the very top and this is where the 2 large triangle tips come in. Put those down and then add in the background triangles that you have sewn together.
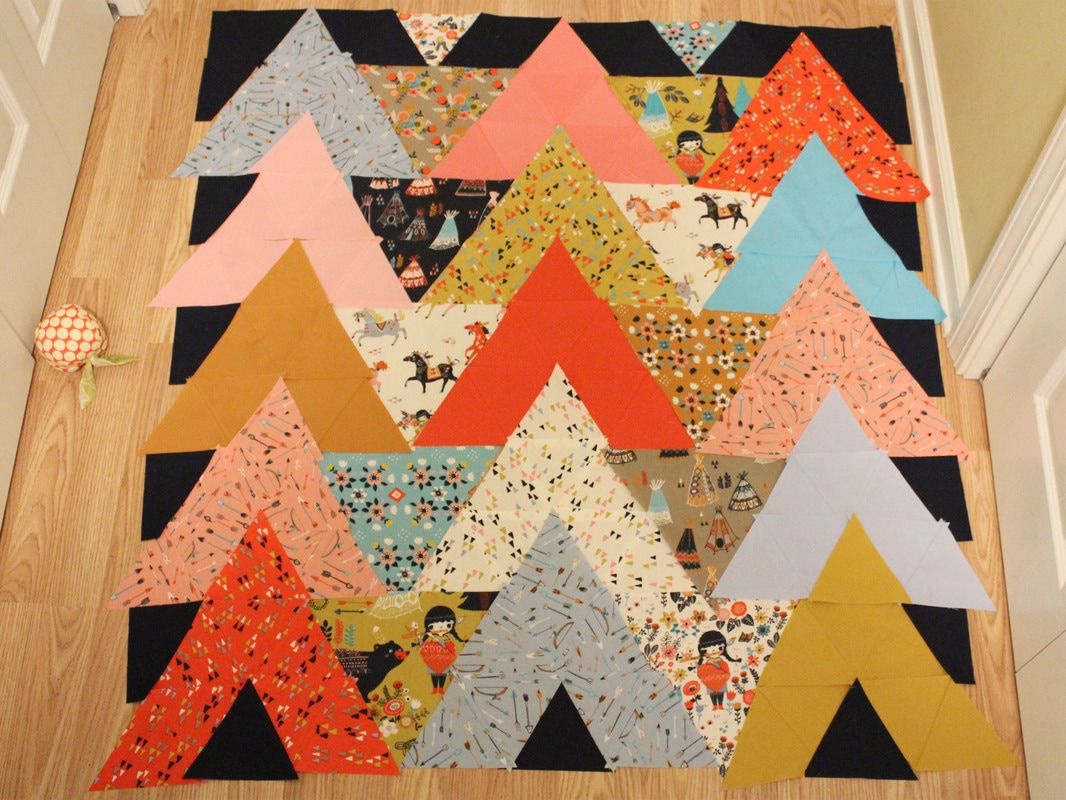
Finish laying out the remainder of the "tipi" shapes and then fill in the gaps with background fabric at the bottom and the sides. You will have to move things around quite a bit to get it perfect but take your time, step back admire your quilt. Take photos, look at it that way. Ask opinions, do whatever it takes to get you to your final layout. I spent a morning rearranging until I settled on the above photo. For me it is about not having too many same colors or prints next to each other. Evenly spacing the solids throughout and just overall being pleased with the final look.
Now let's sew this baby together!
Now let's sew this baby together!
Step Three - Quilt Assembly
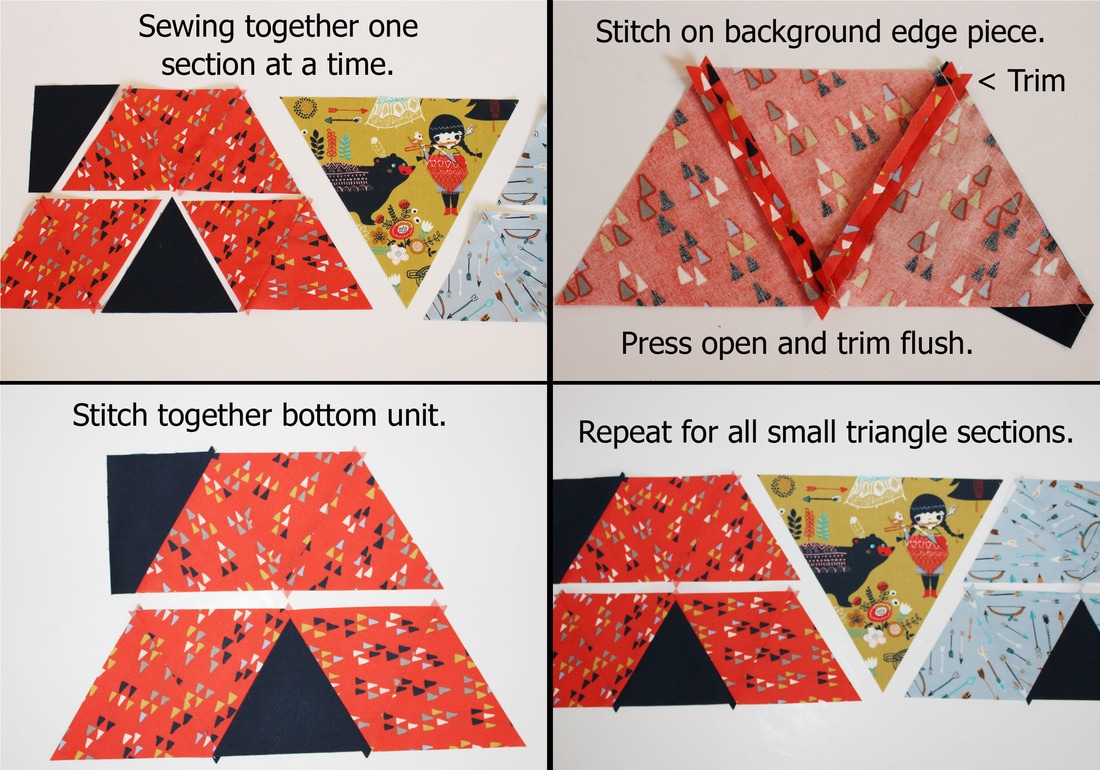
We will start the quilt assembly by sewing together all of the small triangle groupings that are contained within two rows of the quilt. So skip the very first row of the quilt and start with rows 2 and 3. I have the pieces laid out in the photo above. So on row 2 stitch the background side triangle to the 3 triangle grouping. Trim that one point as indicated in the photo. Press open and trim flush. Now on row 3 sew the two triangle groupings to the different colored center triangle. Trim that sticking out point and then press open. Repeat this same process for all the small triangle sections. When you are done it will look like the bottom right image above.
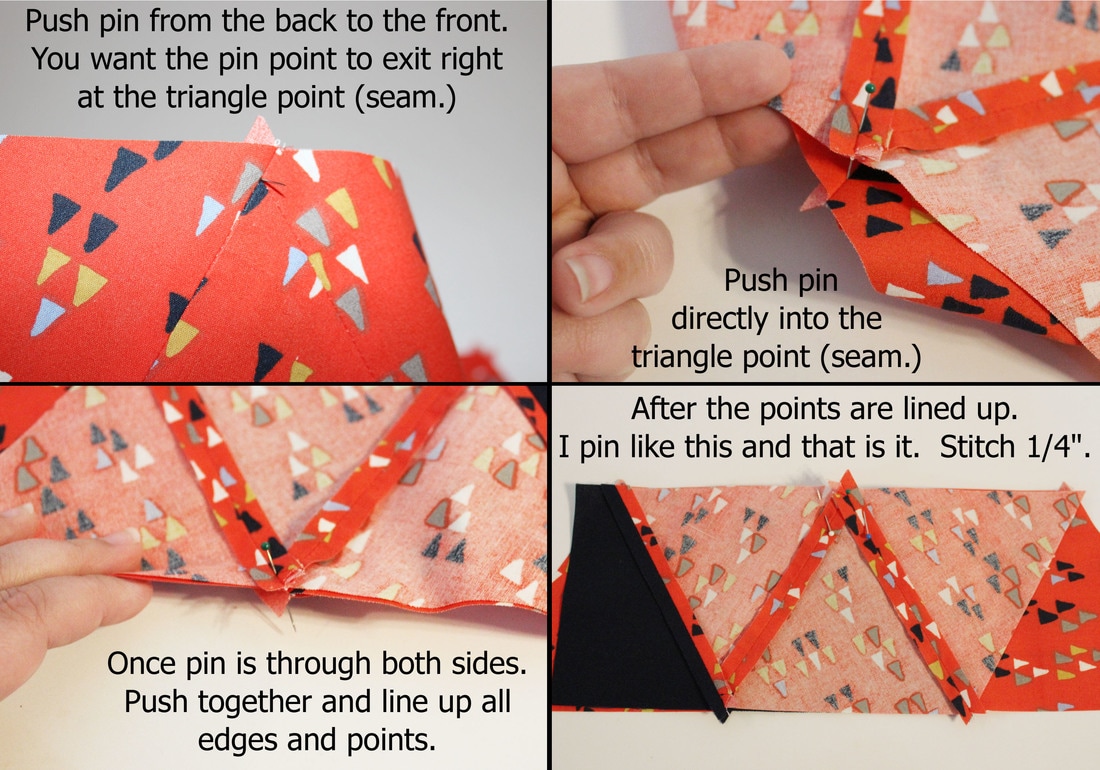
Now it's time to sew that "tipi" together. This is my method for getting all those points to match on each and every row. Taking the top three triangle grouping, push your pin from the back to the front of the point, right in the seam. So your pin should be sticking out just like the top left photo. Then taking your bottom row of fabric triangles push the pin directly into the right side triangle point (seam.) So both of these points are now on the pin. Move them carefully together until they are mated up with one another and using another pin, pin to the left side and then using another pin, pin the right side. I do it like the bottom right photo. Then I remove the first pin completely. Now that the center is pinned, just line up both ends, matching points and pin if you choose to. I do not. I just stitch my 1/4" seam and line up as I go, it's a short seam and just saves time.
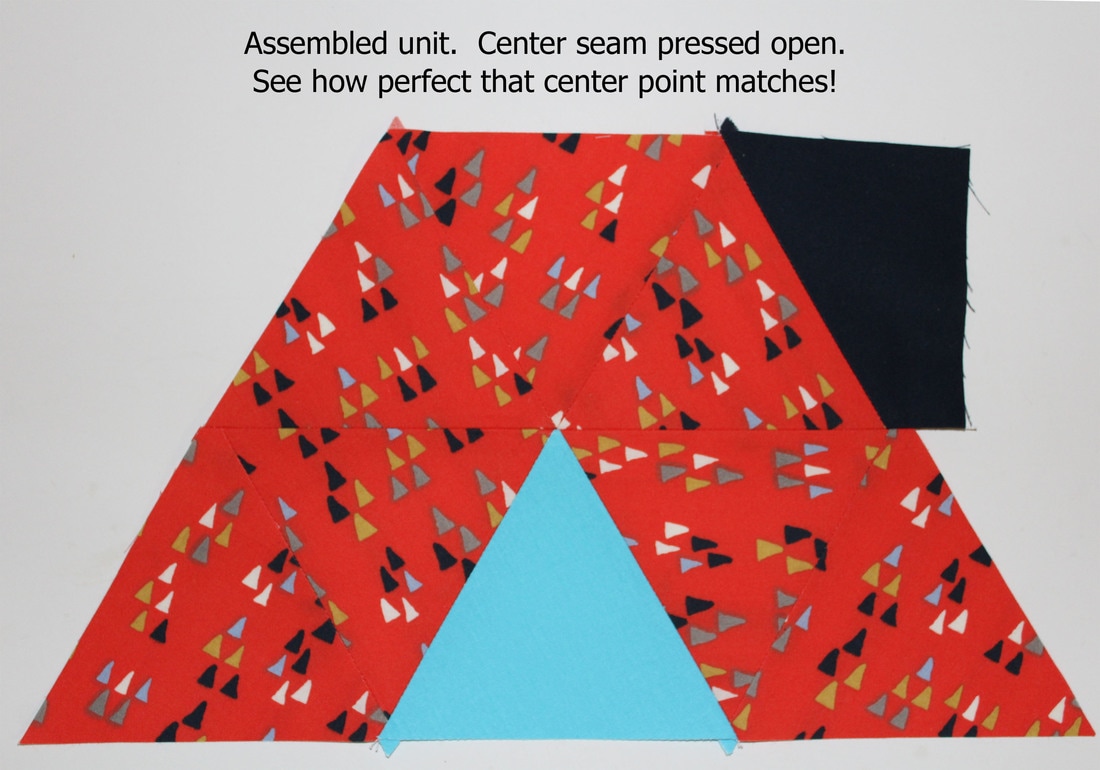
Now that the seam is stitched, open it up and make sure you like how your point looks. If you don't, redo it. If it looks great, carefully open up the seam and press the seam open. Remember, press don't iron. You don't want to stretch anything. Once you are done pressing, the unit should look like the photo above.
Continue sewing all of your two row "tipi" units together. Once that is complete it will be time to sew those units to the large triangles.
Continue sewing all of your two row "tipi" units together. Once that is complete it will be time to sew those units to the large triangles.
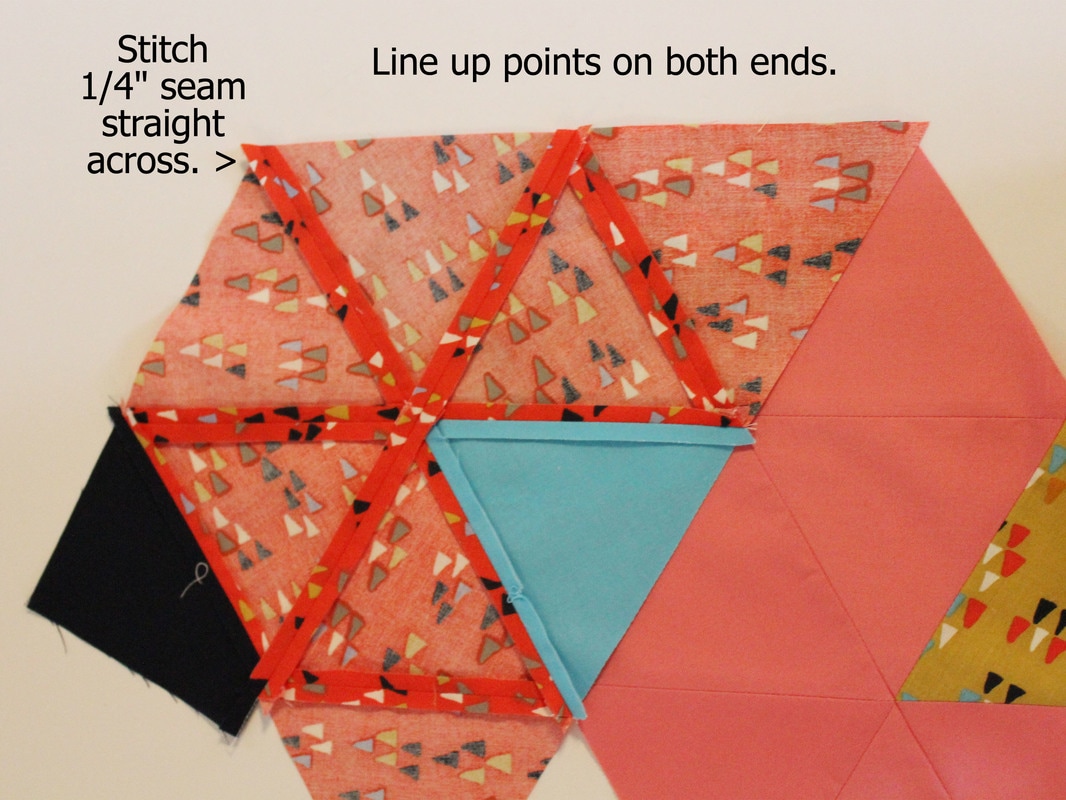
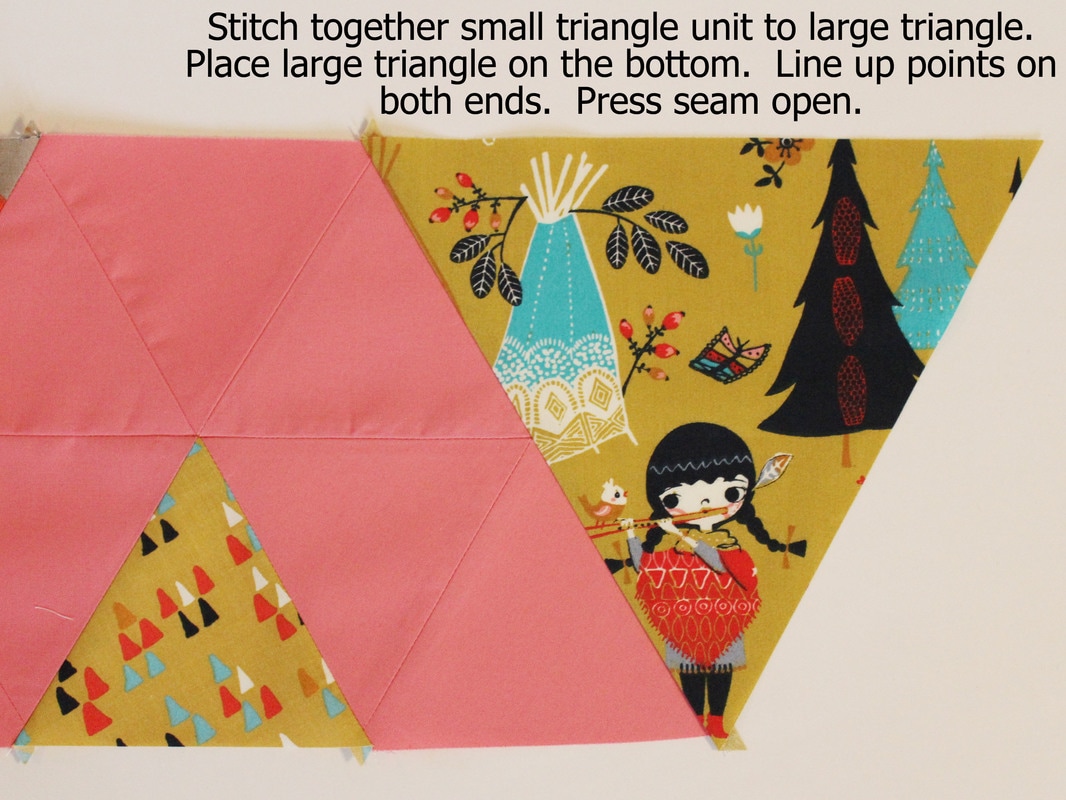
Placing the large triangle on the bottom, right side up, I put my "tipi" unit on top and line up the points on both ends. I find it easier to sew with all those seams on the top. I put a pin at both ends. Stitch a 1/4" seam straight across. If any of those little points are sticking out of the seam you just stitched go ahead and trim them off. Carefully press this seam open. Your finished unit should look like the photo below.
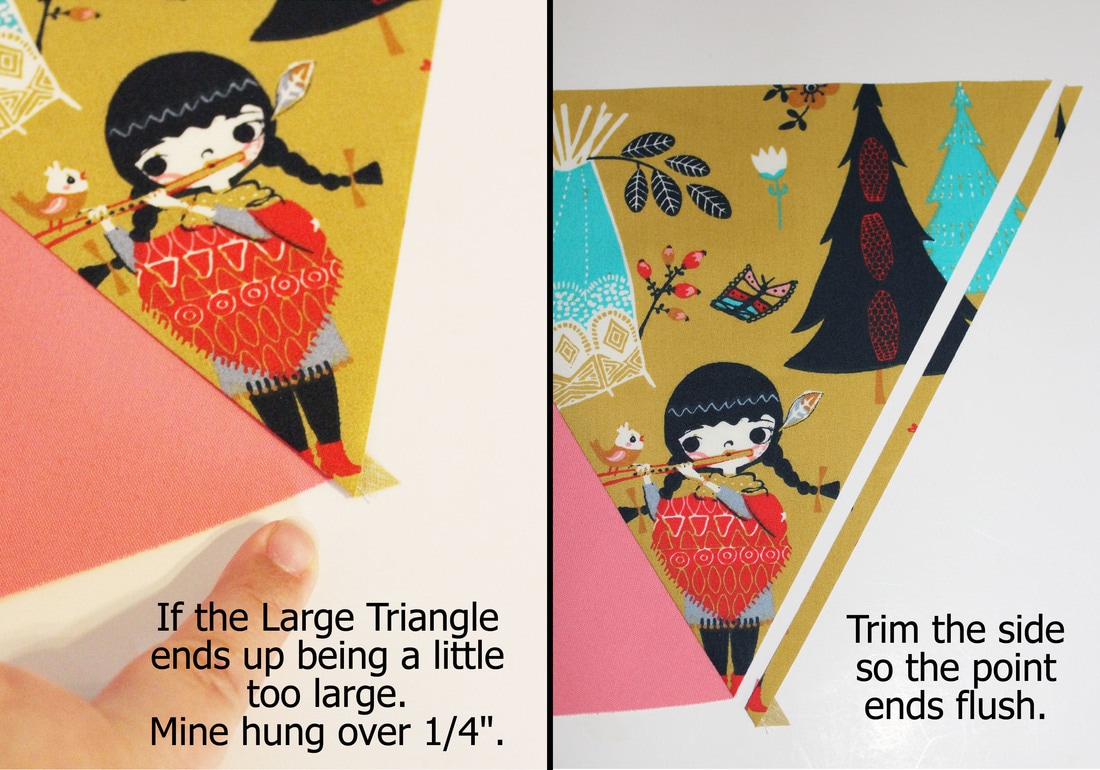
Sometimes (for a large variety of reasons) the large triangle may extend a wee bit from the edge. In my case it was 1/4." I am pointing to it above. You want that point to end at the bottom, otherwise if you sew it as is you will end up with a blunt triangle and no point. So we don't want that, we want pretty, perfect triangles. So if your large triangle ends up being a tad bit too large, take a ruler and carefully trim along the side so the bottom of the triangle meets perfectly with the bottom of the "tipi." On my example above you can see what I trimmed and that my point is now flush at the bottom. If you do end up having to trim, you will probably have to trim every large triangle, but it only takes a second and isn't a big deal.
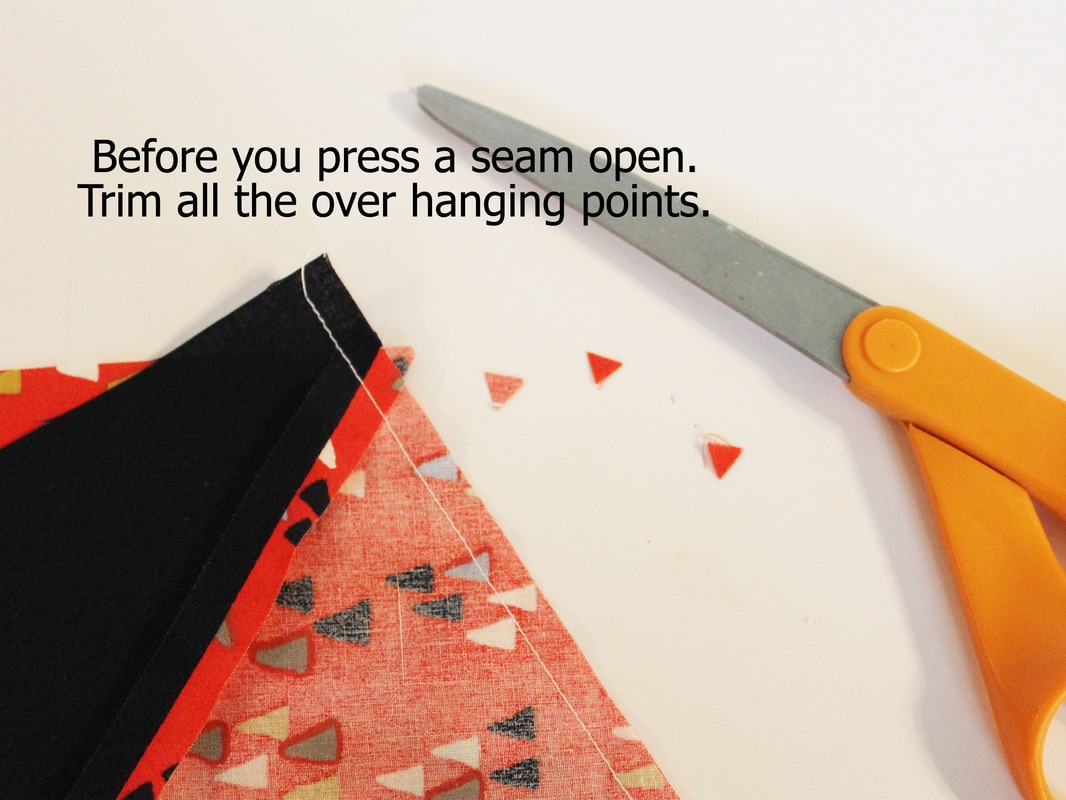
Keep in mind, before you press a seam open if you have any of those over hanging points, take a moment to trim them off.
Now continue sewing all of your two rows together until you have five large rows.
Now continue sewing all of your two rows together until you have five large rows.

You can sew together that top single row at any time. Just sewing a bunch of small triangles together.
Now let's finish this quilt up!
Now let's finish this quilt up!
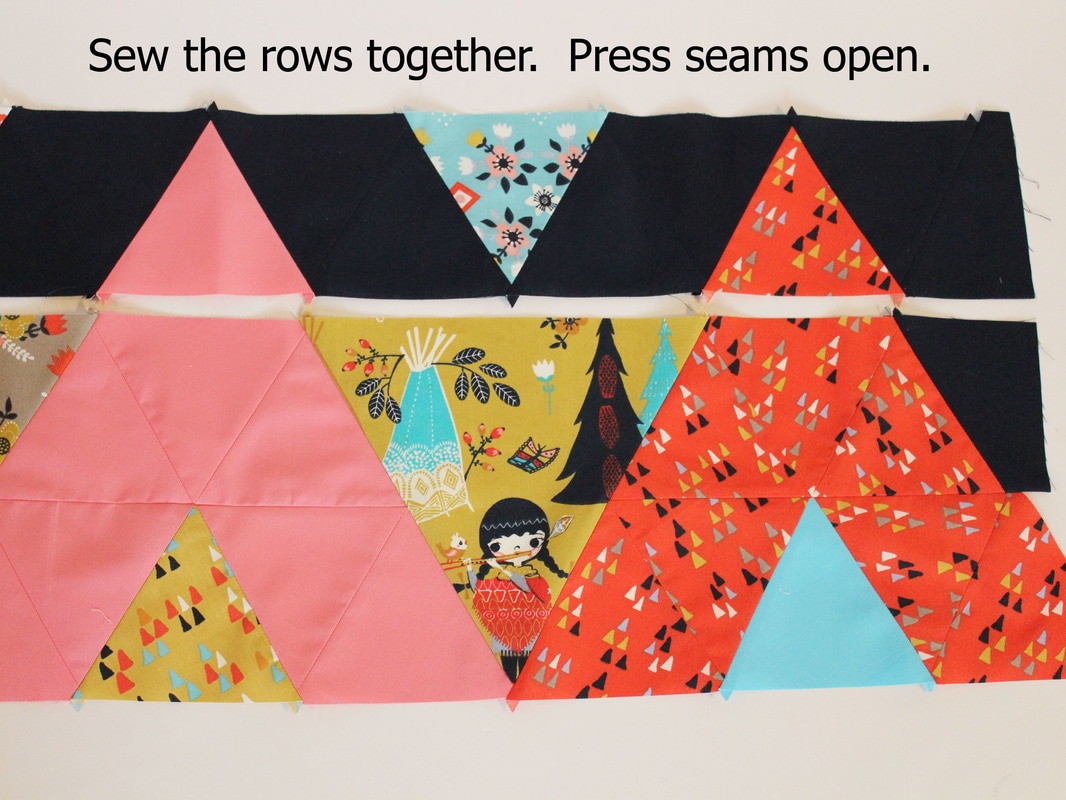
Starting with the top row, sew it to the row 2 and 3 grouping. I push pins in each of my points doing one at a time down the entire row, making sure all those points match up while pinning is much easier than picking out stitches and re-doing it later. I put row 1 on top because the large triangles will end up on the bottom (less seams) and I prefer to have more seams on top Stitch 1/4" across the whole row, check your points on the front, if they are good, trim any sticking out points and then press the seam open. Repeat this procedure until all the rows of your quilt are sewn together and you have a completed quilt top.
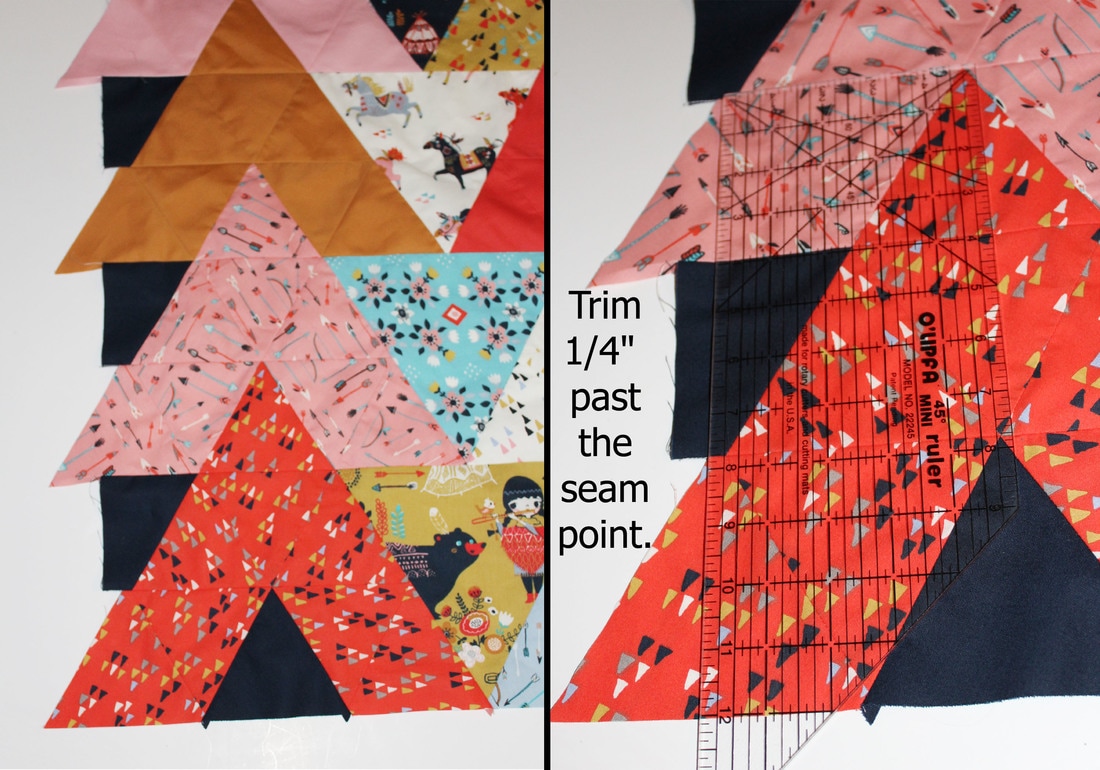
Now that the quilt top is complete, your quilt sides will look like the above left photo. Take your ruler and line up the 1/4" mark directly on top of the corner triangle seams, as you can see on the above right photo. Trim both sides. When you cut 1/4" away from the corner seam, once you add your binding you will maintain those perfect triangle corners and they won't be chopped off.
Congratulations you have a finished Tipi Quilt!
Congratulations you have a finished Tipi Quilt!
I would love for you to make one and if you do please tag me in any photos and use the hashtag #TipiQuilt.
If you need any help with the pattern, don't hesitate to contact me. Thanks for joining me today and I hope you enjoyed the pattern and tutorial.
If you need any help with the pattern, don't hesitate to contact me. Thanks for joining me today and I hope you enjoyed the pattern and tutorial.


 RSS Feed
