• Home
  • Blog
  • 2020 Finish - A - Long
  • 2019 Finish - A - Long
  • 2018 Finish - A - Long
  • Contact
  • 2017 Finish - A - Long
  • Shop
Marci Girl Designs

Tuesday at My Table - Round 8

11/29/2011

4 Comments

 
One of my all time favorite appetizers is so simple, easy and tasty, a 7 layer Mexican Dip.  Oh just thinking about it makes me want to make one.  It is great to make ahead of time (day before) and works year round, but is also great for this time of year because it is so easy and quick to make!  This is another recipe that I had never had until I met my in-laws, and then once I had eaten it, I thought, "Where have you been all my life?"
Picture
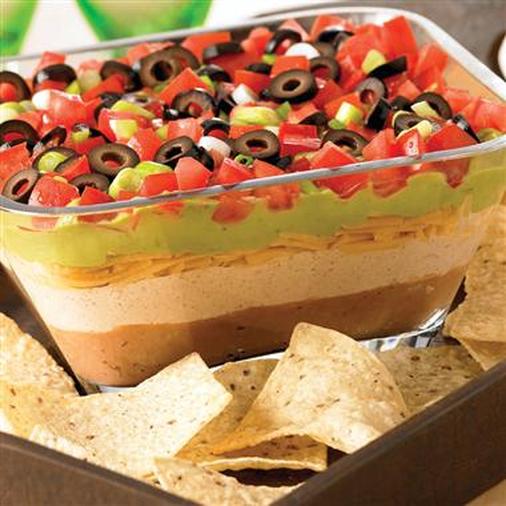
Photo Credit: www.ifood.tv

Seven Layer Mexican Dip

This recipe fills a 13x9 Casserole Dish perfectly and serves a crowd!

Ingredients:
2 cans Re-fried Beans
2 mashed Avocados
1 Tablespoon Lemon Juice
1 16 oz. container Sour Cream
1 packet Taco Seasoning
1 small can of chopped Black Olives
1 Tomato, chopped and seeds removed
1 8 oz. block of Cheddar Cheese, shredded
Chopped Green Onions

Directions:
1.  Spread Re-fried Beans in bottom of Casserole Dish.
2.  Mix together mashed Avocados and Lemon Juice in separate container, and then spread on top of first layer.
3.  Mix together Sour Cream and Taco Seasoning until well blended.  Make sure there aren't any unmixed seasoning "pockets."  Spread on top of Avocado mixture.
4.  Sprinkle shredded Cheddar Cheese on top of that layer.
5.  Sprinkle chopped Olives, Tomato and Green Onions as the final three layers on top.
Serve with favorite Tortilla Chips and Enjoy!

_Linking up to Tuesday at the Table over at A Quilter's Table.  Hop on over and visit the others and their great recipes!
4 Comments

Tuesday at My Table - Thanksgiving Edition

11/22/2011

3 Comments

 
It is always funny to me how everyone has different "traditional" dishes that they serve for Thanksgiving Dinner.  My family always seemed to have turkey, cranberries, cornbread dressing, green bean casserole and of course pumpkin pie.  My first Thanksgiving with my husband's family was quite different.  They had the traditional turkey, but I believe they forgot the cranberries or maybe didn't want them that year?  It was quite a shock.  They served a salad I had never heard of, small green peas with onions, rice dressing, sour dough bread...nothing I was familiar with, and quite honestly I was disappointed.  The one saving grace was another dish I had never had or heard of, Broccoli Casserole, and it was wonderful.  Second helping even though you are stuffed wonderful.  It comes from the same Aunt that blessed us with the Steak Fingers recipe.  The story should end here, but it doesn't.  Her delicious recipe is below.

Broccoli Casserole

Ingredients:
1 Stick of Butter
3 Packages Frozen Chopped Broccoli
1 Medium Onion, Finely Chopped
2 cups Cream of Mushroom Soup
1 Roll Garlic Cheese
Breadcrumbs
Optional: 1 Small Can of Chopped Mushrooms, Drained

Directions:
Cook Broccoli as directed on package and drain well.  Melt butter in skillet and add onions, saute for a few minutes until onions are soft and clear.  Cut cheese and melt with butter and onion mixture, stir constantly.  Add mushroom soup and stir (add can of chopped mushrooms if you wish.)  Spray casserole dish with Pam.  Layer Broccoli and then cheese mixture.  Repeat layering.  Sprinkle top with bread crumbs.  Bake at 350 degrees until bubbly or about 35 minutes.  Enjoy!
Picture
Photo Credit: www.genaw.com
I have only hosted Thanksgiving once at my house, and it was four years ago when my son was but a few weeks old, and we weren't really up to traveling.  I decided to fix that wonderful Broccoli Casserole, and acquired the recipe.  Here is where the problem comes in....after visits to 3-4 different grocery stores I was unable to locate that roll of garlic cheese.  After getting frustrated, I jumped online to locate it, only to discover that it has been discontinued and is no longer produced.  Great, now what?  So I started experimenting.  After trying several things, I found the next best thing, and now the Broccoli Casserole lives on, no it isn't identical, but it is darn close, and I guess as good as it gets.  And yes, it is pretty darn good.  My recipe is below.  So if you are looking for a non-traditional dish to serve at Thanksgiving, give this one a try, it is really easy!

Marci's Broccoli Casserole

_Ingredients:
1 Stick of Butter
3 Packages Frozen Chopped Broccoli
1 Medium Onion, Finely Chopped
2 cups Cream of Mushroom Soup
1 Jar of Cheese Whiz
2 Teaspoons Garlic Powder
Breadcrumbs
Optional: 1 Small Can of Chopped Mushrooms, Drained

Directions:
Cook Broccoli as directed on package and drain well.  Melt butter in skillet and add onions, saute for a few minutes until onions are soft and clear.  Pour in Cheese Whiz and melt with butter and onion mixture, stir constantly.  Add 2 Teaspoons of Garlic Powder, stir well.  Add mushroom soup and stir (add can of chopped mushrooms if you wish.)  Spray casserole dish with Pam.  Layer Broccoli and then cheese mixture.  Repeat layering.  Sprinkle top with bread crumbs.  Bake at 350 degrees until bubbly or about 35 minutes.  Enjoy!

_Linking up to Tuesday at the Table over at A Quilter's Table.  Hop on over and visit the others and their great recipes on this special Thanksgiving Week Edition!
3 Comments

November's Bee Blocks

11/18/2011

6 Comments

 
Picture
This month's bee blocks contained quite the variety of blocks and techniques, which was really nice.  First up (above) is for "Bannermkr" in the Quilting newBEES group.  This block was so easy and utilized a really cool tube sewing technique, the tutorial can be found HERE.  It was so easy to construct and seriously was the simplest block I have made in quite some time.  This will be a lovely Christmas quilt.
Picture
Next up are two blocks for "justabitfrayed" in the Bee Connected group.  This is a pattern that I have had "favorited" for a while called Garden Fence and I wanted to make myself, the tutorial can be found HERE.  These blocks were simple and straight forward, and she used the lovely Ruby line of fabrics, that I have now fallen hard for!  So pretty! Oh, and I swear these blocks weren't that wrinkly in real life!
Picture
Last but certainly not least, these lovely hexagon flowers are for "kristina.withak" in the Always Bee Learning group.  I have basted hexagons around a template before, but never actually hand sewn them together.  A great tutorial can be found HERE.  I was quite pleased with my results and you can't even see the stitching from the front (which is the point, but I was excited that it actually did turn out that way!)  I made these in two nights while watching TV and they provided some great hand work while zoning out in front of the boob tube!  The fabric for these flowers is Amy Butler's Soul Blossoms and this will be quite the stunning quilt.  I do know for sure now that making a few of these babies is great, but the idea of a whole quilt makes my head hurt, and I highly doubt I ever will be trying that amazing feat!
Picture
Picture
6 Comments

Thanksgiving Dinner Challenge

11/17/2011

8 Comments

 
Sara over at Sew Sweetness decided to host a Thanksgiving Dinner Challenge, which basically was for anyone who wanted to join up to make an oven mitt or hot pad in time for Thanksgiving.  I gladly joined up, knowing that I had already decided to make my son's Speech Therapist a set or two of potholders (or hot pads) as a Christmas gift for her.  I used my own pattern, and honestly the hardest part was choosing which fabric to use.  It is really hard to judge someone's tastes by their shoes alone, but since she always is wearing scrubs, the only "unique" thing I could use to determine her style are her shoes.  This didn't really help me much unfortunately.
Picture
Picture
This first set is my best judgement of what she would pick for herself, or what she would like the most.  It looks like her, fits her personality and I hope she likes them.  I am coining this set as her "spring set" of potholders.  I used two larger scraps that I had for these two, and the inside is composed of one layer of Insul-Bright and one layer of cotton batting.
Picture
Picture
This second set is more traditional, and more suited for a kitchen.  This is the "fall set" of potholders.  I figured by making two drastically different sets, she is bound to like at least one of them!  This set was made just like the first, and both sets should hold up for many years of future use!  I certainly hope she likes them!  Thanks Sara for hosting this challenge and giving me the kick in the pants to get these completed!
Picture
8 Comments

A Pregnancy Update...

11/16/2011

12 Comments

 
Picture
I thought I would share some 3D pictures that we had taken on Monday (11/14/11) of our baby boy.  I am currently 29 weeks and in my 3rd trimester, baby is doing great, measuring correctly and so far everything is just trucking along.  I am happy to say that I am feeling a tad bit better, and food isn't as disgusting to me anymore, which is really nice and makes a lot of food available that wasn't previously.  Maybe I will have a normal Thanksgiving, or at least be able to eat a little of everything!  That would be nice.

I had a little discussion with my Doctor on Monday regarding the fact that I had my first son prematurely at 35-36 weeks.  I basically was asking if I had my first son early, what are the chances that would happen again with this pregnancy.  I fully expected him to say that every pregnancy is different and you never know.  But.....instead he said the odds were really good that I would have this one prematurely as well.  I wasn't expecting that.  So we are now mentally preparing for this baby to be born around Christmas instead of his January 28 due date.  We would rather be mentally prepared (and physically prepared house wise) for an early birth than be totally surprised like we were with our first.  If I carry him longer, great (and we are really hoping for that) but, I am no longer going to be delusional that it won't happen early again.  This being said, I will be a little more vacant from my blog, preparing for not only the holidays, but also the arrival of our new baby boy.  I'm not disappearing, I just have to shift around my priorities at this point, and unfortunately it does involve a lot less sewing....BOO!  And yes, i am really sad about that aspect of this whole thing.  But what can you do?

The good news is that since I am having another little boy, we virtually have everything we need already, and I spent the day yesterday washing little baby clothes and organizing.  It is amazing to me that even though my first son wore all those items of clothing, I didn't even remember half of them, so I guess that says more about a new mom's frame of mind at the beginning!  HAHA  Wish me luck on my numerous projects and my one big really important one!
Picture
If you notice a weird discoloration on his cheek/nose region, apparently it is just something floating in the waters. Kinda yuck.
12 Comments

Tuesday at My Table - Round 6

11/15/2011

4 Comments

 
My mother-in-law has taught me A LOT about cooking, some good, some bad, but I am very thankful for every tidbit of information she has shared with me over the years.  I have eaten things at her house that I would have NEVER eaten before if it wasn't for her, and that is such a good thing.  One of the things that she taught me was a little pearl of wisdom that makes so much sense.  If you purchase a food item, and it comes with a recipe, it usually is really good.  Why?  Because the food manufacturer wants to show off their product in a recipe, and isn't going to give you a mediocre recipe, they are going to give you a really good one.  Now this doesn't apply all the time, I have tried some that were gross, but on a whole, the majority are fabulous!  That brings us to the recipe below.  I had never had a really good cold spinach dip, until I had it for the first time at my in-laws.  Low and behold, it wasn't a family recipe or secret, but rather the recipe off the back of a soup package mix.  So if you are looking for a great appetizer during this holiday season, pick up a pack of Knorr Vegetable Soup, Dip & Recipe Mix, usually found in the soup section, somewhere around the packaged stock, and whip up this delicious dip.  I think I'll be making some myself!
Picture
Photo Credit: Knorr.com

Knorr Spinach Dip

Makes about 4 cups.  Serve in a round bread bowl, or just a pretty dish!

Ingredients:
1 package (10 oz.) frozen Chopped Spinach, thawed and drained completely
1 (16 oz.) container sour cream
1 cup of Mayonnaise
1 package Knorr Vegetable Soup, Dip & Recipe Mix
1 (8 oz.) can Water Chestnuts, drained and chopped, optional
3 Green Onions, finely chopped

Directions:
In a medium bowl stir together all ingredients until well mixed.  Cover and chill for at least 2 hours to blend ingredients.  Stir well and enjoy!  Serve with cut up vegetables or crackers.

Linking up to Tuesday at the Table over at A Quilter's Table.  Hop on over and visit the others and their great recipes!
4 Comments

WIP Wednesday - Special Christmas Edition

11/9/2011

37 Comments

 
Picture
My normal WIP Wednesday list is on hiatus for while.  Between the holidays and my due date (in January) I am just focusing on what needs to get done NOW.  Instead I have decided to do a special edition Christmas WIP list!  The list above shows the things that I would like to get done before Christmas, all of these are gifts.  Honestly, in my head this list seemed a lot longer, so it really feels good to actually put pen to paper and write the list out.  It doesn't seem so overwhelming now, which is really a good thing.  Most of these items have not been started yet, but some are in the works, and others are in the "pulling fabric" stage, like the pillowcase below.

Two of the items are on the "if it doesn't get done, that is ok" list.  The bookbag is going to be for my son, and honestly if it doesn't get done, oh well.  The other is the table runner I am considering making for my mother-in-law, once again, if I get it done, great, otherwise, maybe next year.

The one project that I am smack dab in the middle of is the pirate blanket for my son.  I am making a large 25" x 26" block (seen below) from the Modern Blocks book.  It is almost finished (the water is laying down and is Heather Ross mermaids and fish.)  I just have to add borders so that the finished size is closer to 36" x 40."  I have not decided how to quilt this one yet (machine or hand) we shall see what time permits!  Wish me luck on all my projects, I may need it!
Picture
Supplies for Pillowcase. Most of the prints are from Tanya Whelan.
Picture
Pirate blanket for my son. Please excuse my stray threads!
WIP Wednesday at Freshly Pieced
Congratulations to Lee!  She has officially been hosting WIP Wednesday for one whole year now!  Head over to Freshly Pieced to have a look at what everyone else is working on and a chance to win some great prizes!
37 Comments

Tuesday at my Table - Round 5

11/8/2011

5 Comments

 
My husband's Aunt shared with me a delicious recipe for something that I had never heard of or eaten before.  Steak fingers.  Can I sum it up in one word?  Yes, absolutely delicious!  The reason I am sharing this recipe today, is because my husband and I have been eating a lot of steak lately.  I crave it all the time, probably because my iron levels are low and I am craving iron filled things.  Anyways back to the point, our discussion was over the fact that we know of no restaurants that serve this dish, and why not?  So then we said we needed to open our own restaurant (kidding.)  Oh well, until a local restaurant (or chain) decides to serve this dish, I am stuck making it for myself.  I am sure my version would taste better anyway!
Picture
Click on the photo to visit Easy Everyday Cooking for another version of this recipe. Photo Credit: Easy Everyday Cooking.com

Steak Fingers

Ingredients:
1/3 cup Vegetable Oil
1 pound Round Steak
2 Eggs
1/2 cup Milk
1.5 cups All Purpose Flour
Cajun Seasoning (like Tony Chachere's) to taste
Salt and Pepper to taste

Directions:
Tenderize steak by pounding with a mallet.  Cut into 3 inch long strips by about 1/2 inch wide.  Combine egg, milk, salt and pepper in a shallow dish, stir until well blended.  Combine flour and Cajun seasoning in a gallon Ziplock bag.  In a large skillet over medium heat, heat the 1/3 cup Oil (or enough to cover the bottom of the pan.)  Coat steak pieces in flour, shake off excess.  Dip into egg mixture, then dip into flour mixture again.  Fry the strips in the hot oil until golden brown, around 2-3 minutes.  Transfer to a plate lined with paper towels to absorb oil.  Serve, and enjoy!

Linking up to Tuesday at the Table over at A Quilter's Table.  Hop on over and visit the others and their great recipes!
5 Comments

Scrapbuster Swap - Round 3 & 5

11/7/2011

5 Comments

 
Picture
Picture
Picture
Picture
Picture
These are the latest blocks I created for Round 5 of the Scrapbuster Swap.  This round was Christmas themed (obviously) and we had two options, wonky stars with white background or white wonky stars with colored background.  I chose to create 5 of each.  The funny part was that I was worried I wouldn't be able to make them "wonky enough."  I didn't have that problem, if anything they are super wonky.  I am hoping to make some table runners for Christmas gifts, but we shall see.  If you want to know how to make these blocks yourself, the tutorial is HERE.

The blocks below are what I received from Round 3 of the Scrapbuster Swap, plus the addition of one that I made for myself.  I love the diversity of the blocks, though I am still undecided as to what I will be doing with them.  I think for now they will have to wait until next year.  I love participating in this swap, and it is always so exciting to get that package and see what you get in return!  You can join in on this swap at any point, so I hope to see you all in Round 6!
Picture
Picture
Picture
Picture
Picture
Picture
5 Comments

Charm Swaps

11/4/2011

8 Comments

 
Picture
BonBon by Echino
The lovely Sara over at Sew Sweetness hosted an Echino 10" square swap a few months back.  She choose 10" over the normal 5" swap because Echino fabrics are usually larger prints and patterns and with 10" you get a bigger chunk of fabric.  Cool right?  I jumped right in, because I love Echino fabrics!  The fabric above is the one that I picked for my choice.  I sent it to her and just waited to see what lovelies I would get back!
Picture
Picture
Here are all the lovelies I received from the swap!  No duplicates, 28 different prints/colorways of Echino fabric!  I love it!
Picture
This past month, Sara decided to host another round since the newest Echino fabric line was due in stores any minute.  Of course I signed up again.  I do believe that the majority of prints in this round will be new prints, and there will be very few duplicates from the first round, which I am really excited about.  The bird print below was my choice for this round.  I can not wait to see what we receive in turn!  Thanks Sara for hosting such a great swap and for all your hard work!
Picture
Migratory Birds by Echino
Yellow Aqua Gray Charm Swap
The super sweet ladies over at Craft Buds and Crafty Girl Workshop hosted a yellow, aqua, gray 5" charm swap.  I love these three colors together, so of course, I signed up for this one too!  Below is my gray fabric choice.  i can not wait to see all the squares we receive in this swap!

Now all I have to do is decide what to do with all this fabric, which seems to be a running theme in my life these days!
Picture
Silent Cinema by Jenean Morrison
8 Comments
<<Previous

    Marci Girl

    A feisty mom designing, sewing and blogging her way through everyday life!

    Subscribe
    Follow on Bloglovin
    Picture
    Follow on Bloglovin


    Categories

    All
    2017 Finish A Long
    2018 Finish A Long
    2019 Finish A Long
    Bee Sewcial
    Book Reviews
    Clothing
    Everyday Life
    Giveaways
    Handbags
    Handstitched Class
    Inspirational Projects
    Marci Girl Designs
    Projects
    Quilt Along
    Quilting Bees
    Quilts
    Random Thoughts
    Recipes
    Sew Along
    Sewvivor
    Style Stitches
    Swaps
    The Penny Sampler Class
    Tutorials
    Wip Wednesday


    Happily
    Participating In:

    Picture
    Picture
    Picture
    Picture
    Picture
    Picture

    Picture


    Archives

    January 2020
    November 2019
    October 2019
    July 2019
    April 2019
    March 2019
    February 2019
    January 2019
    December 2018
    October 2018
    August 2018
    July 2018
    June 2018
    May 2018
    April 2018
    March 2018
    February 2018
    January 2018
    December 2017
    November 2017
    October 2017
    September 2017
    August 2017
    July 2017
    June 2017
    May 2017
    April 2017
    March 2017
    February 2017
    January 2017
    April 2016
    March 2016
    February 2016
    January 2016
    September 2015
    July 2015
    October 2014
    September 2014
    August 2014
    July 2014
    June 2014
    May 2014
    April 2014
    March 2014
    February 2014
    January 2014
    November 2013
    October 2013
    September 2013
    August 2013
    July 2013
    June 2013
    May 2013
    April 2013
    March 2013
    February 2013
    January 2013
    November 2012
    October 2012
    September 2012
    August 2012
    July 2012
    June 2012
    May 2012
    April 2012
    March 2012
    January 2012
    December 2011
    November 2011
    October 2011
    September 2011
    August 2011
    July 2011
    June 2011
    May 2011
    April 2011
    March 2011
    February 2011
    January 2011
    December 2010
    November 2010
    September 2010
    August 2010
    July 2010
    June 2010
    May 2010
    April 2010
    March 2010
    February 2010

    Picture

    RSS Feed

Powered by Create your own unique website with customizable templates.