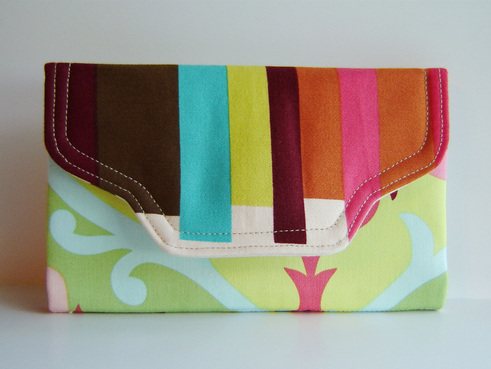
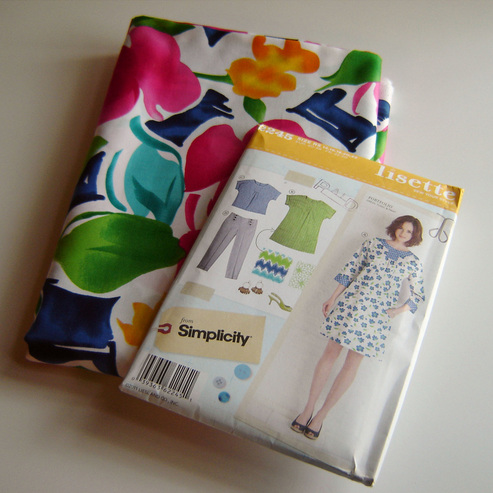
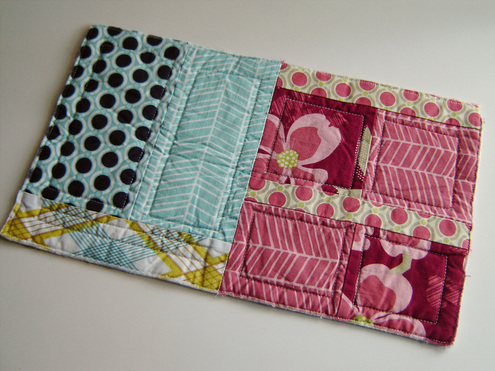
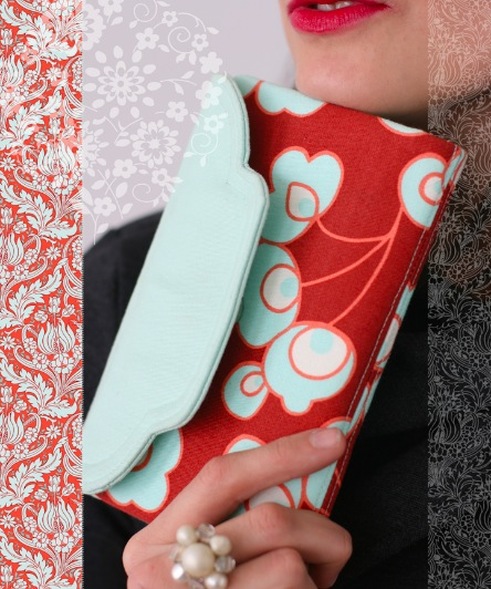
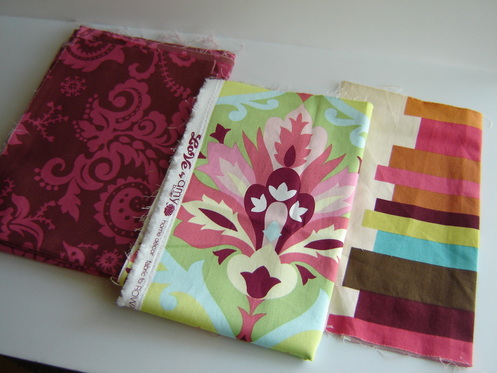
Finished! Guess what? I love it! The brilliant part, I don't really have any complaints about it either! Of all the Amy Butler bags I have made so far, I think this one had the easiest, clearest instructions. I really love these fabrics together, though next time I would center the pattern on the main body, but I was using up scraps, so oh well. 
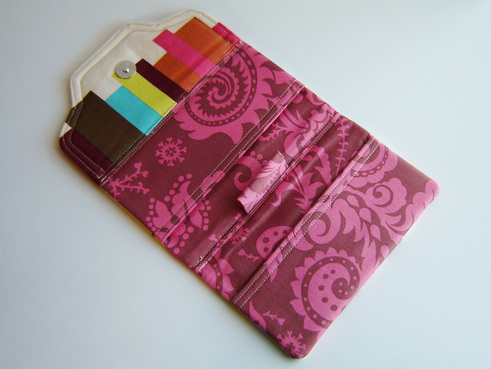
My only suggestion to those of you who haven't made it yet, is to carefully pay attention to the placement of the magnetic snaps. The wording on this step is a little funny, and I could see how you could easily mess it up. Also, don't expect for the square corners to perfectly push out either. If you look at mine open (above) you can see the bottom corners are pretty round. There is just too much thickness for it to be perfectly square. After all my frustration with last months bags, I was really pleased at how quickly this came together and honestly it only took a few hours. The longest part is probably cutting it out and interfacing everything. I liked it so much, I plan to make another!
3 Comments
What happens when the weather is rainy and gloomy three days before Wednesday? That's right, no photos! Normally, I just wouldn't post at all, but this week I decided to go the silly route! So you are going to have to use your imagination! I finished my Style Stitches Checkbook Cover, and I honestly think it turned out great and was so much easier than previous Amy Butler projects, yippee! I also finished up my pouch for the Pretty Little Pouch Swap, also quite happy with the results! I will be posting about both of these projects as soon as I can take pictures. My Advent Calender Quilt is back from the long arm quilter and is now awaiting a binding, which I already have cut and ready to sew on! Plan on doing that today! Very excited to get this project wrapped up. I joined a sew-along this week to make a tunic for myself, you can read more about it HERE. I need to get working on this, and am quickly falling behind. That is all I have today folks! Sorry I don't have any photos, hopefully next time. Hopefully you had a successful week and were able to accomplish a lot! Finished Projects: Amy Butler's Style Stitches Beautiful Balance Checkbook Cover Pretty {Little} Pouch Swap Ongoing Projects: Organizing my OUT OF CONTROL Fabric Stash (65% complete) Bottled Rainbows Ticker Tape Quilt-Along (5 of 16 blocks complete) Lily's Quilts Quilt-Along (Using Sherbet Pips) Advent Calender Quilt (Back Home and Awaiting Binding) Making a Light Box (Supplies bought, partly assembled) Sewing (for myself) a few tops/shirts. Other Random Projects: (These are not counted in my weekly stats!) A Box Full of Alterations and Random "Fix It" Projects. Roughly 150 + Items that are Finished and Need to Be Photographed for my Shop. This Week's Stats: New Projects - 1 Completed Projects - 2 Currently in Progress - 6 Dream Projects On Hold For Now: A Cathedral Window Quilt Cutting into the stack of Home Dec fabric to make Mary Rose Clutches. Sock Monkey Quilt Denyse Schmidt Home Dec Fabric Wall Hanging Quilt Making a bunch of clutches from a new pattern that I have purchased. Head over to Freshly Pieced to have a look at what everyone else is working on!
Have you ever seen the show "My Name Is Earl?" My husband and I loved it, it was silly, the acting was great, it is a shame it isn't on anymore. What is my point? Well the point of the show was "Karma." Do good things, good things come back to you, do bad things, and guess what bad things happen! Simple enough. I have been trying to practice this concept more and more lately, sometimes I succeed, sometimes fail, but heck, at least I'm trying! All of this has a point that I'm about to get to.... A little over a week ago Denyse Schmidt released a brand new line of fabric for the chain fabric store, Jo-Ann's. The internet has been a-buzz, everyone is really excited, myself included. How great, you can run into town, and pick some up! You can even use coupons! Yeah! My first trip was a little over a week and a half ago, I had coupons in hand, and a list of other things I needed, especially some of the (also new) Lisette fabric that was 50% off! I found (and purchased) the Lisette fabric I was looking for, but they did not have the Denyse Schmidt fabric....boo! While waiting in the extremely crowded and extremely long line to get my fabric cut, there was a year old? baby in front of us with her mom. This child proceeded to scream (louder than any adult I have ever heard) and scream, and scream for about half an hour straight. My son (in his stroller) even seemed annoyed. Can I say head ache. When I got home, I complained to everyone that would listen about this annoying kid and how her mother didn't really do anything, and just stood there while this kid wailed and wailed. Now before you start judging me....wait. After a few days went by, I couldn't stand it and decided to make another trip back to Jo-Ann's to see if they had finally put out any of the Denyse Schmidt fabric. I FOUND IT! So excited, I threw my son in the shopping cart and proceeded to load up the 11 bolts they had, to get the fabric cut. That is when it started, the screaming, the crying, the crazy bad behavior from guess who? Yep, my son! What did I do? I went and got my fabric cut, are you crazy, what did you think I did! What did my son do? He screamed the entire time! What was the reason for all this craziness? KARMA! She got me, she won! If you complain about a screaming kid, you kid will be the next to do it. I learned my lesson, the hard way.
This week I have decided to participate in a sew-along! The basic premise is that someone in blog land posts a "how to" all week long, and those of us at home follow along, at the end of the week, you have a finished product! The two lovely ladies of Pickup Some Creativity and Gwenny Penny are hosting this sew-along and they are using the brand new Lisette pattern from Simplicity. I originally saw these new patterns a few months ago, and originally couldn't find them in the stores locally, but when I did find them (for $1.99) I snatched three of them up! I have been saying for a while that I wanted to make myself some tops, so now is the time! I will be making a muslin first (which I never do) but, I really don't want to mess up the fabric I bought (above) and I really want this thing to fit! I have a bunch of fabric that I bought a while back from the $1 a yard section at Walmart and am going to cut into it first before using the Lisette Fabric I purchases specifically for this shirt. I would much rather mess up $2 worth of fabric rather than $12 worth of fabric. I will technically be making View A, but lengthening it a bit to a tunic instead of a short shirt. I also want the short sleeves of View A, it is to hot in South Louisiana for those longer sleeves! This sew-along also corresponds to the Spring Top Sew-Along being hosted by Made by RAE. I have until May 6th to get this baby finished and photographed, so I better get to work!
Hello Swap Partner,
I know that you will receive this pouch, but you have no clue that I have your name. These are the fabrics I have chosen for your pouch. Do you like them? I sure hope so! I am playing with patchwork, and a little hand embroidery, and a box shaped pouch. I really like your inspiration photos, and have so many ideas.... Until next time, Marci Week 10. Really? Wow! I guess I'll keep it short and sweet, I didn't start anything else (technically) or finish anything (technically.) Why technically? Well I did complete a guest blog/tutorial. Was that on my list? No, but it counts darn it! I am keeping up with my Lily's Quilts QAL, and that is what I worked on this week! I put on the borders and now it is ready to quilt using the quilt as you go process that I blogged about yesterday. Very excited to get that started! That is it folks! Wish me a more productive week next time! P.S. I ended with two photos of a beautiful iris blooming in my yard and I wanted to show an un-cropped, un-photoshoped picture at the end. How do you like my shoes? Finished Projects: Nothing - Ughhh Ongoing Projects: Pretty {Little} Pouch Swap Organizing my OUT OF CONTROL Fabric Stash (65% complete) Bottled Rainbows Ticker Tape Quilt-Along (5 of 16 blocks complete) Lily's Quilts Quilt-Along (Using Sherbet Pips) Advent Calender Quilt (Off to be Machine Quilted) Making a Light Box (Supplies bought, partly assembled) Amy Butler's Style Stitches Beautiful Balance Checkbook Cover (Fabrics Cut Out) Other Random Projects: (These are not counted in my weekly stats!) A Box Full of Alterations and Random "Fix It" Projects. Roughly 150 + Items that are Finished and Need to Be Photographed for my Shop. This Week's Stats: New Projects - 0 Completed Projects - 0 Currently in Progress - 7 Dream Projects On Hold For Now: A Cathedral Window Quilt Cutting into the stack of Home Dec fabric to make Mary Rose Clutches. Sock Monkey Quilt Denyse Schmidt Home Dec Fabric Wall Hanging Quilt Making a bunch of clutches from a new pattern that I have purchased. Sewing for myself a bunch of new tops/shirts. Head over to Freshly Pieced to have a look at what everyone else is working on!
Have you ever wondered what "quilt as you go" was? Or how to do it? You are in luck! I have a great tutorial brought to you today by the lovely Leanne of she can quilt and myself! We are guest posting today over at Lily's Quilts, click here to check out her awesome blog, full of tutorials and all sorts of goodies! The photos below are mine, but all of the wording is Leanne (which is really the hard part, to me anyway!) Enjoy the tutorial: Today Leanne from she can quilt and Marci from Marci Girl Designs are blogging together as a guest post on Lily's Quilts. To us, one of the scariest parts of a QAYG approach to quilt construction is how to join all those blocks without making a HOT MESS. Would the quilt have lumpy seams? Would the batting wad up into bumps? One method is to leave the off the backing while you quilt the front and batting together. Then you sew together the front/batting blocks and add the backing at the end. This allows you to have a continuous backing piece but the quilting from the front will not show on it. Penny at sewtakeahike has a tutorial for this method here. Some methods use strips applied with, or without, additional batting between the QAYG blocks. The strips can be wide or skinny and add an interesting design element to the quilt. Marianne at The Quilting Edge has tutorials here and here. Sew We Quilt @ Stash Manicure has a tutorial here. Monica at the Happy Zombie has a tutorial here. Another interesting approach is to bring the backing fabric to the front between the QAYG blocks and use it as a sashing. There is a video by Penny Halgren showing this method here. This tutorial from Mary Ann at Rocknquilts, explains how to join the batting with an iron-on tape specially designed for batting. This idea is intriguing, but we are not certain that it would work easily in a tight spot and it requires you to purchase the special iron-on tape. Marci and I wanted a slightly different result. We wanted:
Here is our approach: Quilt your blocks with the backing fabric in place. Make sure your back fabric and batting are larger than the front block. This gives you something to hang onto while you quilt and the extra for the joining of the blocks later. Leave about 1 inch unquilted at the edges of the front fabric. Align the two blocks and place them right sides together. Fold and pin the batting and backing fabric out of the way. If your fronts are out of line, trim them. Stitch your front fabric, right sides together with a 1/4 inch seam. Press open the front seam. Be careful to use a heat setting on your iron suitable for your batting. With the back of the blocks facing you, lay the piece flat and pin back the backing fabric. Carefully trim the batting with scissors so that when it is lying flat both sides of the batting touch but do not overlap. Perfection is not required here, batting is forgiving. Fold the blocks, right sides together. Push the seamed front fabrics into the fold and pin them out of the way. Pin the batting together. Sew the batting together using a blanket stitch ( _l_l_l_l_ ) or a short zig zag ( vvvvvv ). Stitch slowly so that the needle goes into the two pieces of batting on one side and goes over the edge of the batting into nothing on the other side. When you are done, open the seam and smooth the batting or give it a very gentle tug to flatten it out. The idea is similar to a flatlock that you can do with a serger. You may want to test this out on some scrap pieces of batting to get the best size of stitch to achieve this with your sewing machine. The goal is to secure the pieces of batting together without creating an overlap or lumpy seam. The last step matches some of the tutorials mentioned earlier. Trim the backing fabric if needed so that the pieces overlap about 1/2 inch when smoothed out. On one side, fold and iron under 1/4 inch of backing fabric. You may want to hang one side over the ironing board to make this easier. Then place the back fabric with the turned-under side on top, smooth, pin and hand sew it in place. The photo below shows this sample after it was finished, washed and dried. Repeat for all your blocks, horizontally row by row and then vertically row by row. We are going to use this method on our huge Dresden blocks from Lily's Quilts QAL. If you decide to give this a try, let us know how it works out. Best, Leanne and Marci Thanks so much to Lynne for having us today! A huge Thanks to Leanne for all the hard work! I have so enjoyed working with you on this three country collaboration! It is amazing to me that a gal from Louisiana, Britain and Canada can work together (without ever having met) to come up with something so useful! Thanks ladies, it has been fun!
Happy Wednesday! I've been steady working, just haven't finished anything lately! I completed three more Bottled Rainbows blocks, they are really fun, and I love how they are coming along. I am keeping up with Lily's Quilts Quilt Along, you can see a sneak peak below (last photo) I have all four circles set in their "frames" and now just need to finish adding borders around each one. I figured out which Quilt As You Go method I am going to use for that quilt, and am excited to get to that stage of the process! My one new project this week is the Pretty {Little} Pouch Swap on Flickr. It is my first swap on Flickr, I have been assigned my partner and am super excited to work on this secret swap! You can read more about it HERE! Finished Projects: Three Bottled Rainbows Blocks Ongoing Projects: Pretty {Little} Pouch Swap Organizing my OUT OF CONTROL Fabric Stash (65% complete) Bottled Rainbows Ticker Tape Quilt-Along (5 of 16 blocks complete) Lily's Quilts Quilt-Along (Using Sherbet Pips) Advent Calender Quilt (Off to be Machine Quilted) Making a Light Box (Supplies bought, partly assembled) Amy Butler's Style Stitches Beautiful Balance Checkbook Cover (Fabrics Cut Out) Other Random Projects: (These are not counted in my weekly stats!) A Box Full of Alterations and Random "Fix It" Projects. Roughly 150 + Items that are Finished and Need to Be Photographed for my Shop. This Week's Stats: New Projects - 1 Completed Projects - 0 Currently in Progress - 7 Dream Projects On Hold For Now: A Cathedral Window Quilt Cutting into the stack of Home Dec fabric to make Mary Rose Clutches. Sock Monkey Quilt Denyse Schmidt Home Dec Fabric Wall Hanging Quilt Making a bunch of clutches from a new pattern that I have purchased. Sewing for myself a bunch of new tops/shirts. Head over to Freshly Pieced to have a look at what everyone else is working on!
How does that song by Whitesnake go? Oh yeah, "Here I go again, on my own...." that about sums up how I feel about starting this project. I sure hope it goes a lot smoother than the last one. It certainly looks cute, and there aren't any zippers, and the checkbook cover I am using now is ugly, vinyl and tearing, so a new one would be nice. The first step is to pick out the fabrics that you plan on using. I have chosen some Amy Butler "Love" fabric as the main body (the center fabric,) and a remnant of Anna Maria Horner for the flap (the fabric on the right, below,) and I think the two toned rose print is also by Amy Butler, but honestly I'm not sure, but it will be the interior print. I love the Anna Maria Horner print and have been waiting to use this small piece on something special, and hopefully this project turns out OK! I guess you will have to check back later this month to see the finished results. Wish me luck...
I have officially signed up for my first flickr' swap! How fitting that it would be pouches! The premise of this swap is that I will be assigned someone, that I will then make a pouch for (smaller than 12".) I will use their blog or flickr' account to learn about them, and everyone in the group is creating a collage of inspirational photos to give the person who gets them an idea of what they like and their own personal style. The whole thing is done in secrecy and you don't know who has you until you get your pouch in the mail! Sounds fun doesn't it! I am super excited! Below is my inspirational collage for this swap. I love every one of these pouches/details in their own way! The little squirrel up top is so cute, and how about that super colorful funky sun, did you notice the awesome embroidered human heart! Flickr' is amazing for the sheer amount of talented people creating and sharing their creations. My husband says that the Disney ride "It's a Small World" warped my brain at a young age, and maybe so, but I sure love all the rainbows of colors! 1. Squirrel Pouch, 2. Puffy Pouch, 3. ..., 4. such a star., 5. Little house pouch, 6. kawaii patchwork pouch, 7. Grumpy kitty pouch, 8. Pouch Pyramid, 9. Rosie pouch, 10. Logcabin Pouch, 11. Fatquartlerly inspired :-), 12. gnome friends patchwork pouch, 13. New size - winter modern girl round pouch, 14. The XL, 15. linen patchwork zipper pouches, 16. Pouch for partner, 17. new 2CV pouch, 18. a truly foxy pouch..., 19. Linen House Bag WIP, 20. Babushka pouch Created with fd's Flickr Toys www.bighugelabs.com/
|
Marci GirlA feisty mom designing, sewing and blogging her way through everyday life!
|