• Home
  • Blog
  • 2020 Finish - A - Long
  • 2019 Finish - A - Long
  • 2018 Finish - A - Long
  • Contact
  • 2017 Finish - A - Long
  • Shop
Marci Girl Designs

Quilt As You Go Tutorial

4/19/2011

48 Comments

 
Have you ever wondered what "quilt as you go" was?  Or how to do it?  You are in luck!  I have a great tutorial brought to you today by the lovely Leanne of she can quilt and myself!  We are guest posting today over at Lily's Quilts, click here to check out her awesome blog, full of tutorials and all sorts of goodies!

The photos below are mine, but all of the wording is Leanne (which is really the hard part, to me anyway!)  Enjoy the tutorial:
Picture
Finished Quilted Blocks
Today Leanne from she can quilt and Marci from Marci Girl Designs are blogging together as a guest post on Lily's Quilts.

To us, one of the scariest parts of a QAYG approach to quilt construction is how to join all those blocks without making a HOT MESS. Would the quilt have lumpy seams? Would the batting wad up into bumps?

One method is to leave the off the backing while you quilt the front and batting together. Then you sew together the front/batting blocks and add the backing at the end. This allows you to have a continuous backing piece but the quilting from the front will not show on it. Penny at sewtakeahike has a tutorial for this method here.

Some methods use strips applied with, or without, additional batting between the QAYG blocks. The strips can be wide or skinny and add an interesting design element to the quilt. Marianne at The Quilting Edge has tutorials here and here. Sew We Quilt @ Stash Manicure has a tutorial here. Monica at the Happy Zombie has a tutorial here.

Another interesting approach is to bring the backing fabric to the front between the QAYG blocks and use it as a sashing. There is a video by Penny Halgren showing this method here. This tutorial from Mary Ann at Rocknquilts, explains how to join the batting with an iron-on tape specially designed for batting. This idea is intriguing, but we are not certain that it would work easily in a tight spot and it requires you to purchase the special iron-on tape.

Marci and I wanted a slightly different result. We wanted:
  • a clean join on the front seam without adding any kind of design element to the front or the back of the quilt,
  • the batting securely joined so it would not shift into a lump,
  • as little hand sewing as possible,
  • no bulky seam from sewing the front and the batting together,
  • the quilting to show on the back of the quilt.
So we got into a discussion, exchanged ideas and made some impossible suggestions. That puzzle led us to think harder and come up with the method we are sharing here. Although we are both sure others have solved this problem in the same way, it was not something we had read or heard about before. We both made a small sample quilt to test this approach and we washed and dried the samples. So far, so good.

Here is our approach:
Picture
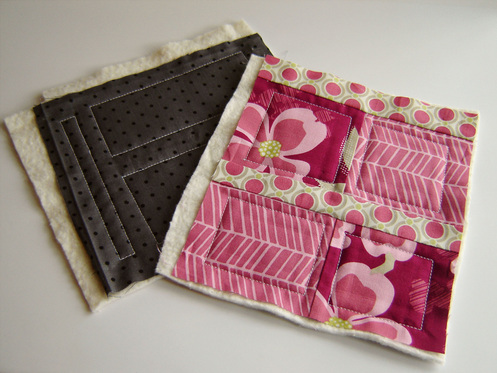
Front and Back of Quilt Blocks
Quilt your blocks with the backing fabric in place. Make sure your back fabric and batting are larger than the front block. This gives you something to hang onto while you quilt and the extra for the joining of the blocks later. Leave about 1 inch unquilted at the edges of the front fabric.
Picture
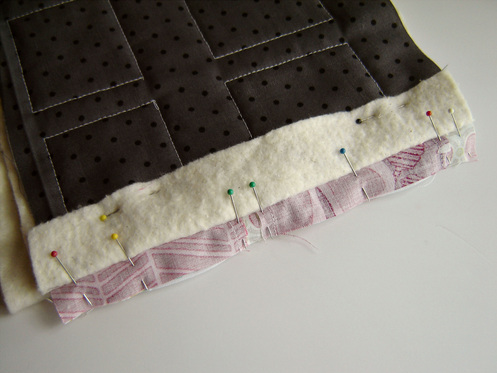
Align the two blocks and place them right sides together. Fold and pin the batting and backing fabric out of the way. If your fronts are out of line, trim them. Stitch your front fabric, right sides together with a 1/4 inch seam.
Picture
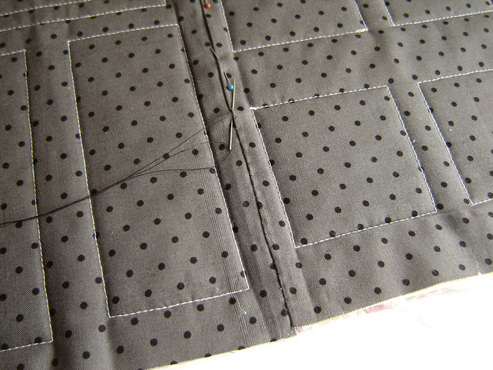
Press open the front seam. Be careful to use a heat setting on your iron suitable for your batting.
Picture
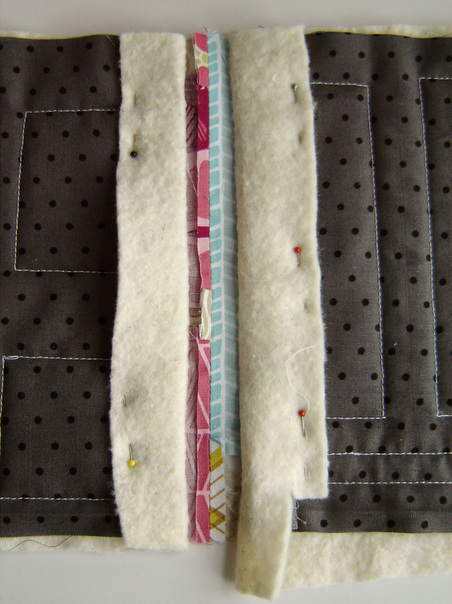
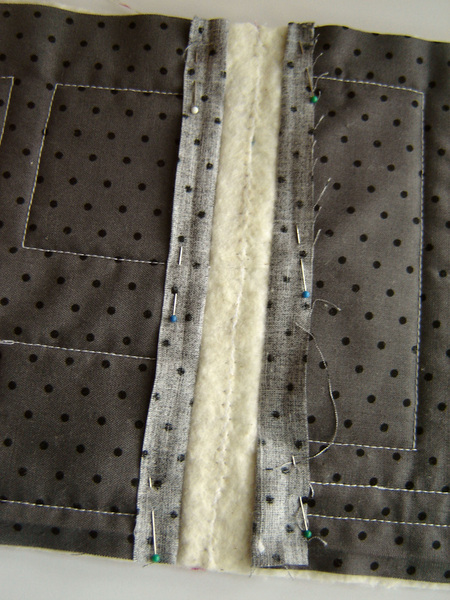
With the back of the blocks facing you, lay the piece flat and pin back the backing fabric. Carefully trim the batting with scissors so that when it is lying flat both sides of the batting touch but do not overlap. Perfection is not required here, batting is forgiving.
Picture
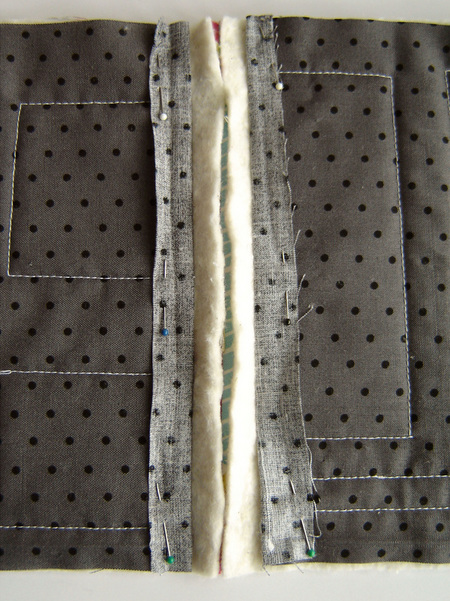
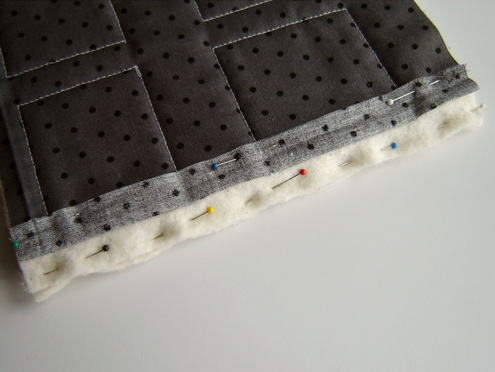
Fold the blocks, right sides together. Push the seamed front fabrics into the fold and pin them out of the way. Pin the batting together.

Sew the batting together using a blanket stitch ( _l_l_l_l_ ) or a short zig zag ( vvvvvv ). Stitch slowly so that the needle goes into the two pieces of batting on one side and goes over the edge of the batting into nothing on the other side.
Picture
When you are done, open the seam and smooth the batting or give it a very gentle tug to flatten it out. The idea is similar to a flatlock that you can do with a serger. You may want to test this out on some scrap pieces of batting to get the best size of stitch to achieve this with your sewing machine.

The goal is to secure the pieces of batting together without creating an overlap or lumpy seam.
Picture
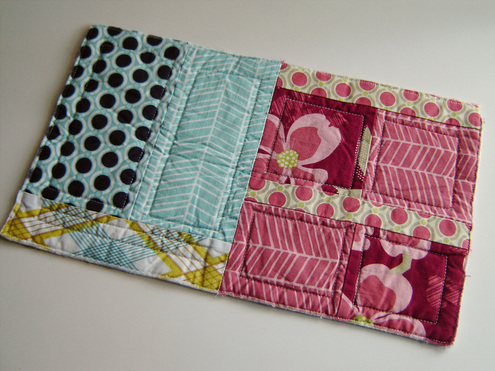
The last step matches some of the tutorials mentioned earlier. Trim the backing fabric if needed so that the pieces overlap about 1/2 inch when smoothed out. On one side, fold and iron under 1/4 inch of backing fabric. You may want to hang one side over the ironing board to make this easier. Then place the back fabric with the turned-under side on top, smooth, pin and hand sew it in place. The photo below shows this sample after it was finished, washed and dried.

Repeat for all your blocks, horizontally row by row and then vertically row by row.

We are going to use this method on our huge Dresden blocks from Lily's Quilts QAL. If you decide to give this a try, let us know how it works out.

Best,

Leanne and Marci
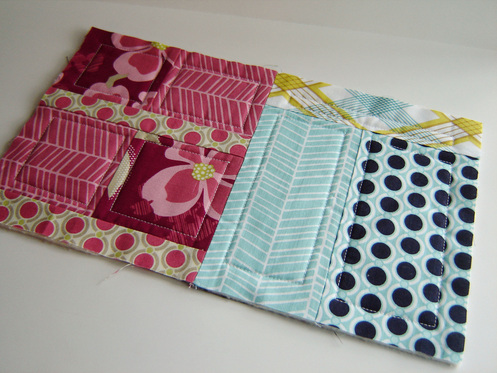
Picture
Washed and Dried Sample
Thanks so much to Lynne for having us today!  A huge Thanks to Leanne for all the hard work!  I have so enjoyed working with you on this three country collaboration! It is amazing to me that a gal from Louisiana, Britain and Canada can work together (without ever having met) to come up with something so useful!  Thanks ladies, it has been fun!
48 Comments
Leanne link
4/19/2011 03:42:13 am

Marci, thank you for this collaboration! It is wonderful to make a new friend and to share ideas.

Reply
Debbie link
4/20/2011 12:37:50 am

Great tutorial! Thanks!

Reply
Ellie
5/19/2011 11:11:02 pm

Hello!
I have made a king size log cabin quilt in 2 pieces because one piece would not fit through my machine. I planned to join it as you show here.
My problem is I didn't leave 1" to join the halves!
Ay ideas to help me?
Hugs, Ellie

Reply
Sandy Opp
1/20/2019 06:46:44 am

I'm still deciding just how I will QAYG my particular design (Kentucky Crossroads) but need to understand all potential problems that I could encounter. THANK YOU!!!

Reply
Sandy Opp
4/2/2019 02:55:00 pm

I'm almost ready to quilt so would appreciate comments as soon as possible. THANK YOU!!!

Jenn
6/9/2011 12:17:38 am

Hooray!Proof that you can join quilted blocks or sections together without sashing or lumps and bumps. I've been thinking about this for ages, because I designed a 2 block quilt for my inlaws 50th anniversary. It's a signature quilt, so it needs custom quilting, not just an allover design. This will let me quilt it in thirds, easily manageable on my domestic machine. Thanks!

Reply
Cyrielle LEMEUNIER link
7/17/2011 12:08:22 am

Merci pour ce super TUTO ! J'ai enfin compris comment il faut faire !

Thanks a lot for this TUTO. I understand how I've to do !

Reply
Rosalie
1/11/2015 06:32:44 am

i have been searching for an idea to join my blocks. A big thank you!

Reply
Becky
11/22/2011 03:58:48 pm

Excellent solution for all three layers. I certainly appreciate the post.

Reply
Betty Grove
3/2/2012 01:42:38 am

I just finished a queen size bed quilt using QYAG with sashing connectors. It worked out quite nicely as I can't imagine doing the quilting the conventional way on my standard machine. Thank you so much for this tutorial, it will help with my next big project.

Reply
Jan
3/4/2012 11:19:06 am

you make this look easy, can't wait to try it! thank you!

Reply
Elizabeth
3/18/2012 04:55:01 am

I am working on a quilt using a method similar to this but I completely quilt the first chunk without leaving the unquilted margin. I then sew the unquilted 1" margin (top layer only) of the second chunk through all three layers of the first chunk trim the batting to match and fold under the backing and hand sew.
I am working in chunks of 3 x 3 blocks (30"x30") which I do not prewash. I use lightweight fusible interfacing cut in very narrow strips to "glue the batting together. It is way cheaper than the stuff on a roll and you can cut it skinnier. Also, because I will have 9 chunks to assemble when I am done, it was important to remember to leave the one inch unquilted margin on two sides of the four outside corner pieces. I'm not explaining it well but the center row is finished much as you describe but the rows on the sides have to have the right center seam on the left side unquilted and the left center seam on the right side unquilted. So the way I do it, the outside corner chunks have two unquilted edges before joining. The first unquilted edge joins to the left center and the right center chunk, and the second unquilted edge joins the finished center strip.

Reply
Kathryn
6/2/2012 03:34:24 am

This is fabulous! Thank you! I would like to add something that may help with abutting the batting perfectly. Carpet installers lay 2 adjoining rooms of carpet separately but let them overlap loosely where the 2 pieces meet. (usually a doorway) Then they use a razor knife to cut through both pieces at once. When the extra is removed from both pieces, the cut edges will align perfectly because they are made with the same cut! Hope this makes sense.

Reply
Debby
5/14/2018 08:47:33 pm

I thought of that too. You would need a piece of mat board to lay between the stitched front pieces and the overlapped batting then cut with a rotary cutter.

Reply
HotPinkThread link
9/20/2012 04:29:29 am

Thanks so much for this tutorial. I had figured out the front stitching and the back hand sewing, but could not figure out how to keep the batting from buckling in betweek. I am making my first king sized quilt, and this will make my process so much better.

Reply
Lori link
1/19/2013 11:42:28 am

THANK YOU! This is the clearest tutorial I've been able to find so far!

Reply
Jane Grendon
1/21/2013 01:43:07 am

I really agree with Lori It was the last in a long line of Q as you Go and is SO clear. Thank you

Reply
Stacey in Stitches link
2/17/2013 07:12:12 am

I have been wanting to try QAYG for a while now, but I could never wrap my hear around the finishing. I love the look of this and hand sewing is fun for me, so yay! Thank you for the great tutorial!

Reply
Debbie H
3/24/2013 06:36:43 am

Love this. Making my first quilt and wanted to do a quilt as you go but this is the first tutorial that made sense to me. QUESTION: How do you bind around the edges of the quilt?

Reply
Joanne D.
11/25/2013 02:26:08 pm

Thank you so much for this tutorial! I don't like the "look" of how most of the QAYG blocks are joined together. You make it look like it's "traditionally" done! Great job!

Reply
Kathy Engelman
1/28/2014 03:41:22 am

Thank-you so much for posting this. I got excited about quilt as you go because I don't feel confident to machine quilt a large quilt. I am hand quilting block for an English Garden quilt for my granddaughter and this tutorial showed me just how to connect the blocks together in a very understanding way!! Thank-you.
Kathy

Reply
Theresa
2/6/2014 10:19:37 pm

Please comment on how you bind the edges (with traditional binding?). On the sample, it looks as if you stitch around all exposed edges first; is this correct! Thank you and I am starting to use this method today as I like the look much better than using strips to join. T

Reply
Susan link
2/20/2014 09:15:36 am

How do you join the top to the back

Reply
alecia
4/6/2014 02:43:57 pm

Yes, please post how to finish the edge, I'm going to try this as my first ever quilt! I love this!

Reply
Marcis
8/16/2014 10:14:17 am

This tutorial allowed me to start quilting since I could not afford to have a quilt done by a long-arm quilter. Thank you so much!! I do have a question though--if the blocks are joined through the entire length of the block, how do you then join the rows? It seems the row joining process would be interrupted by the joining seams for the blocks? Thank you for any assistance provided!!!

Reply
sammie
10/17/2014 01:45:14 pm

What type of stich do you use to join the backing together. Ive always used a machine.....

Reply
Alisa Vogt
1/12/2015 02:51:44 am

What an awesome tutorial! I have been making rag baby quilts for years now as each new baby is born in my family and this seems like the logical next step to move on to! You made it seem so easy that I think I can manage it! :)

Reply
Heather
1/12/2015 03:50:34 am

I've never made a full sized quilt because I just cannot handle all that fabric at once and there isn't a place in this house I can lay out a quilt that size.

This tutorial is the answer for me because I don't want sashing between my quilt blocks. After having just priced professional quilting services (ouch), and knowing I won't get the quilting quite the way I'd like it anyway, this really is the best solution I've found. The bonus is the clear instructions and very good pictures as I learn best by seeing it done.
Thanks very much for this!

Reply
Mary liz
3/9/2015 02:46:01 pm

Marci, some thirty years ago I was doing "lap quilting", yes, quilting by hand! This was the method I used to put the hand quilted, pieced squares together with batting and backing. I quilted several quilts this way. I'm back into quilting again, this time by machine😄! (I'm using up the scraps my two daughters have left from their many projects, I can't STAND to see them go to waste!) MY POINT IS -- I was so happy to see your tutorial to refresh in my mind the details. Thank so very much. Now I can help my daughter make her king size spread.

Reply
Linda
8/6/2015 02:02:22 am

What a great idea and tutorial. Using it for my Green Tea and Sweet Beans - I am a hand quilter and love how portable this makes my project.

Reply
Elvira link
11/27/2015 10:57:54 pm

Thank you so much for the tutorial. I am doing a big quilt right now and will try this method!! and I 'm sharing this tutorial in my blog. :)

Reply
Allison CB
1/11/2016 03:04:11 pm

Great technique - you make it look very achievable!!!

Reply
JoAnn link
6/18/2016 06:49:07 am

Awesome! Clear, concise and it makes sense. Thank you. I'm learning to quilt by myself - no classes -- too expensive -- this is great!

Reply
Susan
7/25/2016 11:28:51 am

ty for posting this great tutorial. I am new to blogs.. I started a quilt many yrs ago and never finished it☹️. I was using a method similar to yours: pinned back and batting out of the way and sewed the tops together...then trim batting, lay one side backing open over seam, fold other side backing under 1/4" and overlap the flat side, hand st closed..long story short- damaged my hand and couldn't do hand sewing . your way is much easier... and flatter seam.

Reply
LindieLee
8/2/2016 02:27:16 am

I've been researching the different methods of joining blocks and I'm so grateful that you have listed other quilters and the methods they use. I did see a video that I believe is exactly the same as the one you show us here. Thanks for the great close up photos. Here's the link to Rose Smith: https://www.youtube.com/watch?v=-pL36s08wg4

Reply
Trena Boyd
2/8/2017 06:33:34 pm

How can you make a string quilt with this method. You sew it all the way to the end

Reply
Betty Harris
9/3/2017 09:09:58 pm

Cant wait to try this method.

Reply
Sally
9/12/2017 12:16:30 pm

Thank you so much! I've saved your post for over a year waiting to use it. The end is near and I owe it to you!!

Reply
Diane
2/3/2018 08:41:38 am

Doesn’t this method become very cumbersome when you are trying do a larger quilt such as a king? Any suggestions?

Reply
Karen Gale
2/23/2018 10:08:05 am

It is not hard. The most you have under the machine is one block wide. I have made one quilt this way, and am in the middle of a second one. When you join the blocks in one row, you don't even have one block, just the 1/4 inch seams joining the blocks. I do all the rows first. I join the block fronts, then trim all the batting, hand stitch the batting together, though using the iron on tape is something I want to try. I then iron the overlap, and I have enjoyed hand stitching the backs. It lets me leave the sewing room and hang out with my husband.
Then, take two rows, and you do the 1/4 inch seam, and that's all you have under the machine. As you add rows, you still just have the quarter inch under the machine.

If you machine sew the backing on each block, then you have only one block under the machine. The rest is on the left, the main part you have done, and the one block or row of blocks.

I don't think I helped!

Reply
KristalB
3/21/2018 04:14:24 pm

Actually that was really helpful! Thanks Karen!

Neoma
5/3/2018 11:16:56 pm

I must be missing something. I visualize each step and I do not understand how the batting can be stitched together without the stitches showing on the top. I have made a large guilt in a similar fashion using sashing so I understand the basic concept. I used fusible iron on tape to join the batting edges. I like your way. I am just having this problem of how to stitch the batting together without having those stitches effect the top of the block.

Reply
Janice B.
5/15/2018 06:43:26 pm

I made a queen size quilt using this method about 20 years ago. I has been washed many times and is still beautiful.

Reply
Sheri Chandler
6/29/2018 09:27:55 pm

Hi Marci
I sent you a couple of questions under “contact me” about this method of QAYG. I took 2pics to show you what I didn’t understand but I can’t seem to get them to you. I tried message, mail. Could you help me?

Thank you

Reply
Mary Hattingh
7/5/2018 05:47:51 pm

I have never done this before, and you made it look so easy.
Will give it a try.
Thank you so much!

Reply
Sharon Maguire
8/29/2018 09:05:55 am

that's great
I add my bindings back to front, by machine, & use a fancy stitch on the front.
So, I'll try your method [backwards] & finish at the front, with a fancy overlap stitch! :)

Reply
Charlene Cairn
2/15/2019 07:18:41 pm

I think sashing the blocks doesn't suit every quilt, and I enjoy hand sewing so I like the demonstrated method, but the "backwards" way sounds great, and could add another interesting feature to a quilt. Might try that one day too. Thanks Sharon

Reply
Marcy Jo
12/7/2020 09:29:35 am

Thank you. The easiest instructions, simple and to the point. This made my understanding and ability to make beautiful quilted pieces on my home machine so much easier and a pleasure to learn.

Reply


Leave a Reply.

    Marci Girl

    A feisty mom designing, sewing and blogging her way through everyday life!

    Subscribe
    Follow on Bloglovin
    Picture
    Follow on Bloglovin


    Categories

    All
    2017 Finish A Long
    2018 Finish A Long
    2019 Finish A Long
    Bee Sewcial
    Book Reviews
    Clothing
    Everyday Life
    Giveaways
    Handbags
    Handstitched Class
    Inspirational Projects
    Marci Girl Designs
    Projects
    Quilt Along
    Quilting Bees
    Quilts
    Random Thoughts
    Recipes
    Sew Along
    Sewvivor
    Style Stitches
    Swaps
    The Penny Sampler Class
    Tutorials
    Wip Wednesday


    Happily
    Participating In:

    Picture
    Picture
    Picture
    Picture
    Picture
    Picture

    Picture


    Archives

    January 2020
    November 2019
    October 2019
    July 2019
    April 2019
    March 2019
    February 2019
    January 2019
    December 2018
    October 2018
    August 2018
    July 2018
    June 2018
    May 2018
    April 2018
    March 2018
    February 2018
    January 2018
    December 2017
    November 2017
    October 2017
    September 2017
    August 2017
    July 2017
    June 2017
    May 2017
    April 2017
    March 2017
    February 2017
    January 2017
    April 2016
    March 2016
    February 2016
    January 2016
    September 2015
    July 2015
    October 2014
    September 2014
    August 2014
    July 2014
    June 2014
    May 2014
    April 2014
    March 2014
    February 2014
    January 2014
    November 2013
    October 2013
    September 2013
    August 2013
    July 2013
    June 2013
    May 2013
    April 2013
    March 2013
    February 2013
    January 2013
    November 2012
    October 2012
    September 2012
    August 2012
    July 2012
    June 2012
    May 2012
    April 2012
    March 2012
    January 2012
    December 2011
    November 2011
    October 2011
    September 2011
    August 2011
    July 2011
    June 2011
    May 2011
    April 2011
    March 2011
    February 2011
    January 2011
    December 2010
    November 2010
    September 2010
    August 2010
    July 2010
    June 2010
    May 2010
    April 2010
    March 2010
    February 2010

    Picture

    RSS Feed

Powered by Create your own unique website with customizable templates.