Why a Semi-Tutorial you ask? What does it mean? Basically, I am going to walk through what I did to create this item, but I don't have step by step photos, so to me that makes it a semi-tutorial!
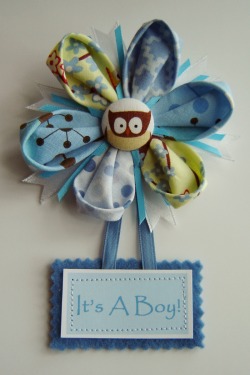
I wanted the mother to be to have a corsage, but wasn't sure real flowers was the route I wanted to take, so after much deliberation I decided to make her corsage. At first I thought about faux flowers, but thought that it wouldn't create the look I wanted, then it dawned on me...fabric, my medium of choice! In the end, I thought it turned out pretty darn cute, and the mother to be can keep her corsage forever! Here is how I created this single flower corsage:
Fabric Flower Corsage Tutorial
Supplies: 7 (2" x 2") Scraps of Fabric, Assorted Ribbon (Various Sizes and Colors), 2 Scrap Pieces of Felt, 1 (3/4") Fabric Covered Button, Card Stock, Scrap of Cardboard, Metal Pin Back
Tools: Hot Glue Gun, Sewing Needle and Thread, Sewing Machine, Fabric Covered Button Tool, Scissors, Pinking Shears, Fray Check, Elmers Glue, Computer and Printer
Instructions: I used a book that had instructions on how to make a Kanzashi Flower, and honestly the instructions were not very good at all and I struggled (Big Time.) The good news is, I have found an online tutorial that is GREAT! Just make the petals smaller using the 2" x 2" fabric scraps and make only six petals. I didn't use starch either, didn't feel like I needed it, and hold off on attaching the fabric covered button for now. OK, here is the step-by-step:
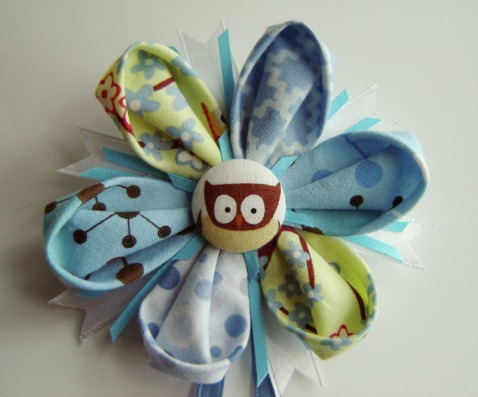
1. Go to Bitty Bits and Pieces for directions on how to make the fabric flower itself. This tutorial is great! Use six (2" x 2") fabric scraps, either all one color, or a matching set of scraps.
2. Make the fabric covered button with the last fabric scrap, I used a piece of fabric that had an owl image, and just centered it on the button. Set aside for later.
3. Cut two or three types and colors of ribbon into 2" and 2.5" pieces. Neatly cut one of the ends at either an angle or a "V" shape. Using a tiny amount of fray check, seal the neatly cut edges of the ribbon. Set aside to dry. I used 6 pieces of 1/2" white ribbon that was 2.25" in length and cut in a "V", and around 12 pieces of 1/8" blue ribbon in 2" lengths cut at an angle. I also used 6 short 1/2" lengths of the same blue ribbon around the center button.
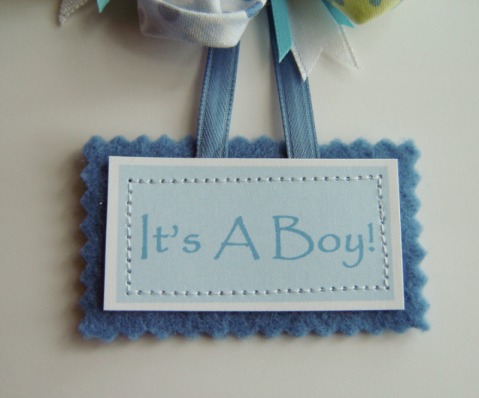
4. Cut a 6" - 7" piece of ribbon, I used a 1/4" blue ribbon. The length of this piece can vary depending on how low you want the saying underneath to hang. Play with the length to get it just right for your corsage.
5. Using your computer and printer, create a simple saying (It's A Boy, It's A Girl, or Congratulations) and print it on card stock, then trim it to a rectangle around 2" x 3". I printed the text in blue, and then put a light blue box around it, then when I trimmed the card stock, I left a slight white border around the blue box.
6. Using the cut out card stock as a template, take a piece of felt (in my case blue) and using pinking shears, cut around the felt to have a border all around the card stock, the felt ended up being roughly 2.5" x 3.5".
7. Cut a 2" circle out of the scrap of Cardboard.
8. Take the 6" - 7" piece of ribbon, and fold it in half into a upside down "V". Using Elmers glue, carefully glue the loose ends to the backside of the printed card stock. Let dry. Once dry take the card stock and felt and place the felt on the backside (creating of sandwich of felt, glued ribbon, then printed card stock) and using a sewing machine carefully sewing around the card stock, roughly 1/4" from the edge, this will hold all the layers together.
9. Time for Final Assembly! Preheat the glue gun. Carefully glue the longer ribbon strips (unfinished edges in the center) to the back side of the fabric flower. Glue the little strips (unfinished edges in the center) to the front of the flower and then hot glue the fabric covered button into the very center, covering up all unfinished edges and hot glue. Flip the flower over to the backside and carefully hot glue the 2" piece of cardboard in the center of the flower, covering up all unfinished edges and hot glue. Hot glue the pin back to the top of the cardboard circle, and hot glue the top point of the "V" (of the felt, ribbon, card stock sandwich) to the bottom of the cardboard circle.
10. Almost Done! Carefully cut another scrap of felt (2.5" circle) this piece is to cover the cardboard and any showing hot glue. Once you have the size right, because you don't want the felt to show on the front, cut a slit that the pin back can be pushed through, and using Elmers glue, glue the felt to the cardboard, pushing the metal pin back through the felt, so that the mother to be, can attach it to her clothing.
You are now finished and ready to give this lovely corsage to the Mother to be!
Fabric Flower Corsage Tutorial
Supplies: 7 (2" x 2") Scraps of Fabric, Assorted Ribbon (Various Sizes and Colors), 2 Scrap Pieces of Felt, 1 (3/4") Fabric Covered Button, Card Stock, Scrap of Cardboard, Metal Pin Back
Tools: Hot Glue Gun, Sewing Needle and Thread, Sewing Machine, Fabric Covered Button Tool, Scissors, Pinking Shears, Fray Check, Elmers Glue, Computer and Printer
Instructions: I used a book that had instructions on how to make a Kanzashi Flower, and honestly the instructions were not very good at all and I struggled (Big Time.) The good news is, I have found an online tutorial that is GREAT! Just make the petals smaller using the 2" x 2" fabric scraps and make only six petals. I didn't use starch either, didn't feel like I needed it, and hold off on attaching the fabric covered button for now. OK, here is the step-by-step:
1. Go to Bitty Bits and Pieces for directions on how to make the fabric flower itself. This tutorial is great! Use six (2" x 2") fabric scraps, either all one color, or a matching set of scraps.
2. Make the fabric covered button with the last fabric scrap, I used a piece of fabric that had an owl image, and just centered it on the button. Set aside for later.
3. Cut two or three types and colors of ribbon into 2" and 2.5" pieces. Neatly cut one of the ends at either an angle or a "V" shape. Using a tiny amount of fray check, seal the neatly cut edges of the ribbon. Set aside to dry. I used 6 pieces of 1/2" white ribbon that was 2.25" in length and cut in a "V", and around 12 pieces of 1/8" blue ribbon in 2" lengths cut at an angle. I also used 6 short 1/2" lengths of the same blue ribbon around the center button.
4. Cut a 6" - 7" piece of ribbon, I used a 1/4" blue ribbon. The length of this piece can vary depending on how low you want the saying underneath to hang. Play with the length to get it just right for your corsage.
5. Using your computer and printer, create a simple saying (It's A Boy, It's A Girl, or Congratulations) and print it on card stock, then trim it to a rectangle around 2" x 3". I printed the text in blue, and then put a light blue box around it, then when I trimmed the card stock, I left a slight white border around the blue box.
6. Using the cut out card stock as a template, take a piece of felt (in my case blue) and using pinking shears, cut around the felt to have a border all around the card stock, the felt ended up being roughly 2.5" x 3.5".
7. Cut a 2" circle out of the scrap of Cardboard.
8. Take the 6" - 7" piece of ribbon, and fold it in half into a upside down "V". Using Elmers glue, carefully glue the loose ends to the backside of the printed card stock. Let dry. Once dry take the card stock and felt and place the felt on the backside (creating of sandwich of felt, glued ribbon, then printed card stock) and using a sewing machine carefully sewing around the card stock, roughly 1/4" from the edge, this will hold all the layers together.
9. Time for Final Assembly! Preheat the glue gun. Carefully glue the longer ribbon strips (unfinished edges in the center) to the back side of the fabric flower. Glue the little strips (unfinished edges in the center) to the front of the flower and then hot glue the fabric covered button into the very center, covering up all unfinished edges and hot glue. Flip the flower over to the backside and carefully hot glue the 2" piece of cardboard in the center of the flower, covering up all unfinished edges and hot glue. Hot glue the pin back to the top of the cardboard circle, and hot glue the top point of the "V" (of the felt, ribbon, card stock sandwich) to the bottom of the cardboard circle.
10. Almost Done! Carefully cut another scrap of felt (2.5" circle) this piece is to cover the cardboard and any showing hot glue. Once you have the size right, because you don't want the felt to show on the front, cut a slit that the pin back can be pushed through, and using Elmers glue, glue the felt to the cardboard, pushing the metal pin back through the felt, so that the mother to be, can attach it to her clothing.
You are now finished and ready to give this lovely corsage to the Mother to be!


 RSS Feed
