On a side note I normally take my bags outside to photograph them as I have more space and hanging opportunities outside. After I had taken the photos outside and then downloaded them to the computer I noticed that the bag really blended into the background, so I guess my colors were very nature inspired! LOL I ended up taking more photos on the white background so you could really "see" the bag.
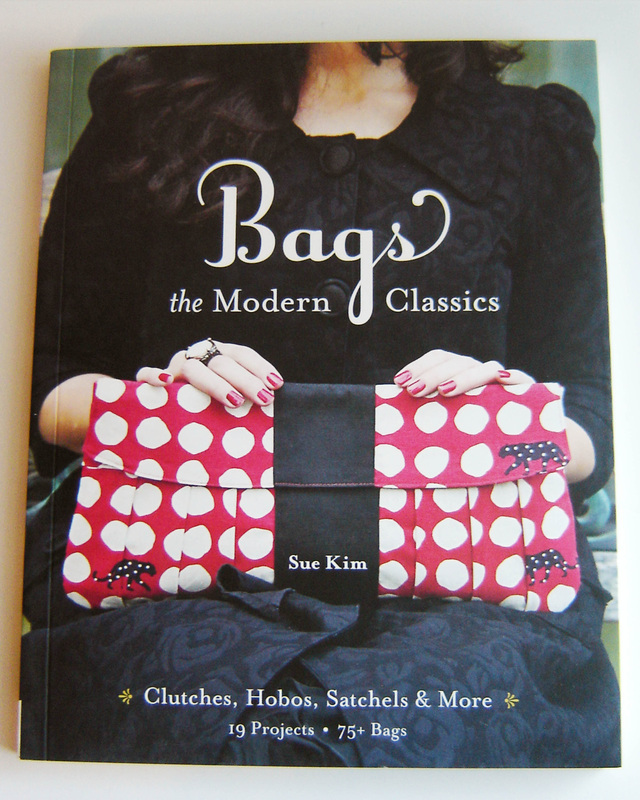
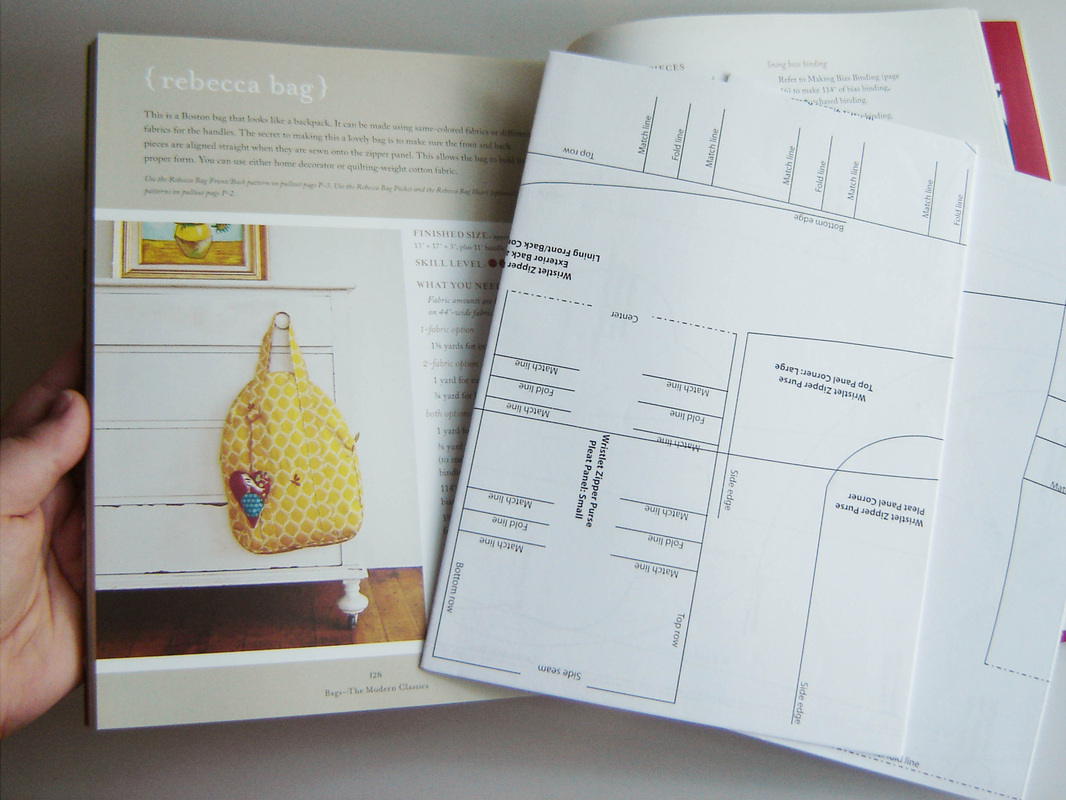
The Rebecca Bag, take two! I usually don't make a purchased pattern twice, if it is my own design I'll make it a lot, but normally with a purchased pattern I will make it once and then I move on. I think for me it is a way to learn techniques and then once I have learned from that project, it is time to move on. Well obviously this wasn't the case here. Case in point is the Rebecca Bag from the book, Bags the Modern Classics - Clutches, Hobos, Satchels & More by Sue Kim. My first time with the pattern was for Craft Book Month at Craft Buds, and you can see the finished bag and review HERE. 
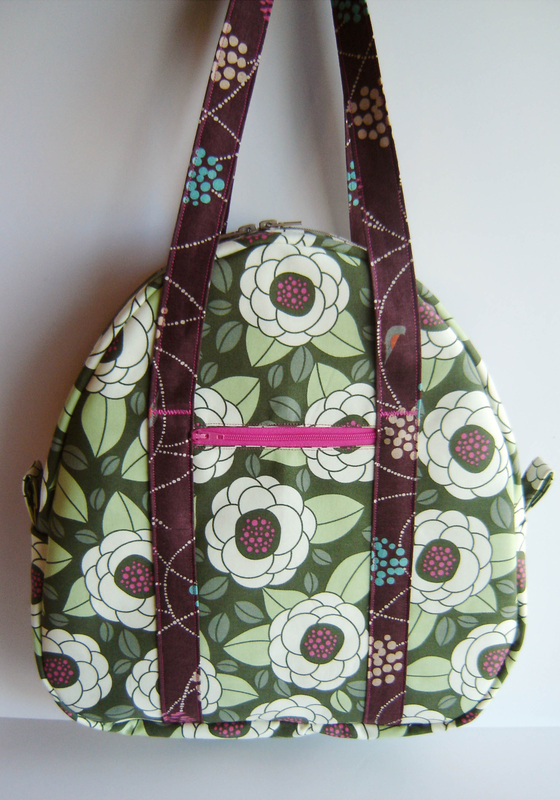
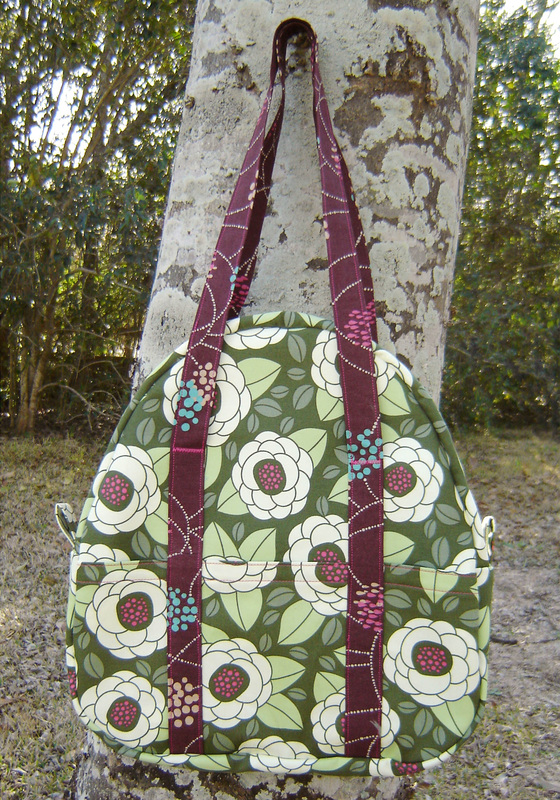
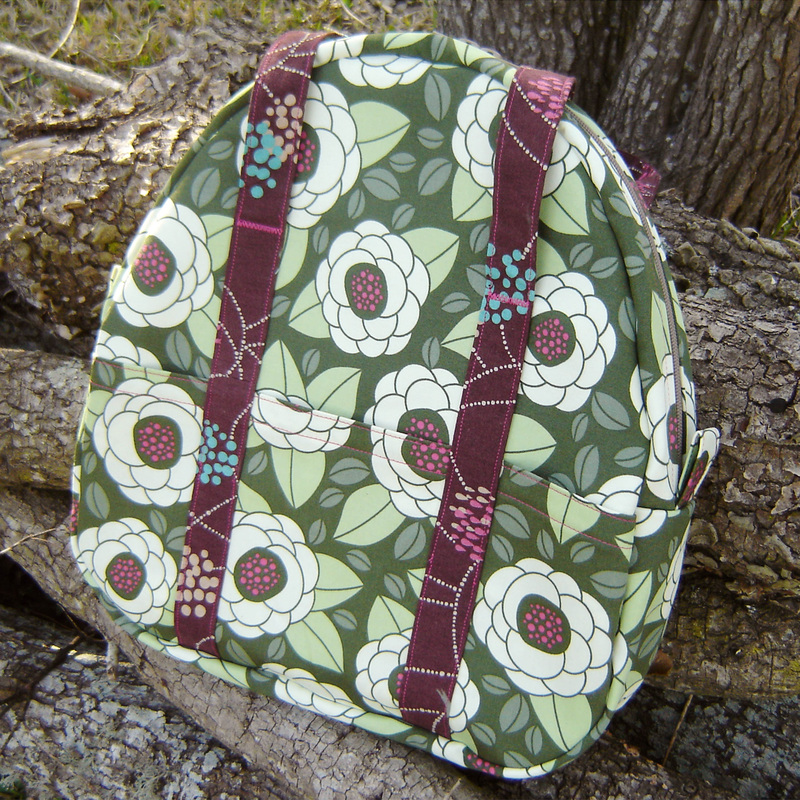
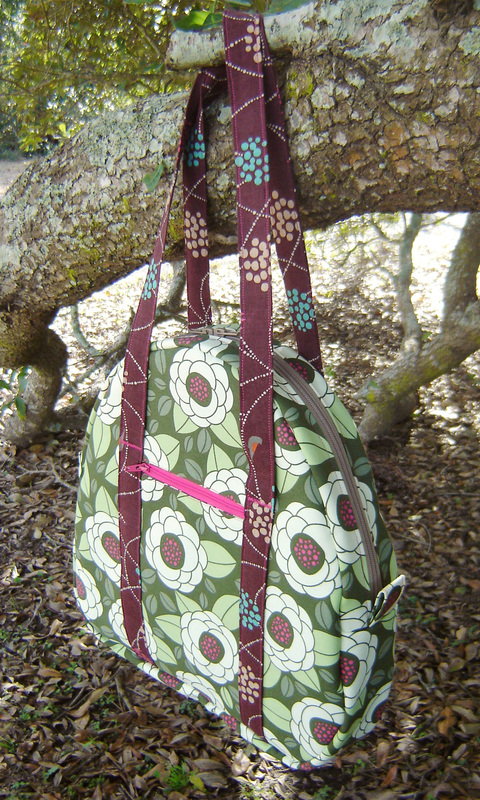
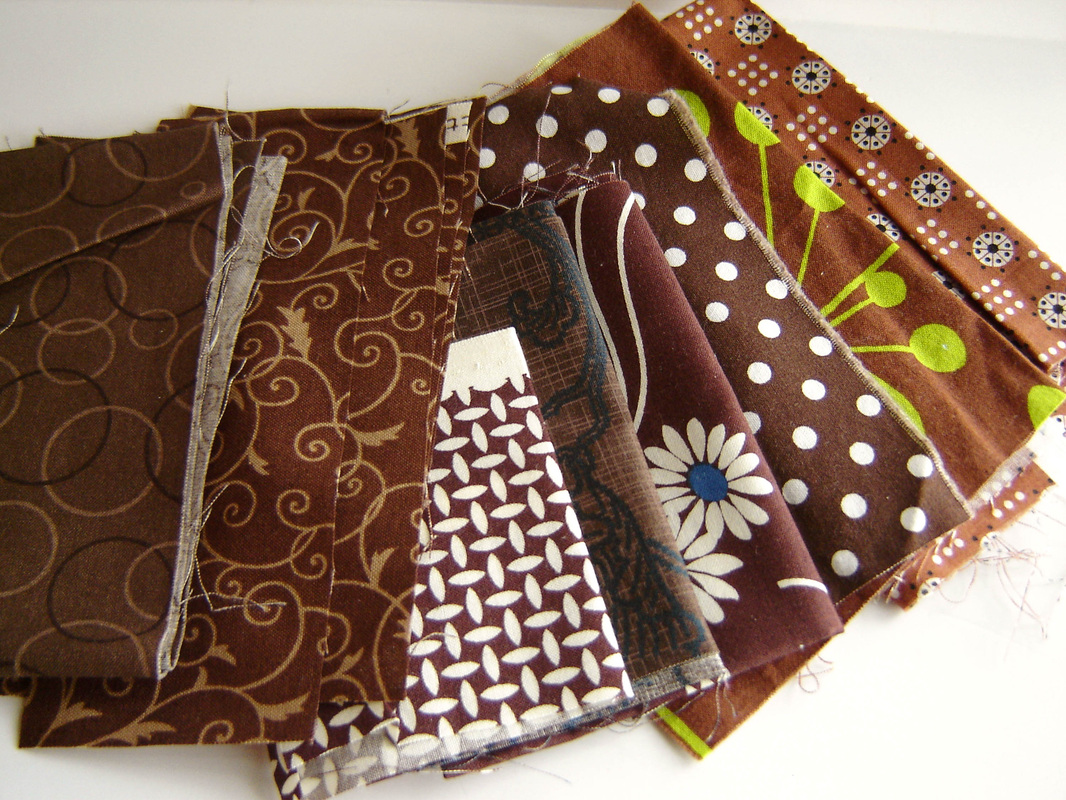
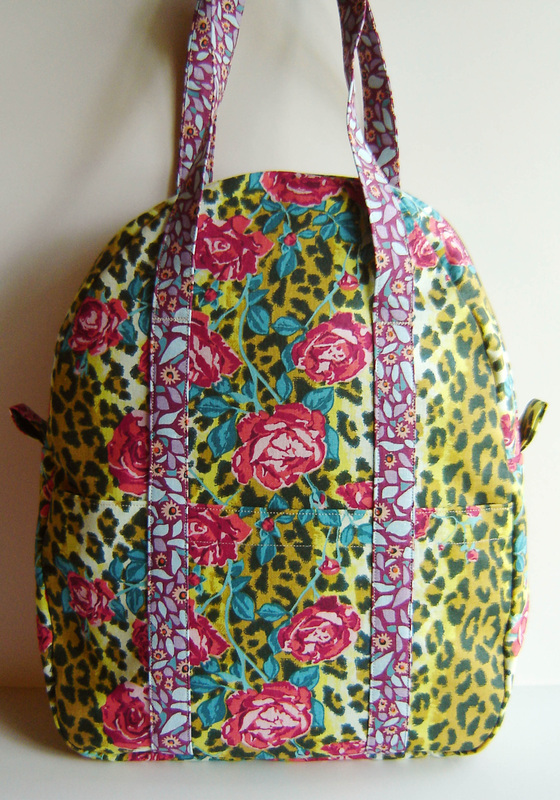
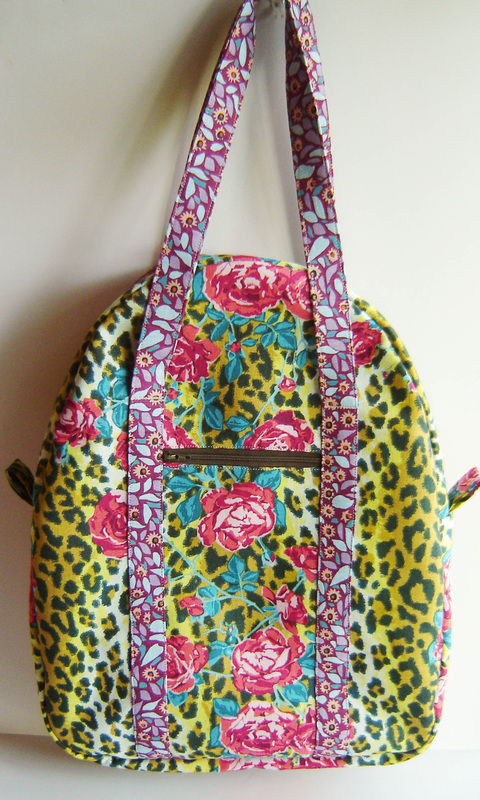
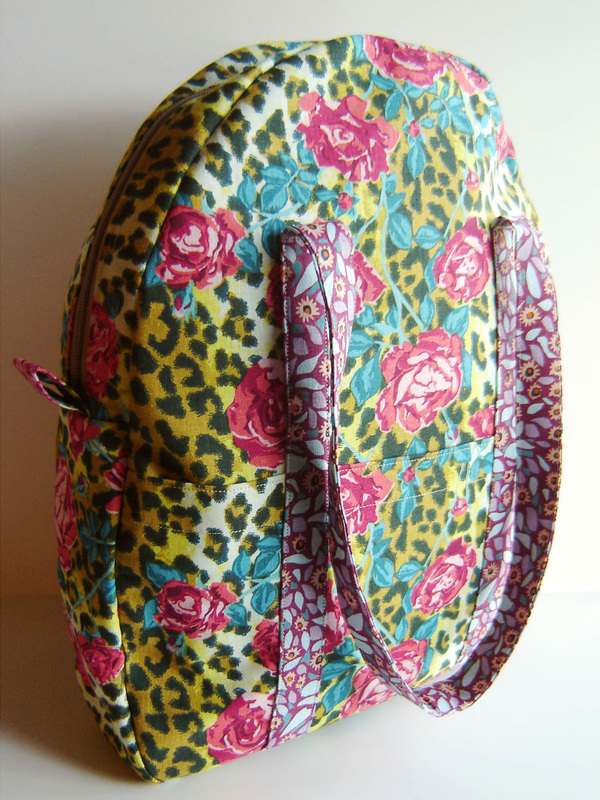
After the blog hop, I had the bag hanging around in my house and my mom spotted it, she fiddled with it a bit and decided it would be the perfect style for her with a few modifications. She wanted more pockets, inside and out, and she wanted a shorter version, it didn't need to be as tall if she was going to use it as an everyday handbag. So I let her dig through all of my home dec fabrics (more than I care to admit) and she pulled out a mismatched stack of things she liked and gave me the job to surprise her with the final pick. Well little did she know that of the stack she picked, only one or two of the prints actually had enough yardage to make the bag, thus limiting the choices in the end. I think it worked out quite nicely though. The main fabric for the bag is a home dec from Joel Dewberry (a few years old) and the handles are a lovely Echino (also a few years old.) The interior is some random toile print that I had in my stash, whose origins are completely unknown, but works perfectly for a bag interior! 
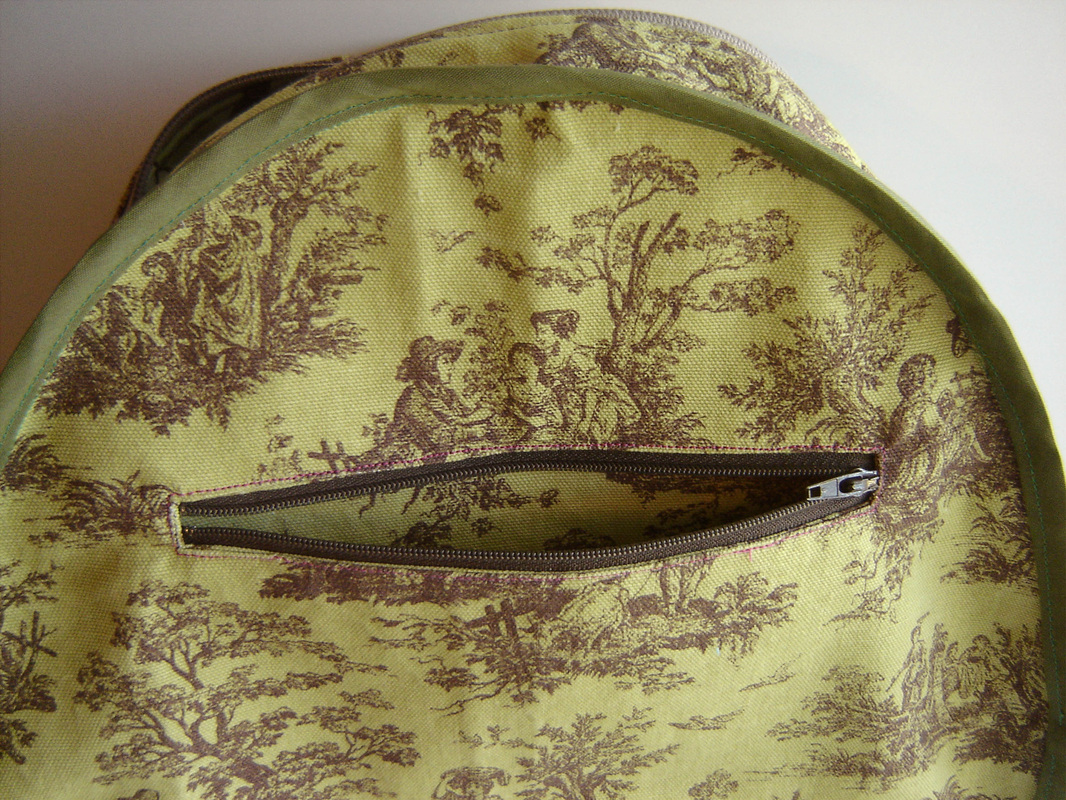
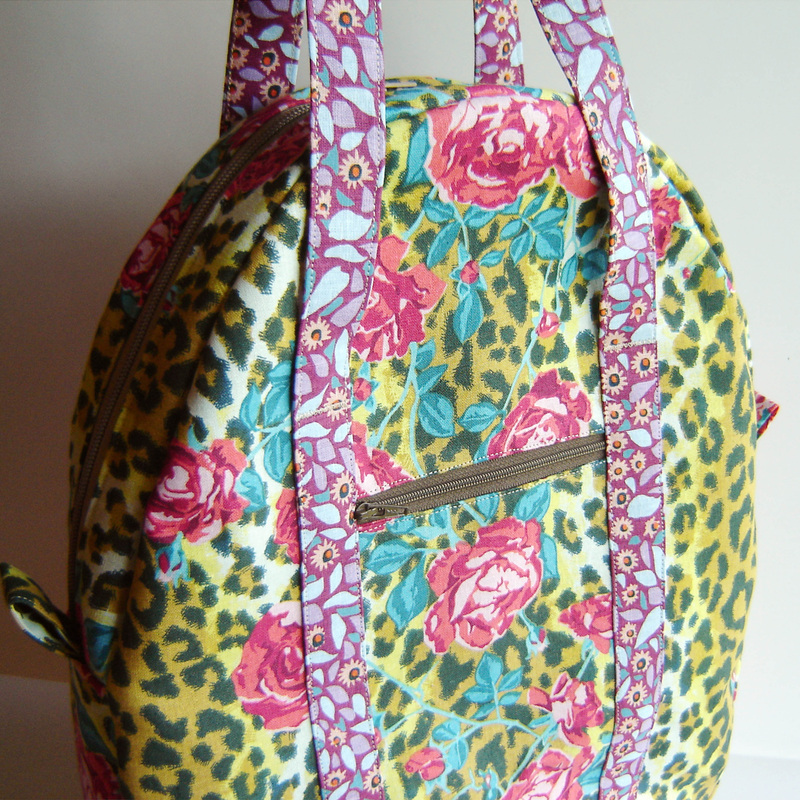
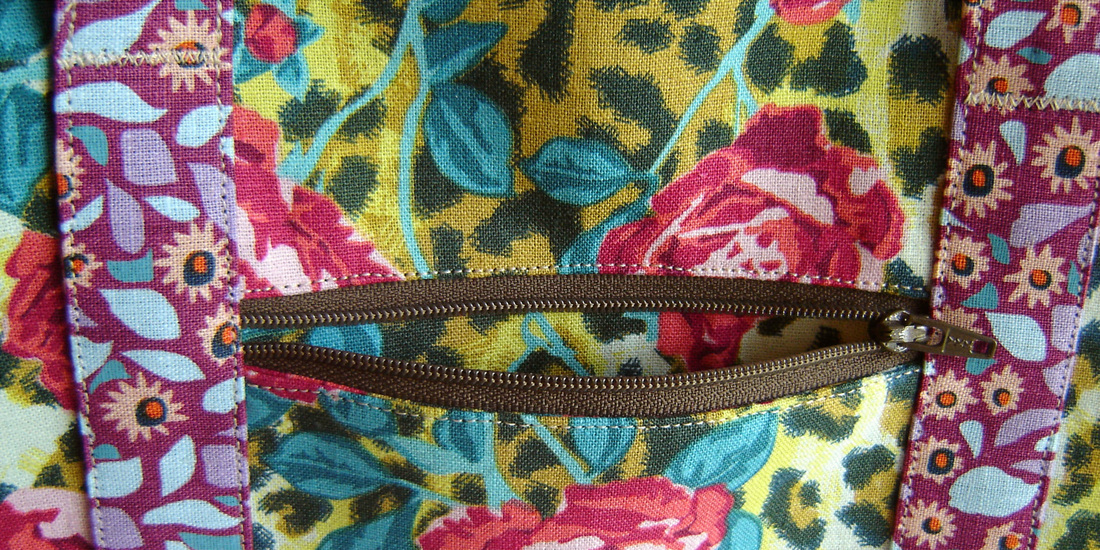
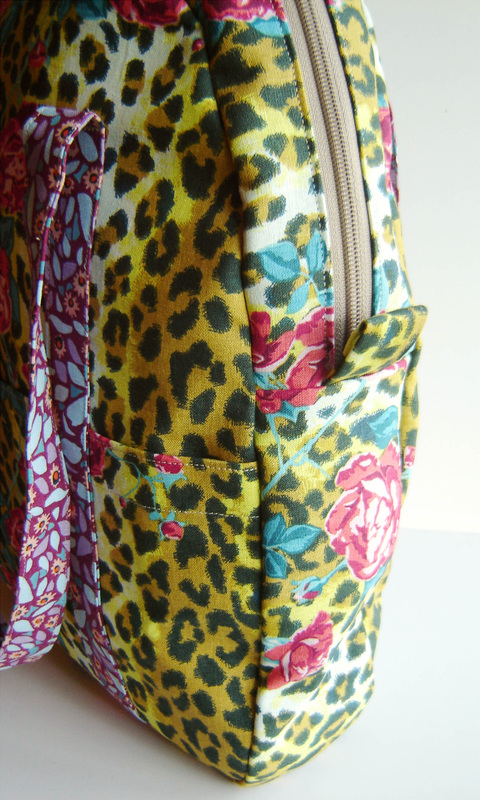
Be it that I had made this bag before, it stitched up really quickly and I only referred to the directions once or twice, making the construction that much faster. I do believe that fabric choice, cutting and ironing interfacing took longer than the actual bag construction. The modifications included shortening the overall length of the pattern by around 4", thus shortening the front pocket a bit too. I added quite a bit of length to the handles also, just to make sure they would fit easily over the shoulder. I did not modify the top curve, as I didn't want to have to make changes to the zipper length and I left the depth alone because it is pretty darn perfect. Just like the original that I made, I added a zippered pocket to the back for keys or cell phone and it is nestled neatly in between the two handles (shown below.) 
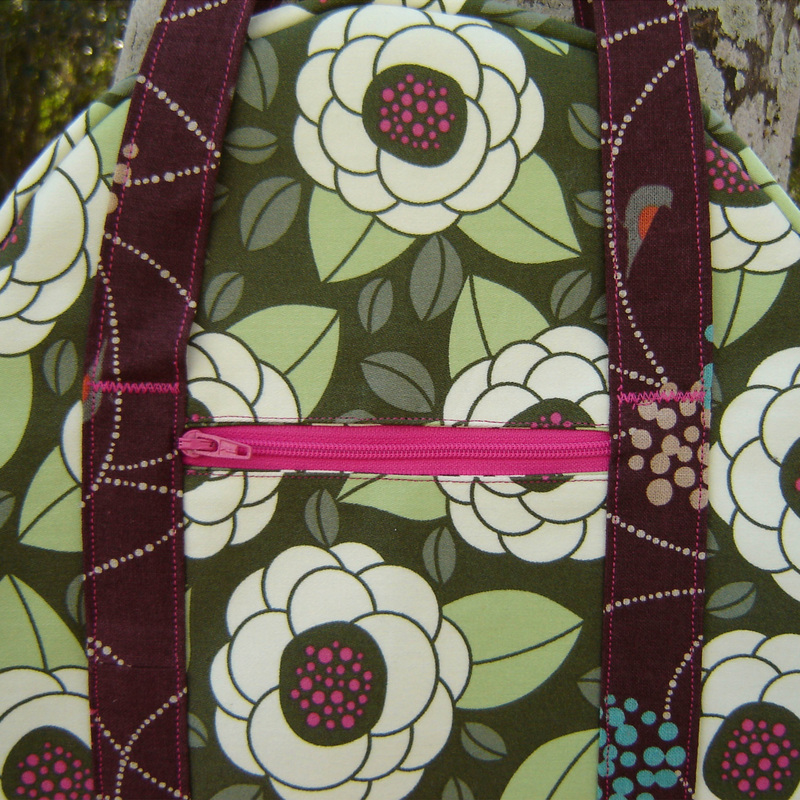
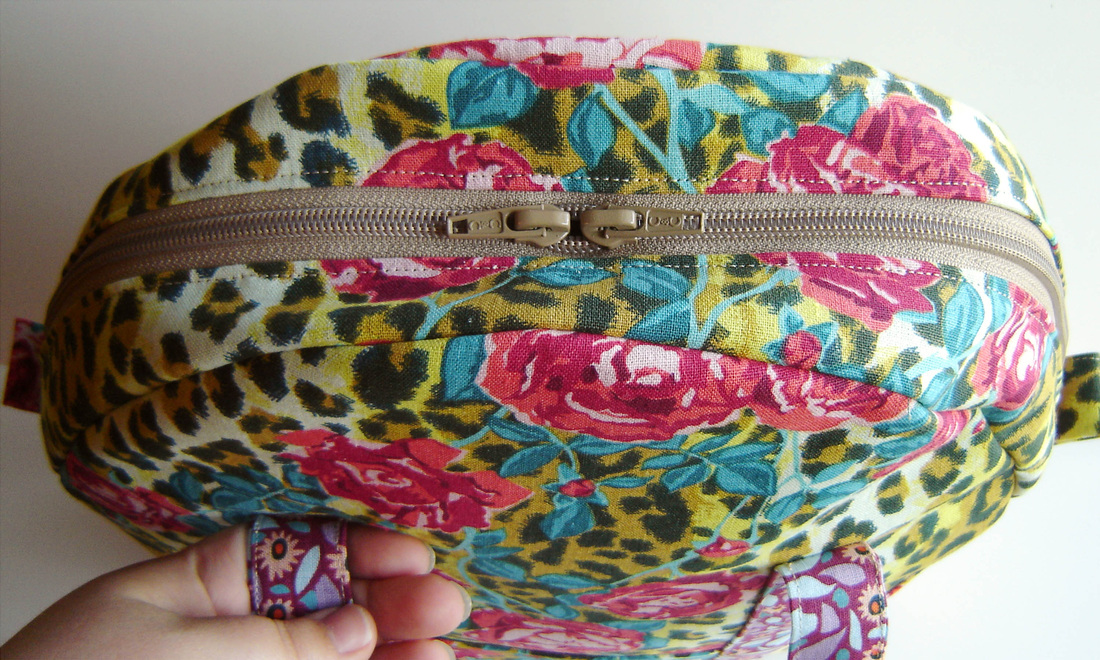
I used a hot pink zipper and top-stitched everything with hot pink to accent the center of the flowers in the Joel Dewberry print. The top zipper was a neutral beige, so it would blend in, and is a "purse zipper" which has two toggles and is super thick and sturdy (I bought it at JoAnn fabrics.) I used a short zig-zag stitch to reinforce the handles where they separate from the bag body, I just wanted to have some extra stitching there, just making sure it was secure. I used a size 16 needle for the majority of the construction of this bag as there are many layers of home dec fabric and interfacing. For the final layers of stitching (the bias tape on the interior seams) I switched to a "denim needle" which would be equivalent to a size 18. It worked like a charm. 
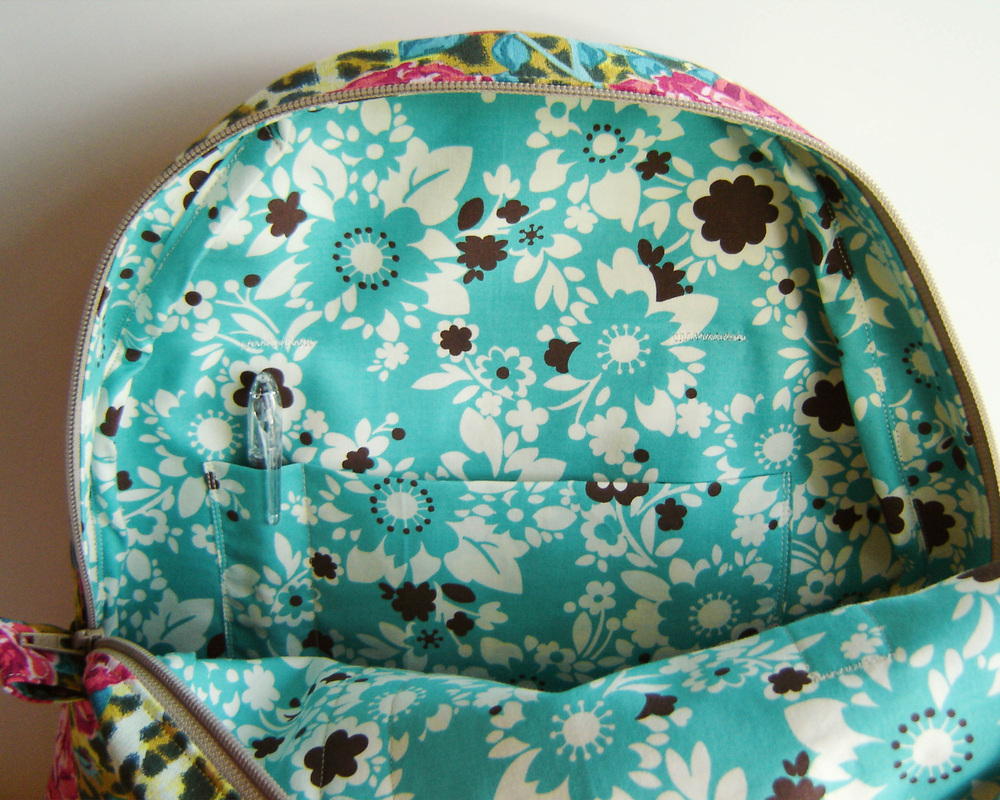
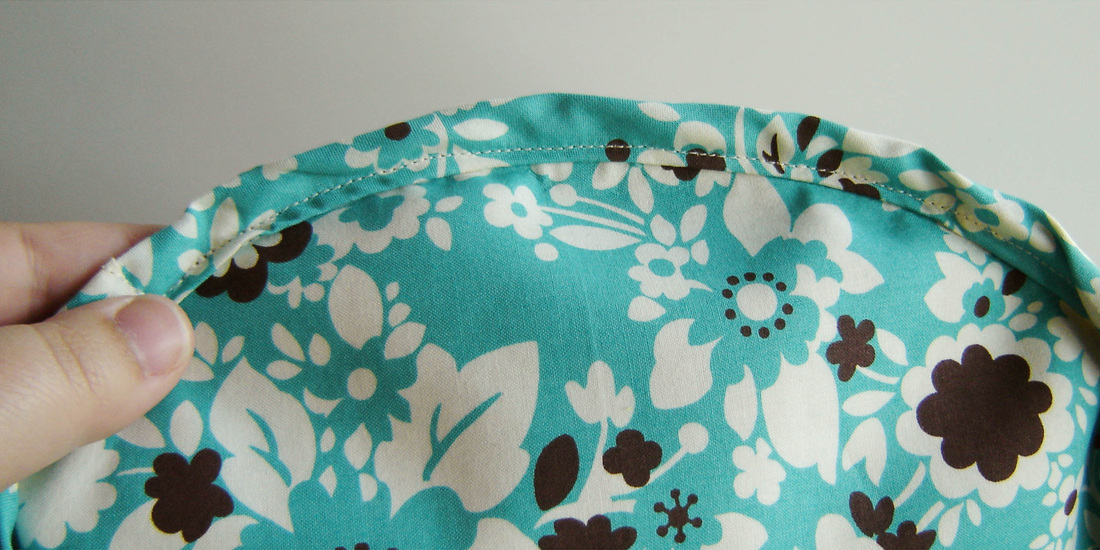
Once I had finished the bag and it was already inside out, I decided to take a few pictures to really show you what the interior looks like. I added in the larger side pocket and another zip pocket for extra storage. You can see that all the layers are sewn together and then to finish the raw edges you attach bias tape to the unfinished seams. It seems like it would be hard, but it really isn't. I used Clover Wonder Clips (which are awesome by the way) to hold the bias tape on the seams and with that denim needle just stitched slowly and carefully around each side. It really isn't that hard, just takes a little patience. Some spots of the interior aren't perfect, and the stitching is a bit messy, mostly at the zipper ends and that short run of bias tape, but honestly what does it matter, it is the interior of the bag and barely visible. 
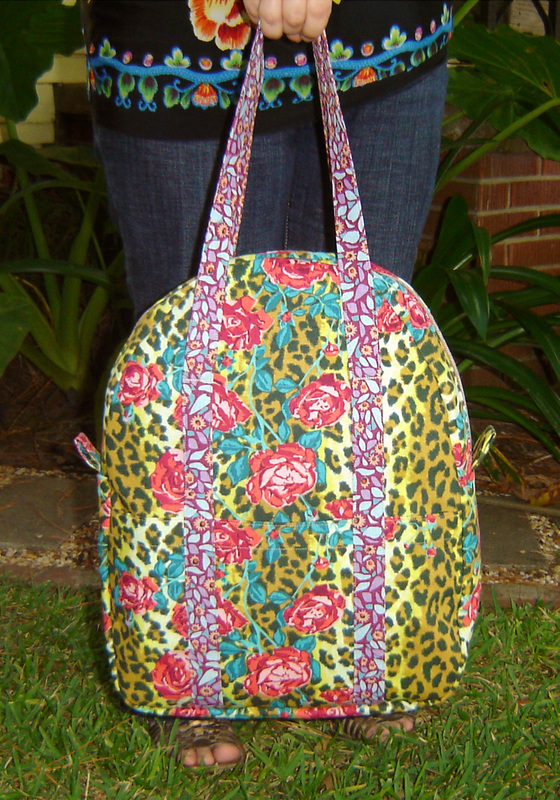
In conclusion, I love this pattern, and the book itself is filled with a ton of great projects. I think my mom loved the finished project (at least I hope so) and should be just big enough to hold all of her everyday essentials. The front divided pockets are just large enough to hold a cell phone, sunglasses, keys or anything you would want quick access to. The interior is just the right size to hold a magazine plus all of your normal purse goodies. The pattern really is a keeper! On a side note I normally take my bags outside to photograph them as I have more space and hanging opportunities outside. After I had taken the photos outside and then downloaded them to the computer I noticed that the bag really blended into the background, so I guess my colors were very nature inspired! LOL I ended up taking more photos on the white background so you could really "see" the bag. I am linking up to The Crafty Traveler over at Ellison Lane and the March Craft Book Sew-Along hosted by Live.Love.Create. This project was also my second finish in the first quarter of the 2014 Finish Along hosted by Katy at The Littlest Thistle.
6 Comments
As of January 1st, I had officially finished 70 of the 100 City Sampler blocks from the book, 100 Modern Quilt Blocks by Tula Pink. Knowing that I had worked on these blocks in spurts for at least six months, I knew I wanted to finish them all and get the quilt top done! Finishing blocks 70-100 took about 3 days total. I picked out all the fabrics, cut everything out and then chained stitched like crazy! Now I had all 100 blocks complete. Yeah!!! All along I knew that I would be making the "City Planner" quilt layout that is included in the book, so I had to decide on the sashing solids. Why didn't I order these fabrics months ago? Who knows, that would have made so much more sense. So I got in touch with Hawthorne Threads, and the lovely Becky helped me with picking two gray fabrics that complimented each other and complimented the blocks, which were constructed out of the line Constellations by Lizzy House and a variety of blue solids. I ended up deciding on two solid (Silver and Charcoal) fabrics from Hawthorne Threads new line called Hawthorne Hues. They were perfect, and have such a beautiful hand to them, it really was a dream to work with these new solids. Oh and I bought these fabrics, so I'm totally not biased or anything, they really are nice. They ironed really well too. Just saying. Now it was time for construction. The City Planner layout uses all 100 blocks and makes a king size quilt. Oh my, what have I gotten myself into? So I started cutting, and sewing, and laying out blocks, and sewing some more. Goodness gracious! I included the below shot to show what it looked like when I was laying the blocks out on my living room floor. I started with the layout that Tula used in the book, then had to move around blocks according to the same fabrics or solids being next to one another. By the end I moved a lot of them, but the original layout concept is still there. Once I had finished all the rows, then it was time to add the sashing in between. I don't think I have ever sewn 104" seams before and needless to say it took way longer than I ever thought it would. It grew and grew and got big and heavy, oh my. Here it is, in all its finished glory! I will start with saying that I have been working on this steady for two weeks now, and everything in the world has been trying to stop me from finishing it. Originally my husband was going to keep the kids one weekend so I could finish, then that fell through. Then we had the crazy snow storm here in the South, and in total the kids missed four days of school. Talk about a freak occurrence, and then of course I had to go and get sick, like fever, all the cold symptoms...yuck. Needless to say that DayQuil has been my best friend as of late and the only reason this quilt was actually finished in time tolink up with the Sew Along over at Sew Sweetness. I also want to apologize for the poor quality of these photos, this quilt is really too big for me to wrestle by myself, and be it that I was working in a fevered stupor today, this was the best I could do. Laying it on the dry spot in the yard. Standing on my step stool, tip toeing, the photo below almost shows the whole thing, which measures 104" x 104." Though the colors look a bit dull in the photos, in real life it really is pretty, be it that the Constellations fabric line technically has no gray in it, the blocks really stand out from the background. All those shades of blue, both warm and cool, all in one harmonious mixture. There is a touch of yellow throughout, and bits of black and white and all those constellations and stars. This quilt is for my husband, using his favorite colors and will be for our bed. At one point he was helping me adjust a row (he isn't aware this quilt is for him) and said, "I really like this one, did you know it is my favorite color combinations of blues and black." I chuckled inside, because yes, I did know that. Now the test will be to see if he reads my blog! HA! At this moment, I do plan to quilt this one myself. I just ordered king size batting, and I bought 108" wide backing fabric (3 yards) so I wouldn't have to piece the back. I think I may try spray basting on this one, because the idea of pin basting it makes me want to cry. You can see my little "helper" below, who desperately wanted to be included in the photo shoot and didn't understand why I wouldn't lay down on it and let him take a photo of me, on the quilt. Nope, not today. Maybe when it is finished. Thanks to all who sponsored the quilt along, and a super big thanks to Tula Pink, who wrote an awesome book that didn't have any mistakes (or at least none that I found,) which is pretty impressive for a book based on measurements and numbers! It was a fun 8 months, I loved seeing all the other entries and all of the blocks posted to Flickr. Though the quilt along is over, you can make the blocks at any point, trust me, they really are rewarding and fun! Well I think it is time for another dose of medicine (NyQuil this time,) so I will sign out for now!
P.S. I titled this post "Labor of Love" because just like when you first have a baby, you think, why would I ever do that again? Then time passes, you forget about all that hard work and you have another. Thus, this is how I feel with this huge quilt. I am hoping in time I forget how hard it was to wrestle this beast and will make another large quilt! But for now, nope won't be making another king size quilt anytime soon! This is a first for me y'all. I made these blocks this morning, picked fabrics, cut them out, sewed them together, ironed them, took pictures and blogged about them all in one day, or better yet, one morning! I think in the three or so years I have been blogging, I have never done that, shared a project the same day it was made. So woohoo for me....I guess, or maybe that is just pathetic. Oh well. Anyways I'm rambling.... Here are my week three blocks in the Quilty Fun Sew Along. Two simple super scrappy Courthouse Step blocks. No wonder I could get it all done in one morning, these blocks are SO EASY and fun, I love log cabin blocks. You can see all three weeks worth of blocks below. So scrappy and pretty, this is going to be a cool quilt. Oh and before I forget, thanks everyone for the well wishes last week, I am slowly feeling better and happy to say that I do believe I am on the mend! Want more information? Interested in sewing-along?
Book: Quilty Fun by Lori Holt Sew Along and Blog Tour Details: Fat Quarter Shop Flickr Group: http://www.flickr.com/groups/quiltyfunsewalong/ Week Three - Courthouse Steps: ps i quilt I've been sick this week and it seems like every time I am sick, I just lay around and dream up new projects. I guess because I can't really work on current ones, it is easy to dream and read online and then before you know it, order a book, some fabric and now that dream project is a reality. Then you find yourself on the floor surrounded by a pile of used Kleenex and mounds and mounds of fabric scraps. After pulling out an insane amount of fabrics, you then stare at them forever and try to decide which ones don't belong. So you edit and edit and then you have a neat little stack of color sorted fabrics that at least in your mind match and look nice together. The fabrics sit there for a day or two, so you add some of the edited ones back in, take them back out, back and forth until you say, "Enough!" You then have to take pictures of all these pretty little mounds of fabric. Everyone does that right? You wait patiently for that book and fabric you ordered earlier in the week to arrive. Thankfully I ordered from The Fat Quarter Shop, so I didn't have to wait long. If I order something from them on Monday, I have it in my hot little hands by Wednesday, so that is pretty awesome. The book arrives and you devour it within the first hour and then realize you will actually have to get your sick butt off the couch if you actually want to get started. The two prints below are the ones I ordered, 50% off (AWESOME) and will be the two outer borders on the finished quilt. Love those two little love birds on the red print. Now I have to decide what fabrics to use for the first block, but since I already have such neat little stacks, the decision is pretty easy. Cutting took about 30 minutes, and then after about 1.5 hours of piecing, I end up with these super cute apples. Eek...love them! Then I move on to the next block, these ninja looking stars. Also quick to cut out, a little more time consuming as far as piecing, but only because my machine tends to chew up the little pieces. Then I am finished and officially "caught up" in this sew along! But alas, still sick. So maybe I'll go dream up another new project... or maybe I should just sleep. Want more information? Interested in sewing-along?
Book: Quilty Fun by Lori Holt Sew Along and Blog Tour Details: Fat Quarter Shop Flickr Group: http://www.flickr.com/groups/quiltyfunsewalong/ Week One - Apples: Very Kerry Berry Week Two - Twinkly Winter Stars: nanaCompany Happily leaving the "triangles" chapter behind and moving onto "stripes." Much easier, much more enjoyable. These are the blocks for last week and this week. I really like block #59, don't really like block #60. There is probably one in every bunch that I like a lot, and one that I don't, I'm sure just the nature of the beast. Running low on the blue solids for this quilt, so it will be time to do some shopping soon! That is always fun! Have a good weekend folks! Wondering what all of this is about? Here are the details:
Book: City Sampler 100 Modern Quilt Blocks by Tula Pink Quilt Along: Hosted by Sara over at Sew Sweetness Flickr Group: http://www.flickr.com/groups/citysamplerquiltalong/ Blocks: 6.5" x 6.5" Featuring the fabric line Constellations by Lizzy House. I am popping in today to share one of my "out of order" City Sampler blocks update. All of these feature triangles, and all were pretty straight forward. I didn't have any problems with these with the exception of number 45. If you look at that one, the top of my triangle isn't there, but I can live with it, it is one of those "good enough" blocks. I really like all the fabric choices for these, and it is amazing to me that even though I am not using any Tula Pink fabric, some of my blocks are pretty darn close to the ones in the book. Neat how that works out. For example, block number 46, pretty similar, or at least I think so. Well that is it for today, hopefully I will have some finishes to show you guys later this week! Wondering what all of this is about? Here are the details:
Book: City Sampler 100 Modern Quilt Blocks by Tula Pink Quilt Along: Hosted by Sara over at Sew Sweetness Flickr Group: http://www.flickr.com/groups/citysamplerquiltalong/ Blocks: 6.5" x 6.5" Featuring the fabric line Constellations by Lizzy House. Today is the official start of the One Block Wonder Quilt Along hosted by Quilter in the Closet. As you can see I got a little head start (I was too excited to wait!) This quilt along is based on one of three books by Maxine Rosenthal. You could purchase any of the three, so I decided to get the first one, One-Block Wonders - One Fabric, One Shape, One-of-a-Kind Quilts. This book covers all the basics of how to make a One Block Wonder quilt, thus I was able to get a head start. The book covers fabric selection, how to cut, sew, arrange and put together your quilt, all from one fabric, and just one block shape, though you do have the option to either make a hexagon or an octagon shaped block. I am going the hexagon route, especially since I already had a 60 degree triangle ruler. Be it that the official start of the quilt along is today, the host (Jen) has an interview with the book's author on her blog today, you can read that interview HERE. After quite a bit of deliberation, I chose this fabric (see above,) isn't it pretty? This fabric is by Valori Wells and is from her Cocoon line, this specific print is Liv in Sapphire, and since I am a September baby, I have always been partial to sapphires! The whole point of this type of quilt is based on your fabric choice, so you need to pick a large scale print that ideally has a 24" repeat. This one has a 24.5" repeat and the smallest foreground butterflies are in the 4" range. It also helps to pick a print that doesn't have too many colors. I felt this print was just right, and I love not only the print, but the colors, so I know I will love the finished quilt! This past weekend I took the time to precisely cut out the fabric, there is a specific way that Maxine teaches in the book of how to perfectly line up and cut your fabric, which was actually easier than I thought it would be. The fabric strip above is 6 layers stacked on top of each other and the print is perfectly lined up on top of one another. You can also see my brand new Olfa Splash Rotary Cutter, which I love. It really helped to have a brand new blade, especially since I was slicing through 6 layers of fabric. After the strips are cut, you then cut out the 60 degree triangles. I was able to cut out 19 triangles from each strip, thus making 19 blocks from each strip. I cut six strips, so by my calculations I should be able to make 114 blocks. After everything was cut I couldn't help myself and laid out the first five blocks! Eek....so cool! Look how they are transformed. I am beyond excited by this one, can't you tell! Since I had these five laid out, I HAD TO sew them together. So here are three of the five sewn top and bottom rows only, they are just pinned together in the middle, so there aren't any frustrating Y seams, you sew this quilt together in rows. I stopped at this point because I had to finish up some other WIPs, but as soon as I've wrapped up a few things, I will be working on this one, full force! Fancy to join along? Go check out the details, there is plenty of time to join in!
I am at the point in which I start sharing my blocks out of order, just to be "caught up." Hope you don't mind, these are the blocks from last week and this week. My next post may be blocks from a few weeks ago, I just wanted to be in the present with these things! I have through block #70 done, just not the time to blog about them, so I'll probably never show off just three, but always six, this way if you have no interest in this sort of thing, don't read these posts! HA! These first three blocks, ughh...two of them made me pull out my hair. I am hoping they are the hardest of the book and that they are now behind me. Block #49 was simple enough, no complaints, though I will say that I did not enjoy this triangles chapter, just not very enjoyable and certainly more time consuming than all the other blocks made so far. So then we move onto block #50. The triangles were a breeze, but I unpicked those middle lines more than I care to admit, had puckers and ended with puckers. I gave up and just let it be. Then when I added the bottom and top rows, the middle section wasn't the right size, so they stick out, yuck, yuck, yuck. And yep, I'm leaving it. So I have one totally crap block in the quilt, oh well. Then there was block #51, below, this one wasn't as bad, but I'm not going to lie, those flying geese are wonky as heck. Stitched together it doesn't look so bad, but it is. Moving on. I do like my fabric choices for these blocks, so one positive. The next three, blocks #52 - 54 were pretty simple, I had no major problems and I have points on my triangles, so that is all that matters, right? I really like #54, one of my favorites for sure! Wondering what all of this is about? Here are the details:
Book: City Sampler 100 Modern Quilt Blocks by Tula Pink Quilt Along: Hosted by Sara over at Sew Sweetness Flickr Group: http://www.flickr.com/groups/citysamplerquiltalong/ Blocks: 6.5" x 6.5" Featuring the fabric line Constellations by Lizzy House. I have a book review and project to show off today! I will start with the book, Beginner's Guide to Free-Motion Quilting by Natalia Bonner. Natalia machine quilted one of my quilts for me a few years back, you can see it HERE. When I heard that she was publishing a book about quilting on your home sewing machine, I was fascinated. I immediately read the book cover to cover, but didn't feel confident enough to really tackle any projects, so the book sat for a while. The book starts with the basics of quilting and how to set up your machine for free motion quilting. The first part of the book, the majority of it, are the patterns and techniques. The book goes over allover quilting, background fillers, borders and sashings, custom quilted blocks and finally quilting on applique. You can get a feel for how this part of the book is laid out by seeing my photo below. There are quilted examples, then drawn images to see how the technique is stitched and written instruction. It makes it all so clear and simple to understand. The second section of the book is six original quilt patterns by Natalia Bonner, this is a neat addition to the book. Lastly the book ends with stencils or the quilting patterns full scale. If you don't feel confident enough to draw the stitches free hand, you can use these pages as stencils, and trace the patterns onto your quilt first with a washable marker, Hera marker or whatever your favorite method it. This section is nice to see the actual scale of these patterns. The book is a really good reference book in regards to looking up patterns and getting ideas of how you can quilt your quilts, it certainly has come in handy for me! OK, now on to my project, fast forward to the middle of this summer when I realized that my niece's birthday was approaching quickly (beginning of September) and I had this fabric panel that I was wanting to turn into a quilt for her. The panel is by Deb Strain and from the Luv U collection of fabrics and I had purchased it quite a while back, knowing that eventually would make a quilt for my niece. After deciding to go ahead and use the panel, I just added two simple pink strips of fabric to each side and then a pretty Riley Blake floral print on either side of that. I just wanted to make the quilt a tad bit wider, but not any longer, the panel was the right length (42".) Once the top was done, I had a solid piece for the backing, so I basted it together with safety pins and then had to decide how to quilt it. This is the point that the book comes into play. At first I thought I would hand quilt it, but couldn't decide on a good pattern. I also had a problem to work around. The panel was printed slightly off-grain, so instead of being straight up and down, it had a good lean to it, like the top went to the left and the bottom went to the right, so I really wanted to try and quilt it in such a way to shift it back to straight, or at least to visually look straight. I wanted to stretch myself and do something other than just a normal plain stipple. I pulled out the book and started looking through the patterns. Once I stumbled upon the the "Loops and Hearts" pattern found on page 30 (see above photo,) I knew it was the perfect pattern, and a great learning pattern, because honestly the only free motion quilting I have done so far was the basic stipple and I felt ready to broaden my horizons. I set up my machine, loaded some light pink quilting cotton thread, and just went for it. Since I was trying to shift the quilt back to straight, rather than a lean, I started quilting on the panel in the upper left hand corner, then continued quilting diagonally all the way to the bottom right hand corner. Once I had the feel for the pattern, I was on a roll. After I had this section quilted, I then just had to fill in the upper right corner and the lower left corner. Honestly, it didn't turn out perfect in spots (far from it,) but once I got the hang of it, I had some really nice sweet spots, see the photo below to see the pattern up close. All in all it took me around 2 hours to quilt the entire panel section, and I was pleased as punch with the results. Once the panel was quilted, I then had to decide how to quilt the side borders, so I turned back to the book. After looking through it for a while, I decided to dive in and try the "Poppies" pattern found on page 70. You can see my flowers below, I was also pleased as punch with these results too. Yes, they aren't perfect, but what flowers are? So I did a line of Poppies on either side of the panel in the light pink strips. Eek...I'm drawing with my sewing machine and thread, how cool is that!!! One set of borders to go, so once again I consulted the book and decided on "Swirls" found on page 66. I actually found this pattern to be the most difficult for me, it was a larger pattern and I struggled to get "even and smooth" circles, but on a whole, I think it turned out fine and was a great learning experience! You can see my less than perfect results below, but heck, this quilt is for a five year old, I don't think she will mind. Once the quilting was done, all I had to do was bind it and add fabric hoops for wall hanging. I added four fabric hoops to the very top of the quilt, just in case this became a wall quilt vs. one that was actually used. I used some Patty Young Sanctuary fabric for the binding, such a pretty bright pink. I also used my new favorite way to bind a quilt, totally by machine! I found out about this technique through Leanne at She Can Quilt. She used this method on her Octagonal Orb Quilt, and mentioned that she learned about the technique from Marianne at The Quilting Edge. You can find out the details of this technique HERE. My corners turned out fairly well and I didn't have to unpick any section of the binding, it works like a charm and is SO QUICK compared to hand sewing the binding. I'm in love! So I know you were wondering if I was able to straighten out the panel with my quilting so that it wouldn't be too wonky. Well I am pleased to say that I was successful. The two photos below are my proof. The photo to the left is what the quilt look liked after quilting and binding. The panel was fairly straight, but the edges of the quilt are pretty darn wavy, a.k.a. it did NOT lay flat. But....after machine washing....all flat and perfectly smooth, as seen in the photo to the right! I was thrilled that since the quilting was fairly dense, the texture didn't change after washing, but since it shrank incrementally, it just smoothed out so nicely. Here is a photo of the back, washed and ready to gift! I washed it on a normal cycle, with one color catcher, but apparently didn't need it because none of the colors bled, and the color catcher was white when the cycle was over. I threw it in the dryer, normal cycle and it dried so nice and soft. I used a poly/cotton blend batting that was pieced from two smaller pieces to make a whole and you can not see the pieced line at all, even when you hold up the quilt to light. Once washed, I had my five year old help me hold it up, he reluctantly agreed and was just tall enough! I am happy to say that this quilt has been gifted to my niece and she loved it. I don't think it will make it to the wall, but will be a much loved and played with blanket. I couldn't be more thrilled with that, because isn't that what quilts are for?
Hello and welcome to my little blog! I am thrilled to be participating in the 3rd annual Craft Book Month hosted by Craft Buds. If this is your first time visiting my blog I would love to have you stick around and discover all the cool things going on in my little world. Below is a mosaic featuring just some of the projects I have made in the past few years, just to give you a little taste of what I am all about! Today I will be showing off a project and reviewing the book, Bags the Modern Classics - Clutches, Hobos, Satchels & More by Sue Kim. When I was first asked to participate in this blog hop I knew instantly that I wanted to make a bag, the problem was, which book??? I own A LOT of handbag sewing books. I pulled them all out, picked out my favorite bags and in the end decided on the Rebecca Bag from Bags the Modern Classics book. I was just so drawn to the shape of this bag, so cute and large, and one that has been on my to do list for quite some time! This book is laid out in a really nice format. The first part of the book explains basic terminology when bag making (types of stitching and how to clip curves.) The next section breaks down different parts of bag making in easy step by step directions and photos (how to install a zipper, how to install an interior pocket, how to make piping.) This makes it really easy to customize each pattern in the book, which is really nice. If you want to add a pocket that isn't called for in the pattern, you just look it up in the front of the book and you can easily figure out how to incorporate it into your bag. After the basics, the book is broken into three sections (small bags, clutches and large bags) and in each section are several patterns to chose from. For example the large bags section includes the patterns and directions to make 12 different bags. Most of the bags in the book offer several different size options, which makes for limitless varieties. This book comes with two double sided full size pattern sheets. The bag patterns are layered on top of one another, so in order to use one you will need to trace the pattern onto something else. I just use wax paper, which works great, is cheap and see through, so it works great for fussy cutting the pattern pieces onto the fabric. This book includes step by step photos (which I love) and written directions and is very easy to follow along and understand exactly what you are supposed to be doing. The projects are not labeled by easy or hard, but I think there are enough directions that even a beginner could tackle the majority of the projects in this book. The Rebecca bag called for minimal supplies, basically fabric, interfacing, thread and a zipper. Simple enough! Once I had chosen this pattern, I then had to dig through my stash to see what would work for this pattern. I actually had quite a few choices in my stash that would have worked perfectly, but in the end I settled for two lovely prints from Anna Maria Horner's Field Study linen/cotton blend of fabrics. The author suggested using either quilting-weight cotton or home decorator fabric for this bag, and since the linen/cotton blend was somewhere in between the two, I figured it would work perfectly (and it did!) The cutting directions were based on 44" wide fabric, but since my fabric was 56" wide I was easily able to cut the main body and pockets out of 1 yard, and I used 1/2 yard for the handles (with plenty of leftover.) I then used 1 yard of quilting-weight cotton for the lining and bias binding on the inside of the bag. The pattern called for a heavy weight fusible interfacing. I chose to use Pellon Shapeflex 101, which is a mid-weight interfacing, and I interfaced EVERYTHING. All of the exterior pieces, the exterior pocket, the handles, and the lining. This was a smart move and made the bag just sturdy enough, but not too bulky to sew. Though I will say that this bag does not support itself, it is a wee bit floppy. If you want to make the bag stand by itself, you just need to use a heavier duty interfacing, but honestly I think my bag is perfect. I followed most of the directions exactly with the exception of a few additions or small changes. The first change that I made to the pattern was to add extra length to the handles. I added around 4" extra to each side, which was a good idea, but honestly I could have added more because it barely fits on my shoulder. Next time I will add between 6" - 8" to each handle. If you make the pattern "as is" then you will have a carry only bag that doesn't fit on your shoulder comfortably. Which is fine, it just depends on what you plan to use your bag for! The next addition that I made was to add an exterior zip pocket to the back of the bag. I use this pocket for my keys and sometimes my phone. This book does not include directions on how to install a pocket like this, I just knew how already (sorry folks) but I am sure you can find directions online how to install this sort of zipper. I purposely made it fit in between the two handles, and this worked out so nicely to hide those zipper ends that sometimes don't come out exactly perfect. You can also see in the photo below the extra small zig-zag stitching that I did to reinforce the handles on the bag. The author's directions were to just stitch straight across, but I wanted a little more strength at the point in which the handles become "free" from the bag itself. The last addition that I made to this bag was to add an interior pocket to the inside. Directions for this type of pocket are included in the book, and this type of pocket is super easy. I divided the pocket to include a spot specifically for my ink pen, which is something that I do every time I make a bag for myself. No searching around for that pen at the bottom of the bag! You can see the Momo quilting-weight fabric that I chose for the interior, which I think only "slightly" matches the exterior, but I am a bit wild and crazy and this is just perfect for me! This is the very first pattern that I have ever made that uses the technique of sewing the exterior and lining pieces together and having raw seams on the interior of the bag that have to be covered with bias binding. At first I thought about altering the pattern to have enclosed seams so that I could skip the binding step, but decided against it because I thought there had to be a reason as to why the author would construct the bag in this manner. After it was all said and done, I realized she did have a very good reason. The bias binding on the inside actually gives the bag more structure and holds the shape much better than if the seams weren't encased. I thought I wouldn't like this step, but honestly I used Clover Wonder Clips to hold all the layers together, used a heavy-duty sewing machine needle and plowed through, and it worked perfectly with no problems. You can see my bias binding above. It isn't beautiful or perfect, but it is inside the bag and you don't really notice it when you are using the bag, it just blends into the corners and curves. I opted to buy a 22" Coats and Clark Purse Zipper that features two sliders and closed bottoms on each side. It is a touch heavier duty than a regular zipper and the double sliders make it feel like a real handbag and not a handmade one. I was really happy with this decision and I love the look of it. This bag pattern has a large front pocket that runs the entire length of the front of the purse. It is divided into three sections once you sew on the handles and each pocket is a great size for your phone, sunglasses, keys or whatever you want to just drop in. I took special care to line up the floral pattern when cutting out this pocket so that it just blended into the front of the bag. I love how the roses run up the center in between the handles. The author also added the little tab details on either side of the zipper ends, which I think was just the perfect touch, it adds a little something "extra!" The photo above shows the bag stuffed with an over-sized plush blanket that I had laying around. This bag is BIG! It could easily hold two over-sized beach towels, maybe even three. I plan to use this bag when traveling, it will work great for holding all those overnight essentials, change of clothes, normal purse stuff, you know when you need to carry all those extras when traveling. In the picture below I am holding the bag and I hope it gives you a good example of just how large this bag really is. It measures 17" from bottom to top, not including the handles. Overall I love the finished product and have plans for another in the immediate future. I really enjoy this book and love the majority of the projects in it, I can definitely see making more bags from it, and would especially love to try one of the clutches. If you are thinking about getting into handbag making, this book would be a great starter for learning all the basics and in the process of learning you will end up with a really great handbag yourself! Blog HopWeek OneMonday 9/2: Fabric Mutt / LRstitched Tuesday 9/3: Stitch This! The Martingale Blog / Stitched in Color Wednesday 9/4: Fabric Seeds / Pile O Fabric Thursday 9/5: The Feisty Redhead / Rae Gun Ramblings Friday 9/6: Sew-Fantastic / Clover + Violet Saturday 9/7: A Prairie Sunrise / Small Town Stitcher Week Two Monday 9/9: Hopeful Threads / Go To Sew Tuesday 9/10: The Sewing Rabbit / Sewing Mama RaeAnna Wednesday 9/11: Marci Girl Designs / imagine gnats Thursday 9/12: Sew Sweetness / amylouwhosews Friday 9/13: Lindsay Sews / 13 Spools Saturday 9/14: Inspire Me Grey / Angela Yosten Week Three Monday 9/16: Sew Very / Craftside Tuesday 9/17: The Littlest Thistle / CraftFoxes How to Enter: 9/1 - 9/30: Link up your craft book project at Craft Buds from your blog or Flickr account, and enter to win prizes. Winners will be announced on Tuesday, October 1! To participate in the month-long contest, just link up any project you've made from a pattern in a craft book. That easy! You'll tell us a little about the book, the project, how you personalized it, etc. Full rules and details can be found at Craft Buds or right HERE! |
Marci GirlA feisty mom designing, sewing and blogging her way through everyday life!
|