• Home
  • Blog
  • 2020 Finish - A - Long
  • 2019 Finish - A - Long
  • 2018 Finish - A - Long
  • Contact
  • 2017 Finish - A - Long
  • Shop
Marci Girl Designs

UR Priceless Coin Purse Blog Hop

11/13/2012

55 Comments

 
Picture
Hello!  Thanks for stopping by my blog today!  This is the last day of the UR Priceless Coin Purse Blog Hop, and I am happy to say that I am one of the participants.  I signed up for this particular blog hop because I have never tackled a "frame" pouch or purse and really wanted to give it a try.  This was a great way to get my feet wet and to join along with tons of really creative participants!

I wanted to make sure and thank Madame Samm over at Sew We Quilt and Katherine over at Sew Me Something Good for hosting, organizing and providing/designing the pattern for this lovely blog hop.
Picture
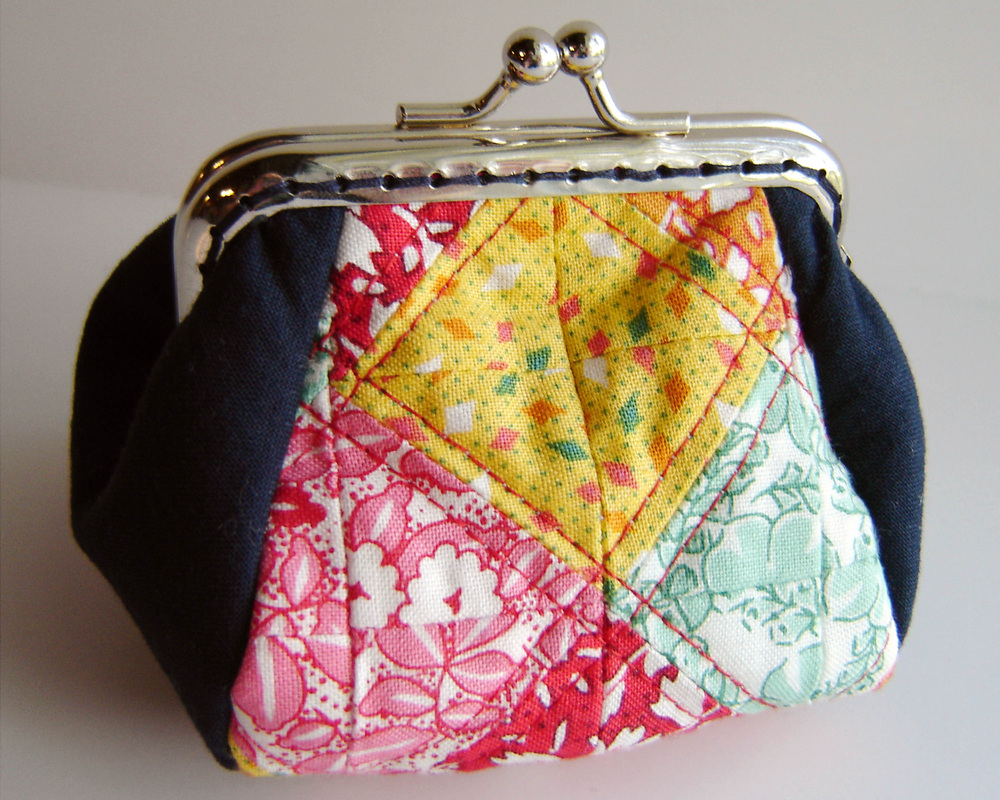
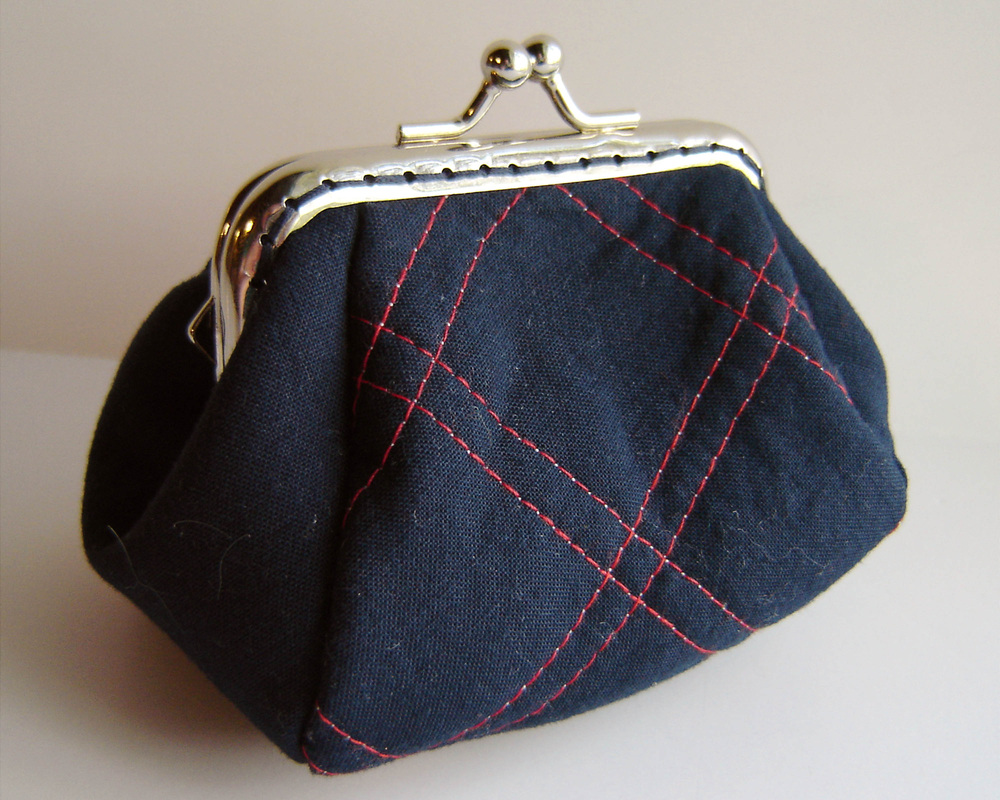
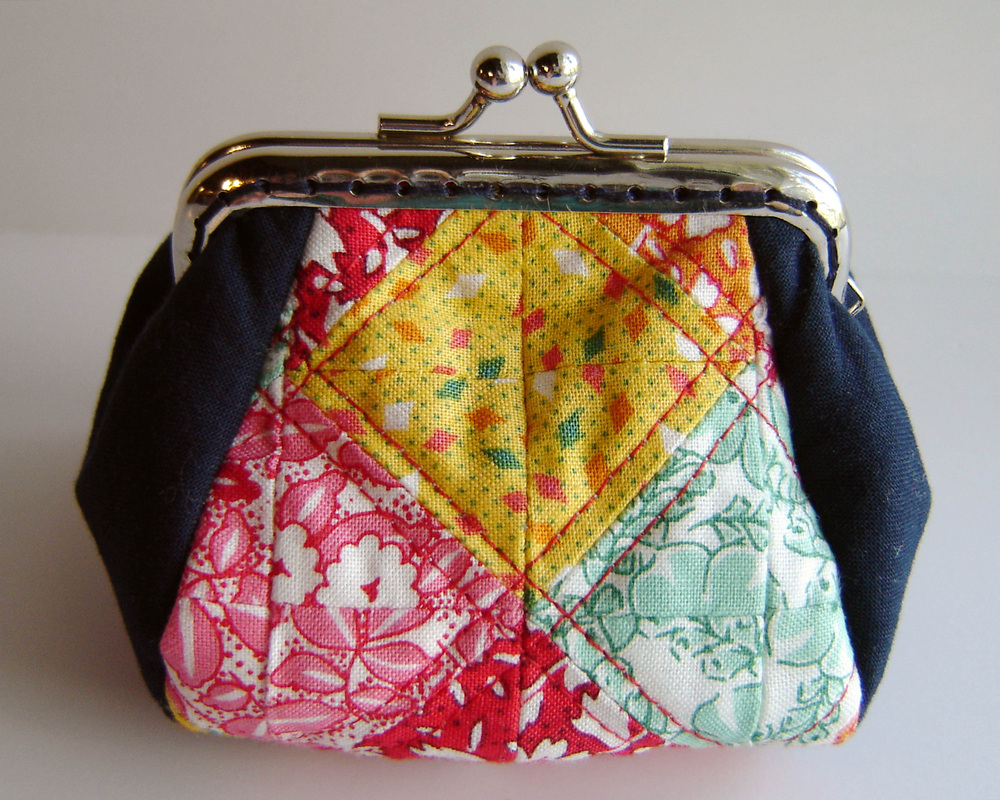
This is my only finished one (at the moment) and I am quite pleased with how it turned out!  For my first frame pouch, I think it is quite cute, and was really a lot easier than I thought it would be.  I started with some tiny half square triangles that I had saved from a previous project, stitched them together and created the front panel for this pouch.  I believe the hst measured 1.25" before they were stitched together, so you can see they are quite small.  After I created this piece, I ironed on the fusible batting and then machine quilted it.  I then echoed the quilting on the back panel of the pouch, just to tie the whole thing together.  Stitching together the pieces of this pouch was really easy, but I will say the size of this pouch is pretty small (a 3" frame) so it was more challenging than something larger.  My experience sewing Barbie clothing from my childhood days came in handy here for sure!
Picture
What is up with all the fuzz on this thing?
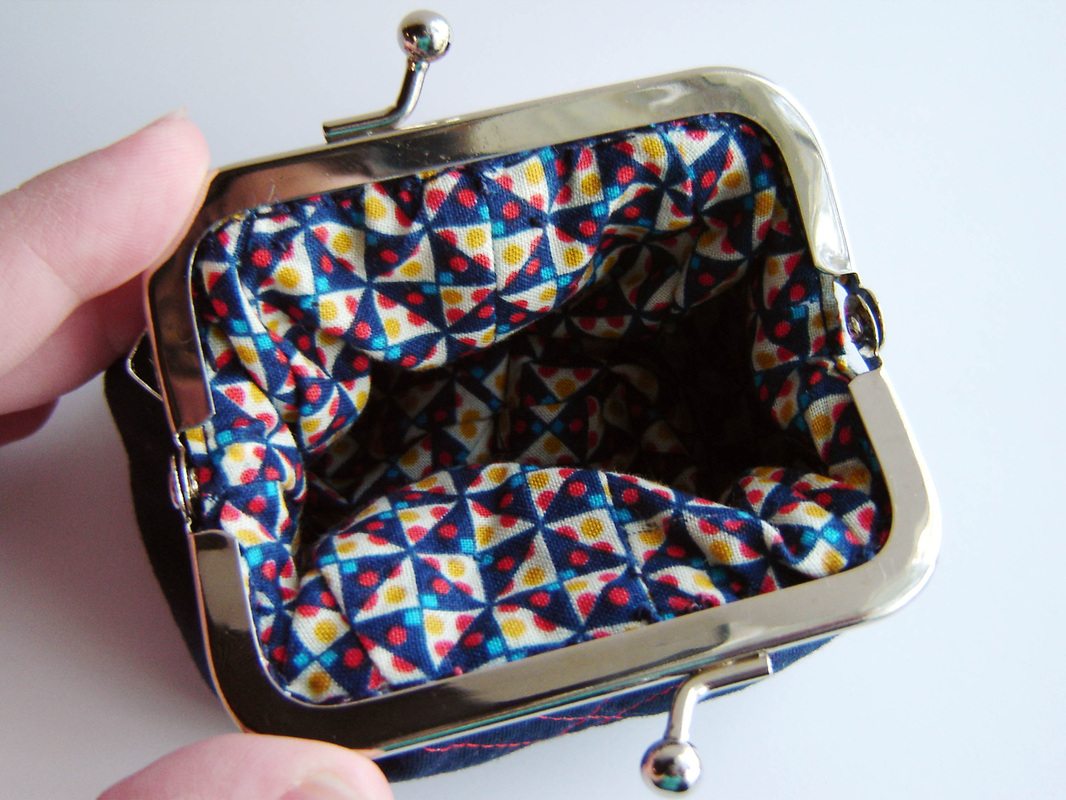
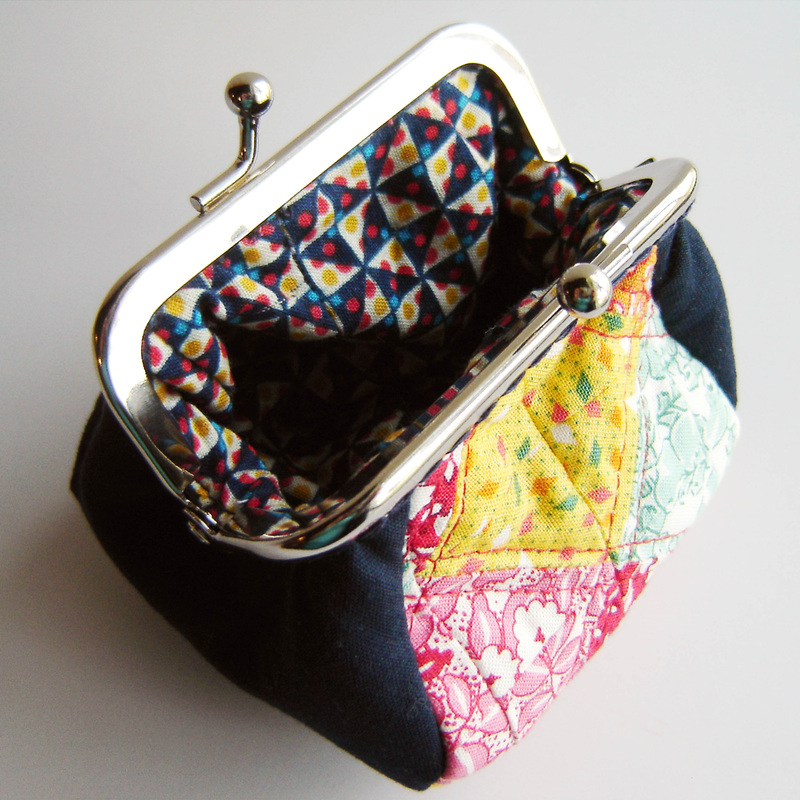
I used a Liberty of London print for the interior of the bag, and continued the color scheme on the inside.  I also wanted to use a busy print on the interior to in essence hide the stitching that does show from hand stitching on the frame.  I think I was pretty successful in this aspect.  Can you see the stitching?  It is there, and it isn't that neat or pretty.  Look hard and I bet you can spot it, it really is a hot mess in there, which is the only real downfall to these hand stitched frames.  But honestly, I prefer not having to use glue, so you win some, you lose some.

I wanted to mention the hand sewn metal frame process.  This was my first time doing this and I was really unsure as to how it would work out in the end, but honestly it fit much better than I ever would have imagined.  A near perfect fit, I was impressed.  I wasn't sure how to tackle it, so I just stuffed the top in the frame as much as I could and started stitching in the middle, and continued outwards to the sides, making sure the pouch was centered on the frame.  It worked great, I used a medium needle with a big eye, and once you got the hang of it, it really went pretty quickly.  Though it wasn't a perfect process.  I started with a navy blue Pearl Cotton size 8, was almost finished with my first side and the needle pierced the thread wrong and broke it.  No way to fix it other than to start over, take out the stitches and redo it.  Before I started over I tested the thread I was using (by yanking it really hard) and realized it just wasn't strong enough for this application.  Not having any other navy blue thick thread on hand I decided to quadruple up regular sewing thread.  So that is what I did.  Then once the frame was completely sewn on, I went back with doubled up thread and stitched the whole thing a second time for extra security.  This wasn't ideal, but did allow for me to use a needle with a smaller eye, thus making the stitching process easier.  Even with this one hang up, I think the pattern is great and made a cute little coin pouch.

I have another one almost finished, but alas had to go and get sick and wasn't able to finish it on time, bummer.  Oh well, I'll show it off once I have it finished.
Picture
This photo shows the scale of this little coin pouch. Or I have enormous huge fingers...
Make sure to hop on over to all of the other participants today, check out their blogs and their versions of this cute little coin purse.  The full blog hop schedule can be found at Katherine's blog, Sew Me Something Good.

Julia P
Tina
Dachsies With Moxie
 -----> Marci Girl Designs <--- You are Here!
The Sunflower Patch
Wish upon a star
Mary on Lake Pulaski
Greco Mara
Linda M
Mack and Mabel
Dreaming in Patchwork
Judith Handmade Treasures
Kaydie
Caesarea Scrappers
Patchouli Moon Studio

Sew.Darn.Quilt.
Sew We Quilt
Picture
Thanks for joining me today and reading about my version of this coin purse!
55 Comments

Kids Clothes Week Challenge Fall Edition

10/8/2012

5 Comments

 
Picture
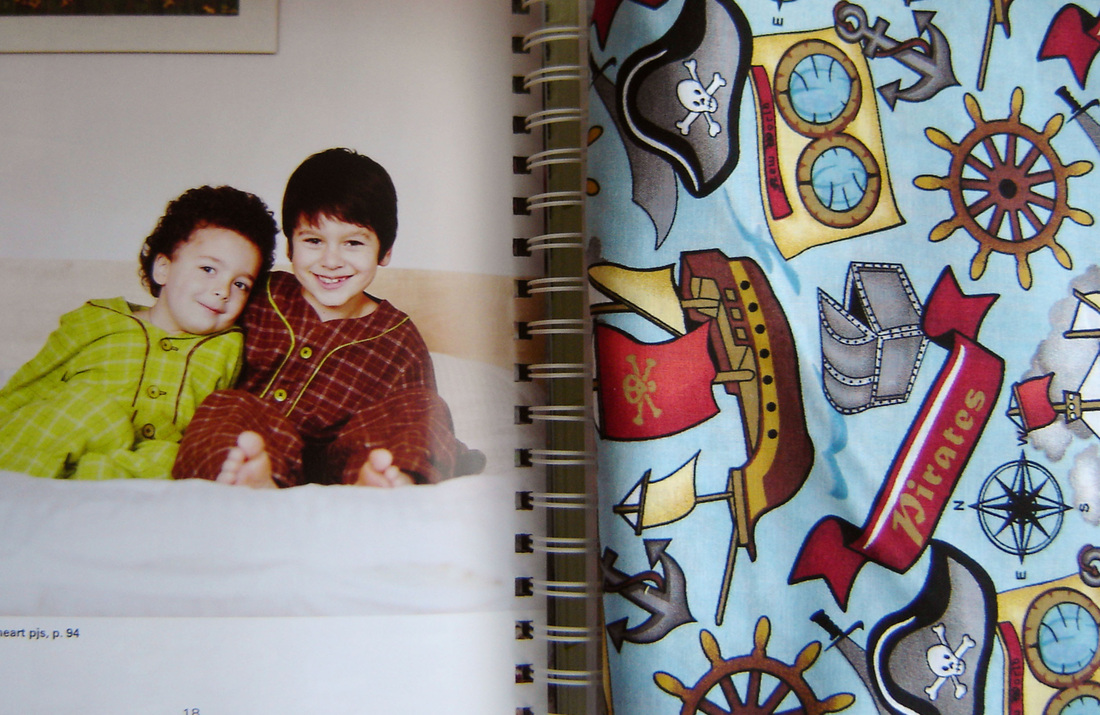
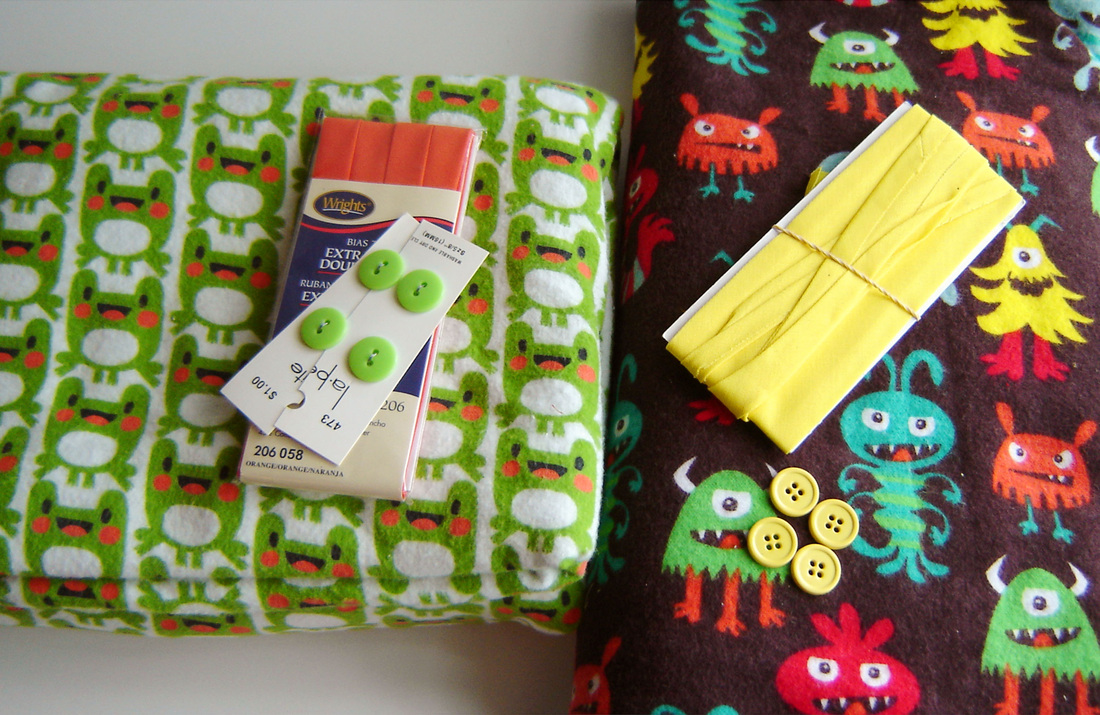
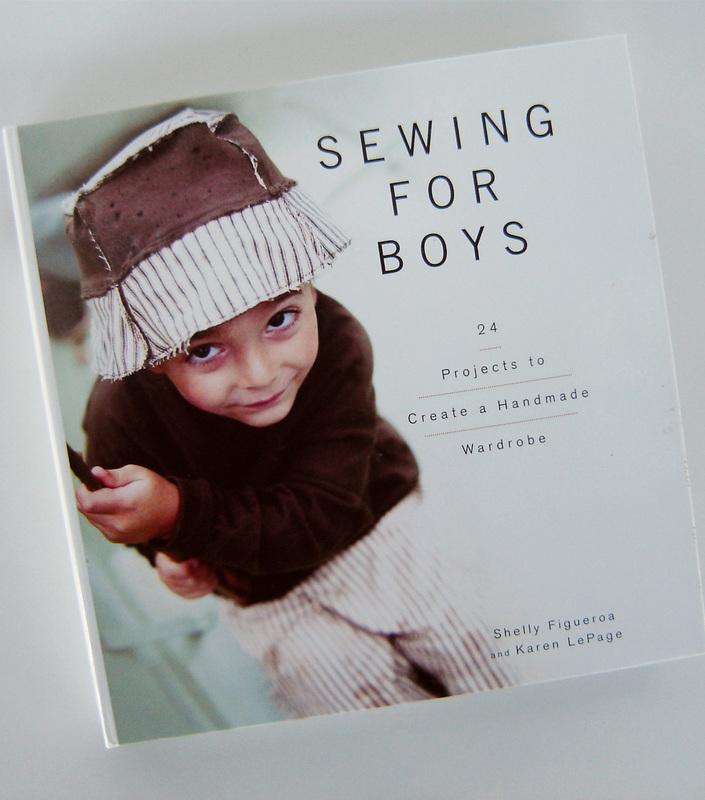
Today is the start of Kids Clothes Week Challenge over at Elsie Marley.  Basically you sew clothes for your kids for one hour a day.  I have a busy week ahead, so I don't know that I'll be able to devote as much time as I'd like, but I am going to try!  I have the pattern, Sewing for Boys, Goodnight, Sweetheart Pajamas.  I have the fabrics washed and notions picked out, which is a pretty good start for me.  I might actually cut them out today too, which would be amazing.  I am going to make a short sleeved version out of the upper pirate fabric since it is a lightweight cotton.  The bottom two are flannel and will be a smaller size for my youngest and a larger size for my oldest, both to be worn next winter, not this winter.  Preparing for the future folks!  I decided to make the same pajamas I showed off lately (the Star Wars pair) simply because they turned out so great and the pattern is fresh in my head and should whip up quickly.  Fingers crossed!
Picture
5 Comments

Le Petite Salon - My Way

10/5/2012

7 Comments

 
Picture
Hello and TGIF!  I just wanted to share my little guest posting over at Sew Sweetness this week.  You can go to the original post HERE, my contribution to the Tula Pink Sew Along was this past Wednesday.  I was so excited to be a contributor in this Sew Along, and so excited to get to make such an awesome quilt for my sweet little boy!  Thanks so much to Sara for having me!
Picture
Picture
The photos that are here on my blog today are the "outtakes" from the photo shoot, you know the ones that didn't quite make the cut.  To be completely honest, I was really disappointed with this photo shoot all-together.  I think that even though I was on a ladder (much higher than I'm comfortable with) the quilt is just too large to fit into the frame well.  I think I would have needed to be on the roof!  Oh well, live and learn.  The wrinkles in the quilt are killing me too, but once again, with a quilt this size I ironed it several times, but the wrinkles just didn't seem to go away.  Yuck.  What is done is done, right?  Below is a shot of my binding all ready to go, I just need to make the backing and quilt it first! HA!  I am just thrilled with this quilt and can't wait to finish it up so that it can eventually go on my son's "big boy" bed (I know, I still have a while, he is only 8 months old!)  I hope he loves it as much as I do!
Picture
You still have plenty of time to make an item from a Tula Pink pattern or using Tula Pink's fabric and enter it into the Sew Along contest.  You can join the Flickr group HERE and get all of the information and details.  There are a ton of great prizes to be had!  Go ahead, join and get sewing!

Tula Pink Sew Along
7 Comments

The Busiest Table Setting That You Ever Did See

10/2/2012

6 Comments

 
Picture
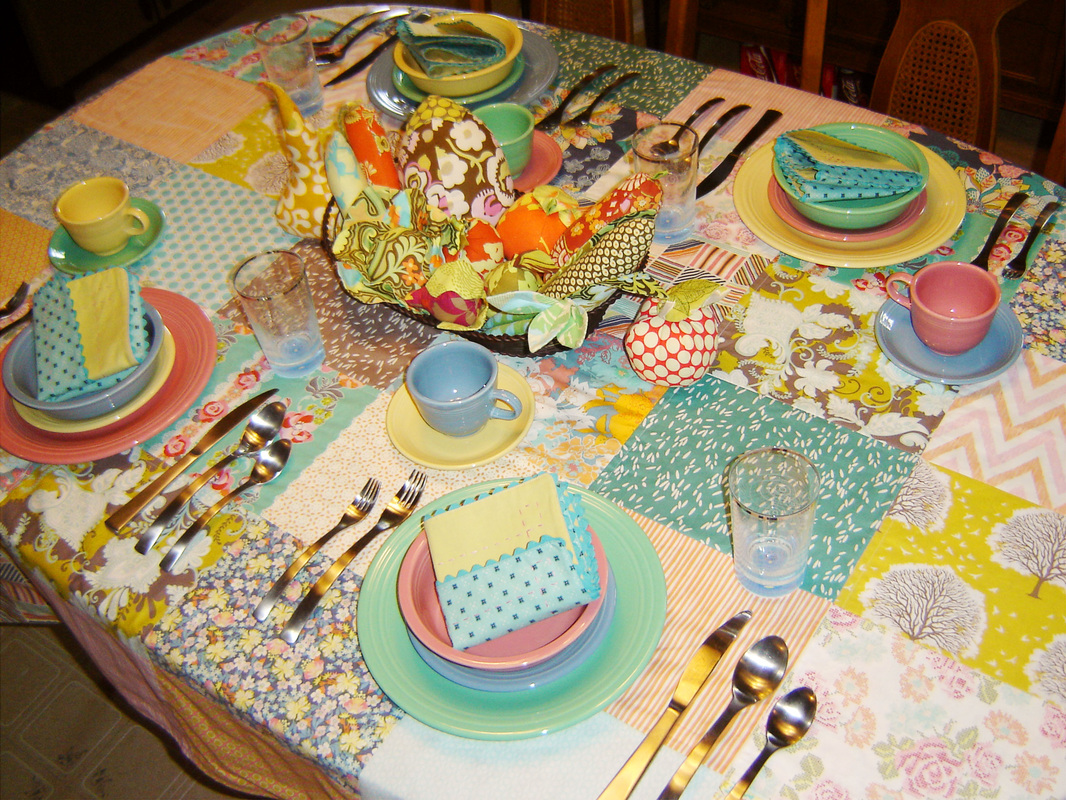
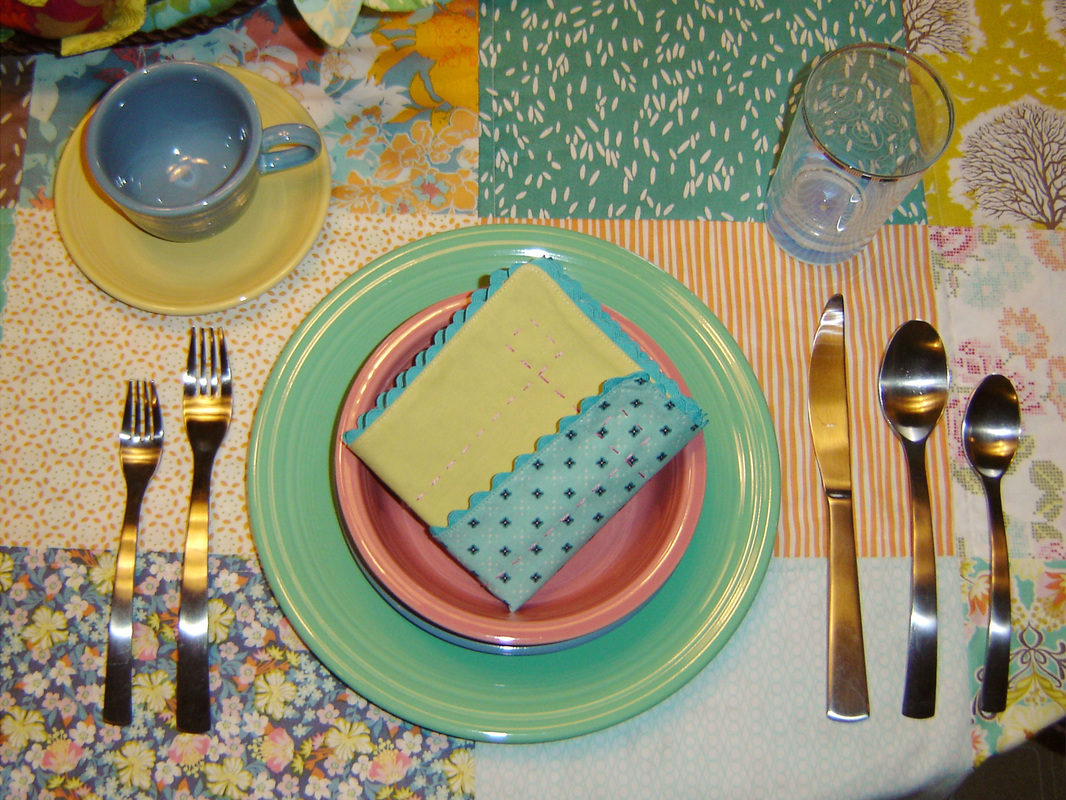
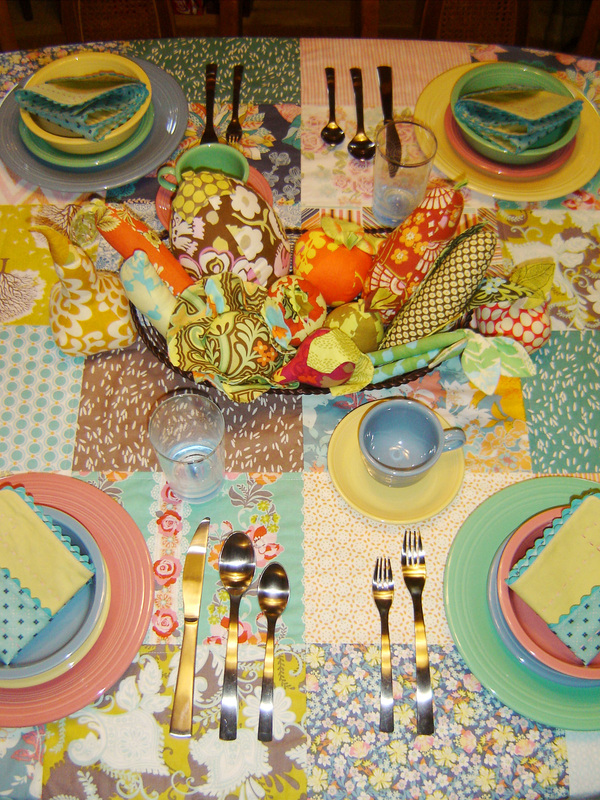
See, I told you, pretty busy huh.  Oh well, that is me...busy!  I recently made a new tablecloth for our dining table.  It is a patchwork tablecloth that includes the fabric lines Echo, Simpatico, Hope Chest, Summerlove, Loulouthi and Modern Meadow.  Quite the eclectic collection!  I bought a fat quarter bundle of Hope Chest by Josephine Kimberling, cut the fat quarter into 4 pieces, added from my stash any fabric that I liked and matched, and presto...patchwork tablecloth!  I just love it, so pretty and so "me!"
Picture
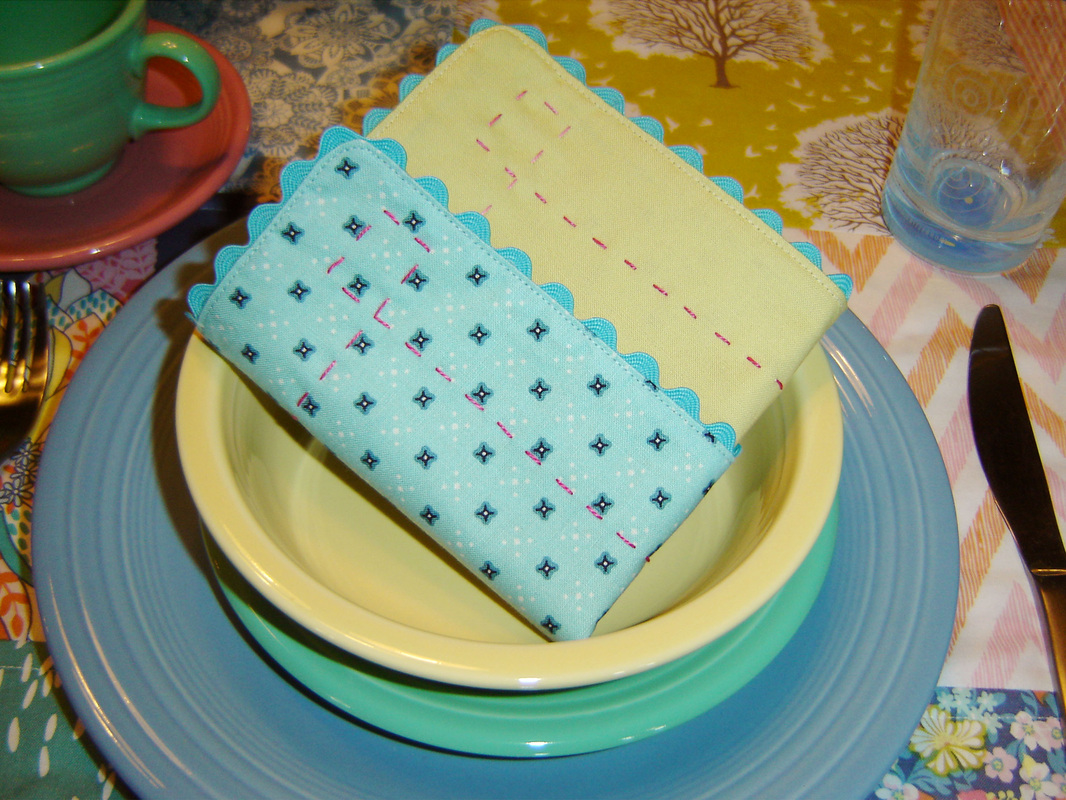
This summer I participated in Rachel's Hand Stitched Class over at Stitched in Color.  One of the last projects of the class were some great hand quilted cloth napkins.  Well you can see those above.  I made eight and hand quilted each one with pearl cotton.  They are trimmed in ric rac and I just love them.  I have them folded into squares and nestled into the Fiesta Ware bowls, so I could show them off, they deserve special attention, don't you think?
Picture
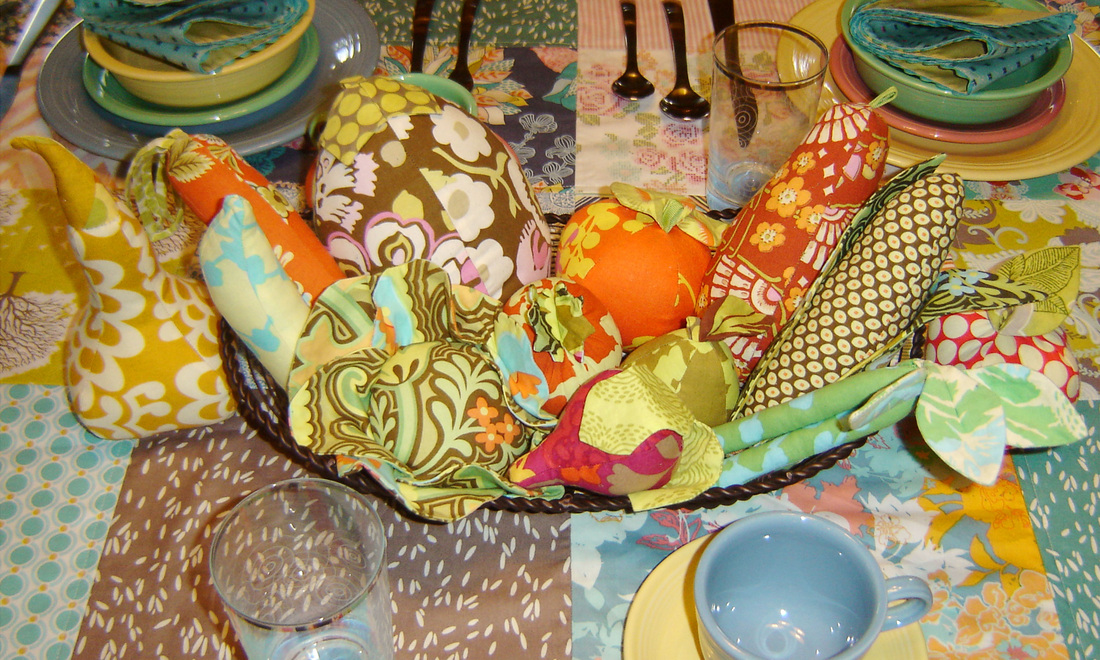
The centerpiece of this crazy wild table are fabric stuffed fruit and vegetables that I made a few years ago for my first son to play with and to help him learn about fruit and veg.  Once they were completed my husband said they were too nice to be toys, so even though my kids do play with them, a lot of the time they work as a great centerpiece on our table.
Picture
Above you can see those cloth napkins in greater detail here.  I used a DS Quilts print from JoAnn Fabrics on one side and a Kona cotton on the back.  Below you can see a closer shot of the centerpiece, all the fruit and veg are nestled in a simple wire basket.  This collection contains two different types of squash, a carrot, banana, cabbage, egg plant, tomato, orange, pear, beet, corn, apple and string beans!  Can you spot each one?
Picture
I am entering this "tablescape" into the Sew, Mama, Sew! contest.  I stitched, then set it up, and now I get to enjoy this wild and crazy table.  Though I will admit, my plates, silverware and glasses do not stay out day to day.  I have two small children for goodness sake, I don't want to think about that kind of disaster that can happen by leaving out all those breakables!  Just keeping it real folks!  I also have handmade place mats that I could have added to this hot mess, but honestly, you have to draw the line somewhere!
Picture
I am also linking up to Tuesday at the Table over at A Quilter"s Table.  Make sure to stop by, get some great recipes and visit all the other link ups!

6 Comments

Sewing For Boys - Goodnight, Sweetheart Pajamas

9/24/2012

7 Comments

 
Picture
Earlier this year over at Elsie Marley, she hosted KCWC (Kid Clothes Week Challenge) where the basic premise is that you sew for just one hour each day, working on something for your children.  I signed up and participated, but honestly sewing (or doing sewing related things like cutting) didn't result in any finished projects, but it did get me started on this project, which was totally worth it.  I think I finished these pajamas about a month later, but at least they are done!

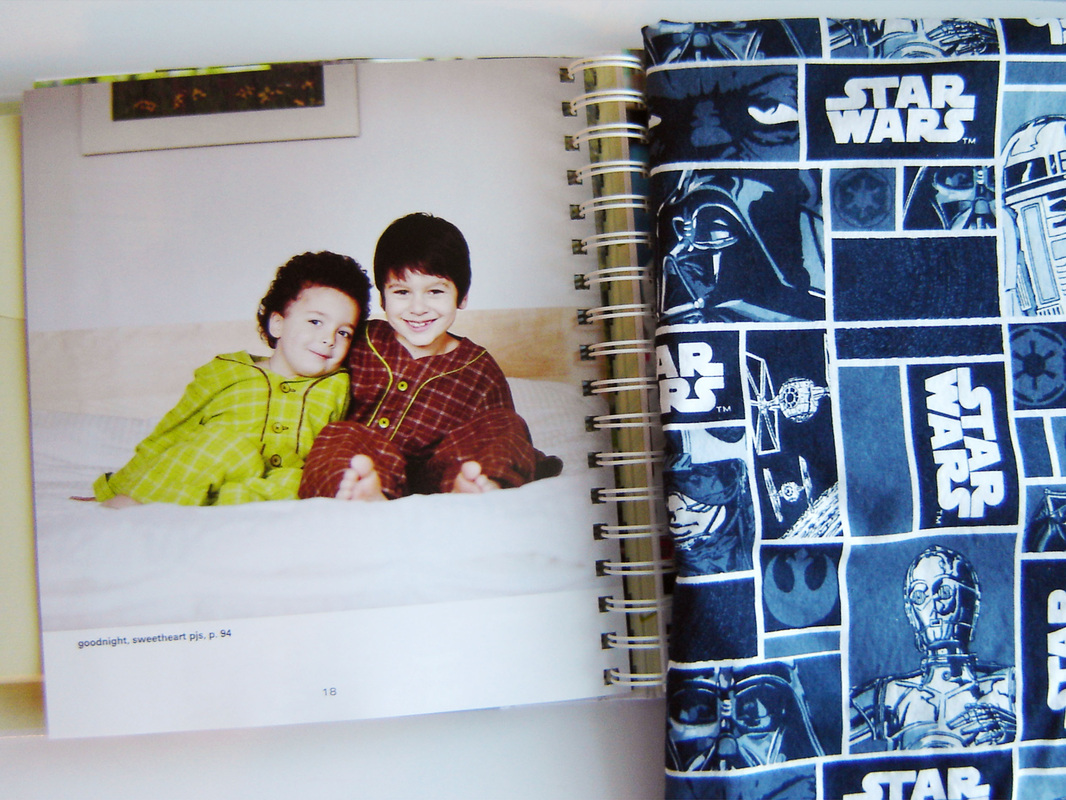
I stumbled on this great Star Wars fabric at JoAnn's and knew my son would love a pair of pajamas made from them.  I grabbed my Sewing For Boys book, fabric, notions and set off to make them.
Picture
Sewing For Boys Goodnight, Sweetheart Pajamas, Page 94
The pattern pieces in this book are printed on pull out pages, but are printed on both sides, so you have to transfer them to something else.  I wasn't thrilled about this, but honestly I traced them onto wax paper, and now I kinda love it.  You trace just the size and pieces you need, super simple.  Any changes, just modify the wax paper and write notes.  I had no problems with the pattern pieces or cutting instructions, all of that is pretty straight forward, but in the same sense I honestly have sewn A LOT of clothes before, so this wasn't new to me.

The one major problem I did have was both a problem I made and a problem with the book instructions, the fabric amount.  The book called for 2 yards of fabric for both the top and pants to make the size 4/5.  So I bought 1.5 yards, which I hate to say is what I normally do.  I have found through the years that pattern makers tend to over estimate the amount you need and I have always managed to squeeze the pattern onto much less, so I buy much less.  The problem came in when I realized that you really needed closer to 2.5 yards to make both.  That is where the extra trip to the store came in to play.  I ended up buying the matching blue texture print (another 1.5 yards) to make the pants and contrasting front facings.  Oh well, lesson learned.  I actually like it better this way, and the fabric I found was a perfect match, so what could be better than that?  Next time I will be purchasing 2.5 yards in order to make this size, and honestly that isn't taking into account that this was a directional print.  If you are making these pajamas in a directional print in the 4/5 size, buy 3 yards in order to have enough, you won't be sorry!  Trust me, I was cursing all the way to JoAnn Fabrics.
Picture
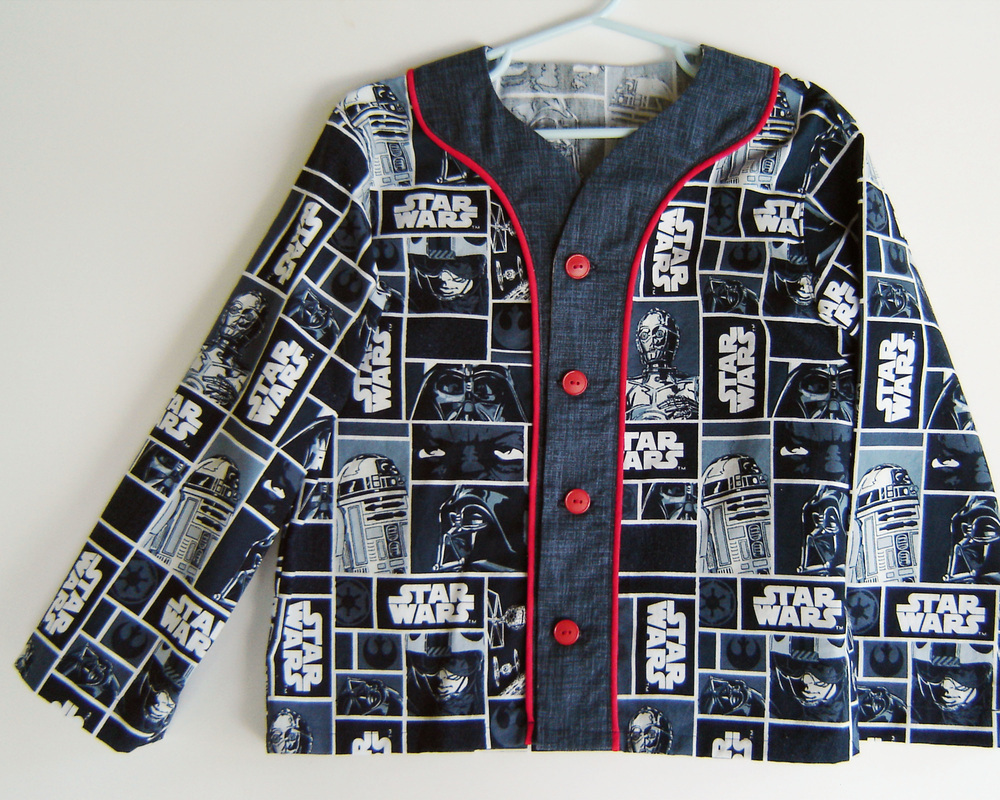
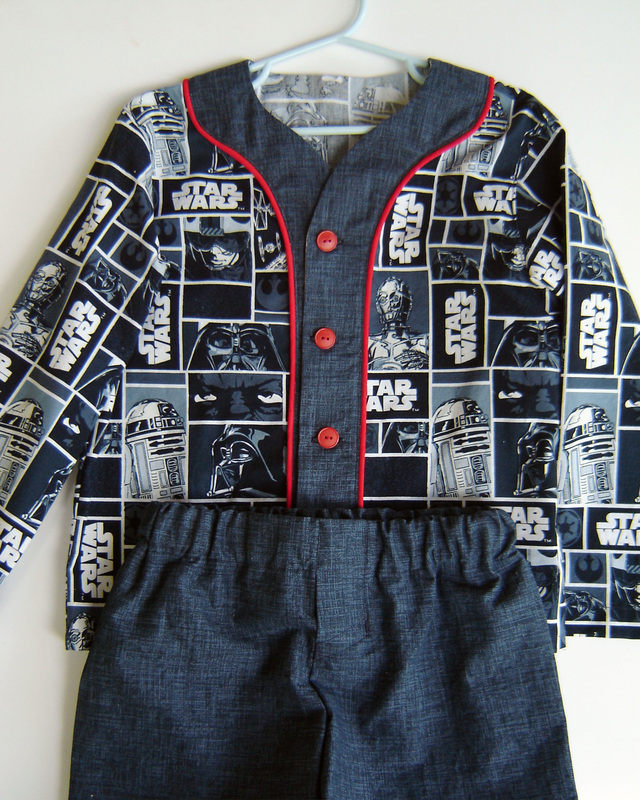
Top - Front View
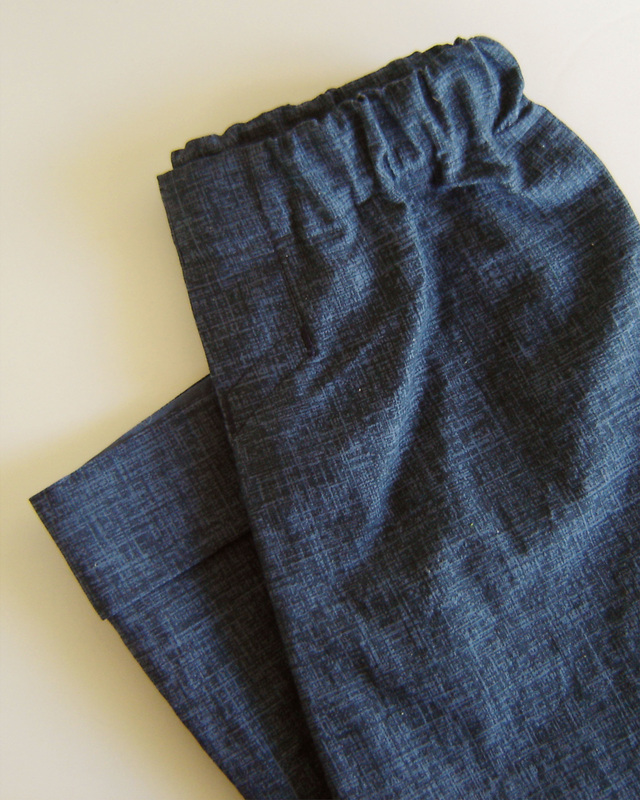
The pattern is really straight forward and easy, I love the way the shirt was constructed, the facing and piping was really easy to install.  I decided to go with the red piping and red buttons to add the extra "pop!"  I love it!  I didn't have any problems with the construction of either the top or bottom and my only complaint is that the book lacks diagrams or pictures of what to do.  I am a very visual learner, and using just the written instructions is hard for me, but I will admit, if you carefully read through, it does explain everything exactly how you need to make it.  I just think a few extra diagrams would have been helpful, especially on things like the faux fly on the pants, which was an optional detail that I chose to add on.
Picture
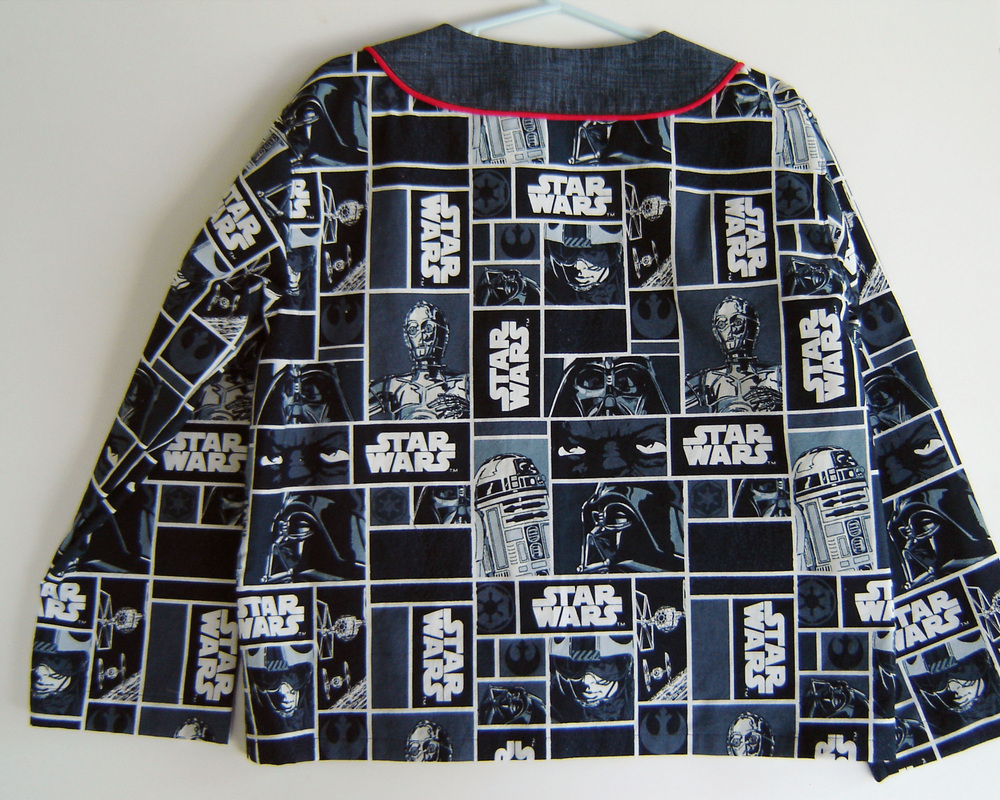
Top - Back View
Overall, I love them and can't wait for my son to wear them this winter.  These are the 4/5 in size and that is the size he wears normally in store bought clothes, so the sizing is spot on.  I finished all the interior seams with my serger for a nice clean finish, and the way that the facing is constructed creates a nice smooth irritation free neckline, which is always nice for little kids.  The elastic waist pants and cuffed hem allow for easy adjust-ability and comfort, which is perfect for pajamas.  I will be making more of these pajamas for both of my boys, and already have bought the fabric!  This is one of those gratifying projects that makes you remember why sewing clothing yourself is such a rewarding process.
Picture
Pants - Faux Fly and Cuffed Hem
Speaking of KCWC (Kids Clothes Week Challenge) the next round is coming up next month, Oct. 8-14, you can pop on over to Elsie Marley to sign up.  I plan to participate again and hopefully start and finish a project this time!
Picture
Linking up to Craft Buds, Craft Book Month Challenge.  It isn't too late to enter something made from a craft book yourself!  Also linking up to Manic Monday over at Sew Happy Geek and {Sew} Modern Monday over at Canoe Ridge Creations.

Craft Book Month at Craft Buds

Sew Happy Geek
7 Comments

The Unofficial End of Summer

9/3/2012

6 Comments

 
Picture
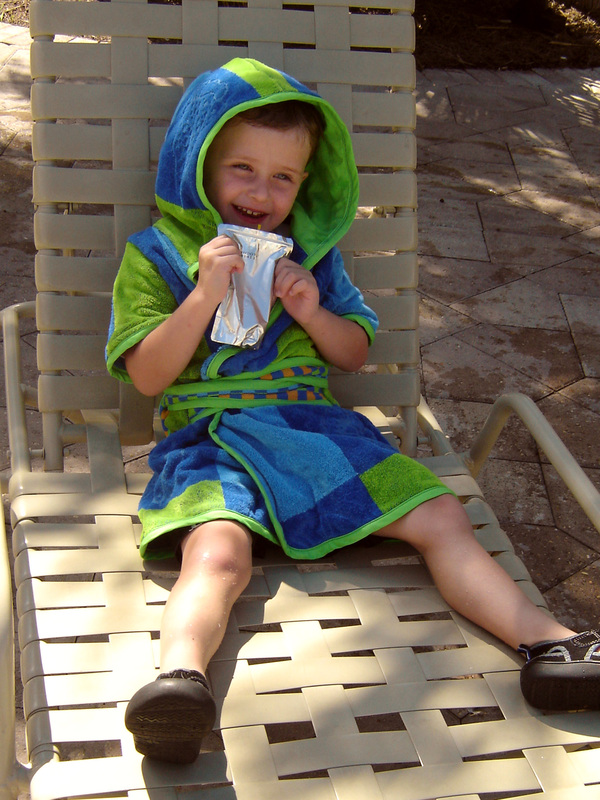
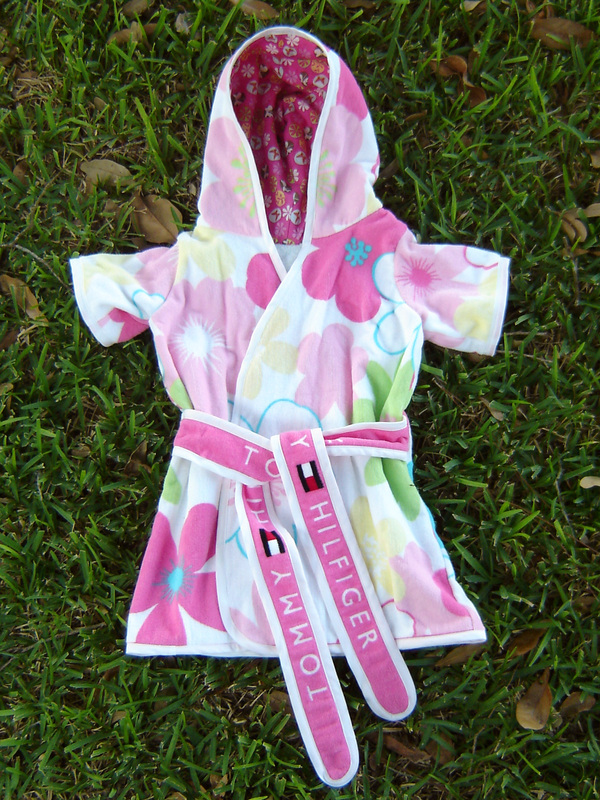
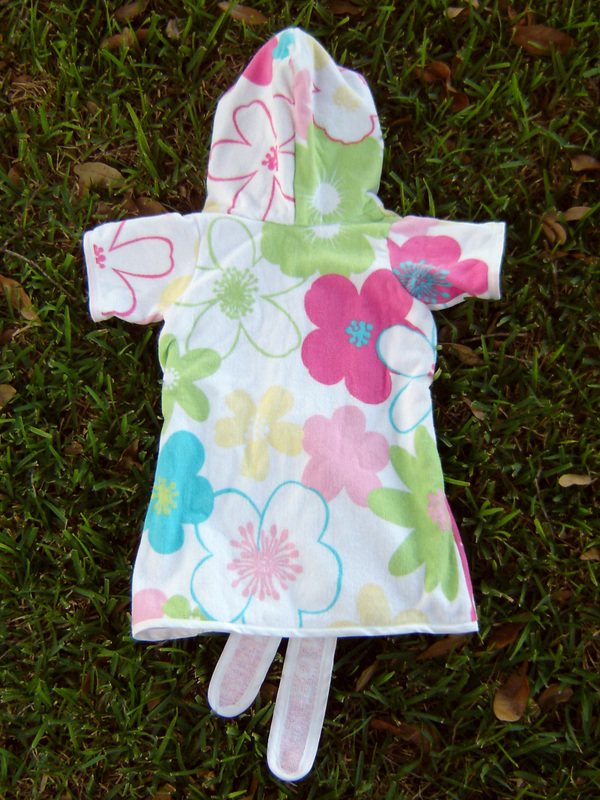
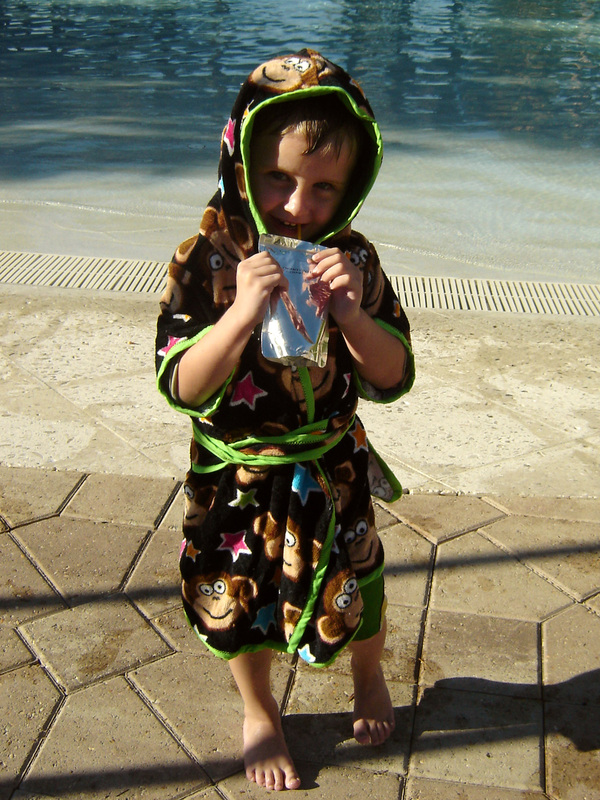
Oh Labor Day, the unofficial end of summer, not technically Fall, but not really the Summer anymore either.  Since most beach days and time spent at the pool are over for most I thought I would share these beach robes that I actually made last year and never got around to sharing on my blog.  These beach robes are from a pattern from Dana over at MADE, and are so fabulous!  You can purchase The Beach Robe pattern HERE.  I sewed up three of them, two for my big boy and one for my niece.  I love them, and honestly think this pattern and use of towels are just genius!  They work great, are easy to sew and the kids love them too.
Picture
The pattern uses either regular towels or beach towels, one or two depending on the size of the towel and size you are wanting to make.  I managed to squeeze by the skin of my teeth each of these robes out of one beach towel, each one was the 3T-4T size.  Since I was making the biggest size the pattern offers, I had to make the robes short sleeved in order to make these robes out of one towel, but honestly that works out great since it is so hot outside anyway!  I lined the hood of each robe with either cotton prints or solids and made my own bias tape out of matching colors of cotton.  All of the edges are either covered with bias tape or enclosed in some way, and the only exposed seams I used the serger to make them nice and neat.  The first one I made, the girly flower one took the longest, maybe about a day, on and off, but the two for my son went together so quickly and I finished both in one day.  I absolutely adore this pattern, and plan to make more for my new little guy next year when he is bigger.  My son wore these last year (that is when I took these pictures) and even though he has grown considerably they still fit great this year, and I honestly think he will be able to use them next year too, which is awesome.
Picture
The most challenging part of this pattern is the cutting out process and since I bought each of these towels on clearance for less than $8.00 each, I was bound and determined to make the pattern fit onto one towel.  Two of the towels (the monkey print and the blue and green color blocked) are directional prints, but with a LOT of thought, I managed to squeeze all the pattern pieces on the towels.  Two of the towels also featured unusual ends, the flower print featured "Tommy Hilfiger" strips on each end that I was able to make work perfectly for the ties on the robe, and the blue and green color blocked towel had a different type of fabric on the ends that wasn't terry cloth, so I had to avoid using it for the main body, but managed to use it for the ties also, which worked out perfectly for both robes. 

This pattern is a great beginner sewing project, especially if you are new to sewing clothes.  Dana suggests the easy way to add sleeves (great for the beginner) or the harder (or normal way) to add sleeves, which is what I did, but either method works great and creates a very professional finish.  Everyone who has seen these robes can not believe that they are handmade and wanted to know where I purchased them.  Nothing better or more complimentary than that!  I think you can tell from these pictures just how much my little guy enjoyed being "warmed up and dried off" after getting out of those cold pools!
Picture
Sad to see the end of Summer, but excited to bring on the colder temperatures and routines of Fall!
6 Comments

Handstitched Class

6/22/2012

11 Comments

 
A bit disappointed that I was unable to attend Sewing Summit later this year, also disappointed that most likely I won't be attending Quiltcon.  Really extremely disappointed that I couldn't be part of the Anna Maria Horner embroidery retreat also.  Do you see a trend here?   I do.  Blah.  Being in the funk that I was, I started thinking about taking Rachel's Handstitched Class.  You know, the Rachel from Stitched in Color.  It would be fun to take a class this summer, so I bit the bullet and signed up.  I will admit that I have done a bunch of these techniques before, but there were a few that I had never attempted, and I thought it would be great fun to learn something new.
Picture
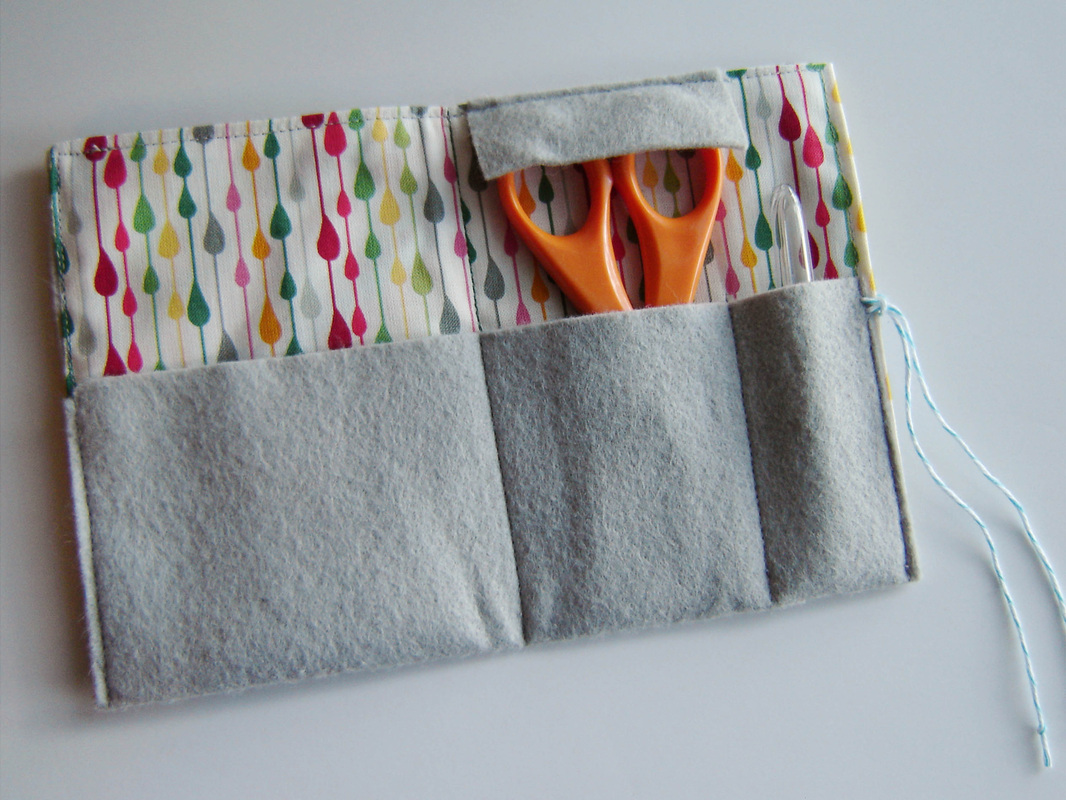
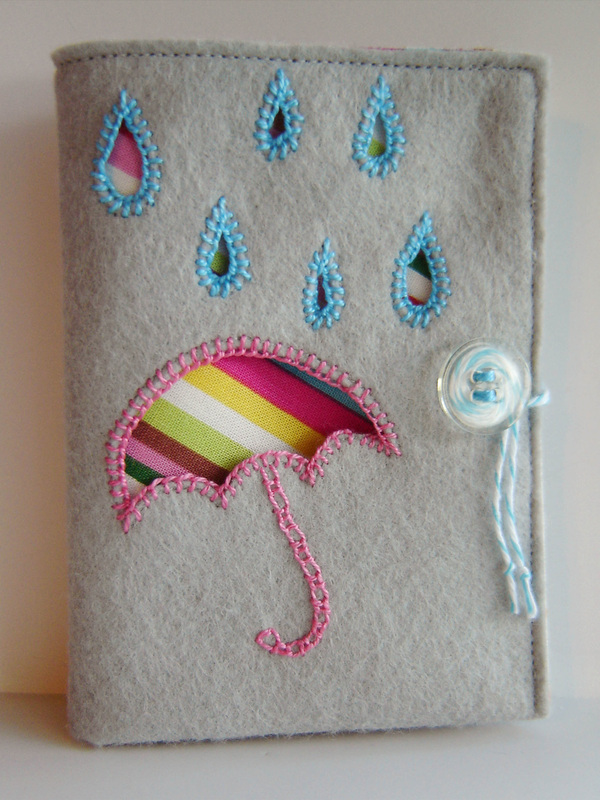
We are already in Week 3, though we have one week of lessons and one week off, so it is really like we are in Week 2.  Unfortunately for me, I am already rapidly falling behind.  Seven projects have been introduced, and alas this little needle book is the only project I have completed at this point.  I do so like it though, and this is the first time I have ever done reverse applique, which is really neat and has so many possibilities.  The blanket and running stitch are not new to me, so I decided to take liberties with Rachel's pattern and create my own design, thus my little needle book features raindrops and a sassy little umbrella.  I didn't have a fancy button, so I went with a clear one that would show off that funky thread that I saved from some packaging I received in the mail one day.
Picture
I thought the raindrop lining fabric was appropriate!  If you were wondering what is next to the scissors, it is my seam ripper, never leave home without it!

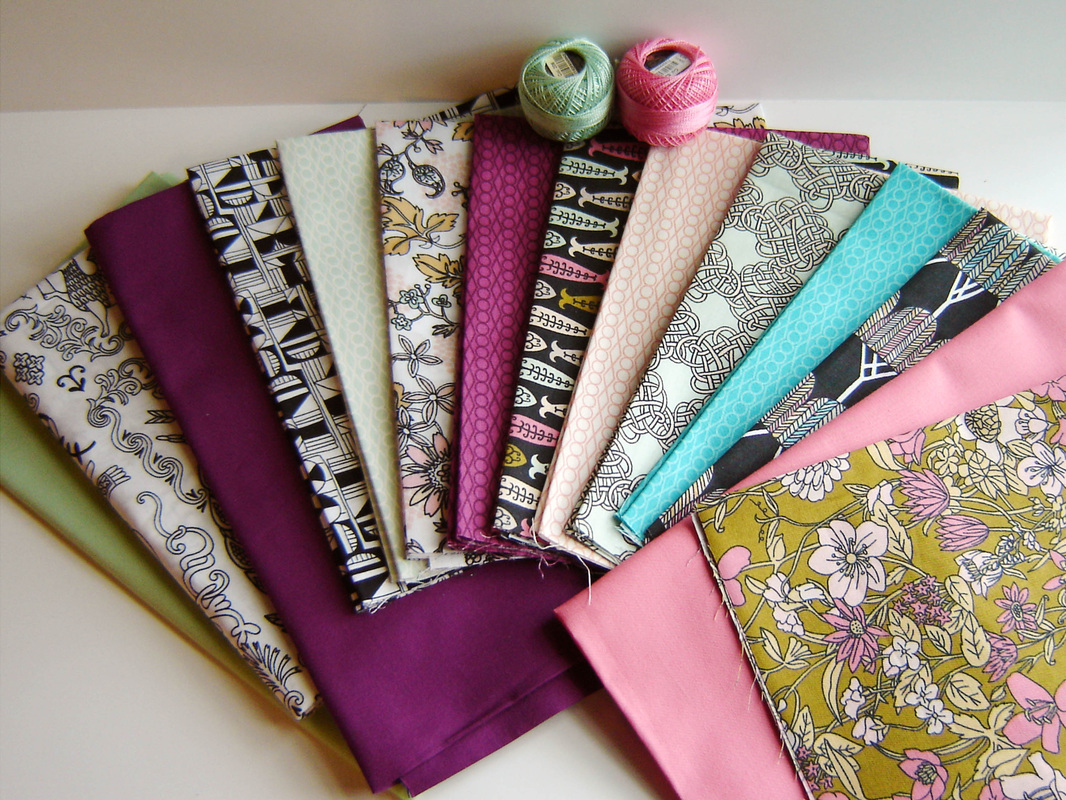
Below is my selection of fabrics for the Medallion Quilt we are making in the class.  A different palette for me, but I love the modern fabrics.  I was getting everything ready to start, but alas had wax paper instead of freezer paper, and yes, there is a HUGE difference.  Oh well, everything is a learning experience.  Hopefully I can locate some freezer paper soon!
Picture
Handstitched Class
There and Back
11 Comments

Utterly Amazing and Random Bits

6/20/2012

6 Comments

 
Ellison Lane Quilts
It is absolutely amazing to me that I was nominated as a finalist in the Summer Sewing Contest over at Ellison Lane Quilts.  Thank you so much!  Wow, I am truly blown away.  If you have already voted for me, thank you, I truly appreciate it.  If you have yet to vote, you can HERE, and no, I'm not asking for your vote, there are so many great finalist, you should vote for the one you love, but if you love mine, I'm number 11.  Just saying.

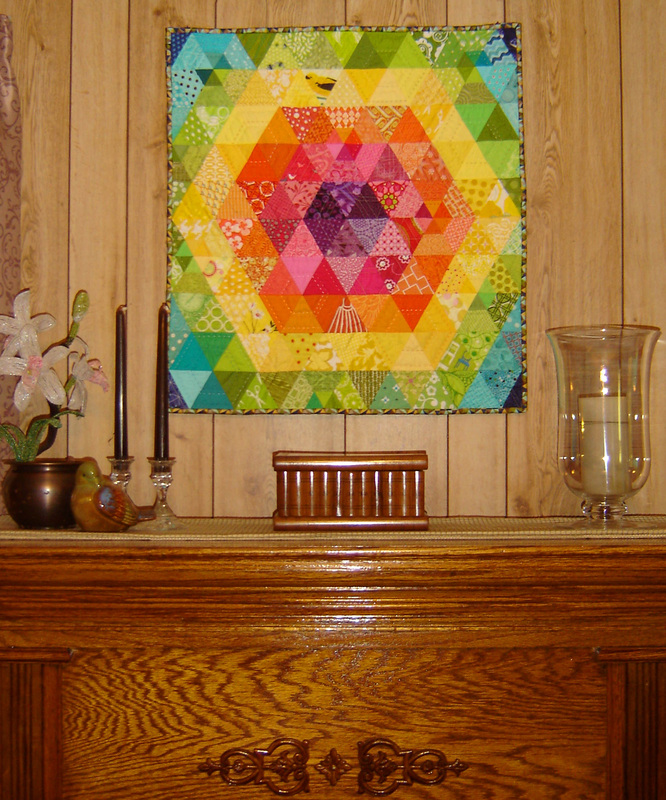
In my original post about the Patchwork Prism, I shared that we were considering hanging it above our fireplace.  Well here it is, in all its glory!  We both love it and boy does it brighten up the room!
Picture

I also have a few random bits I would love to share:

I read a great blog post over at The Sometimes Crafter about the various evolutionary stages of a quilter.  I loved it and thought it was so appropriate.  You can read it HERE.

I am in desperate need of a new iron, and am seriously considering this model HERE.  Do you know anything about Singer Irons?  I am also in the serious researching stage of this sewing machine found HERE, to be used exclusively for machine quilting.  Any thoughts or advice?  That's it folks....
6 Comments

Patchwork Prism

6/16/2012

24 Comments

 
Picture
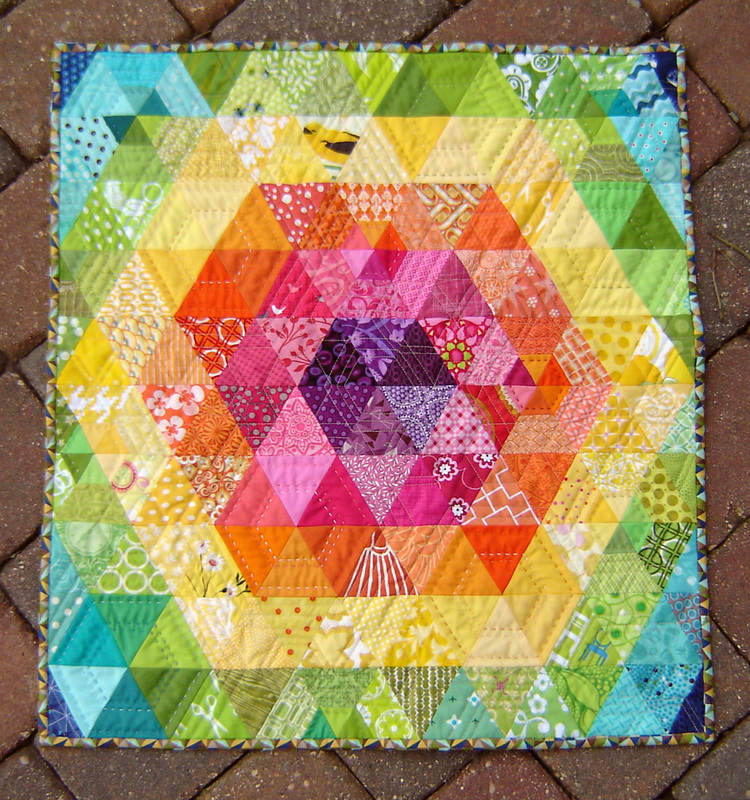
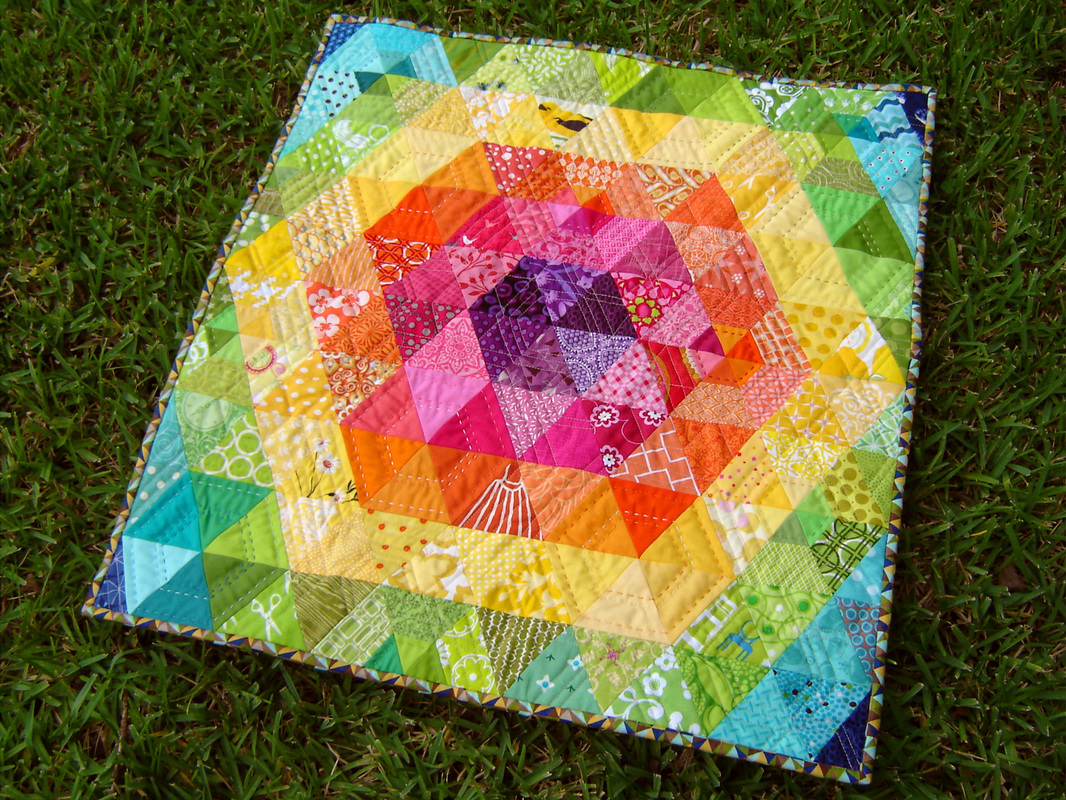
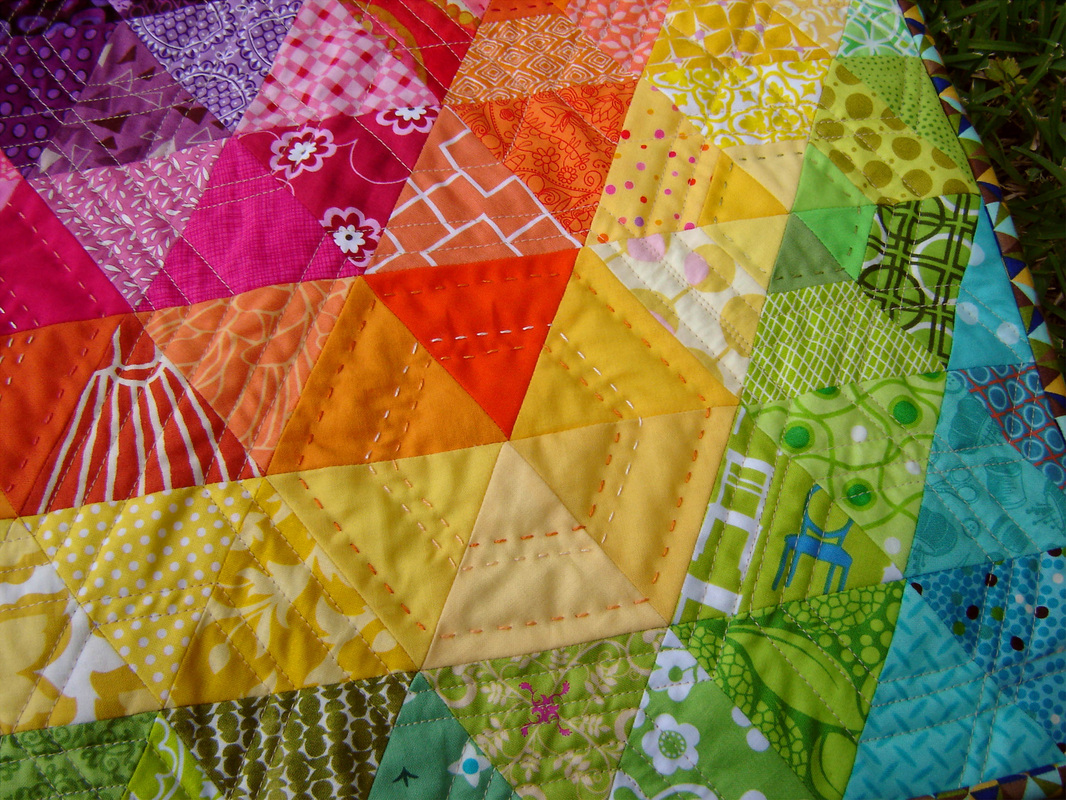
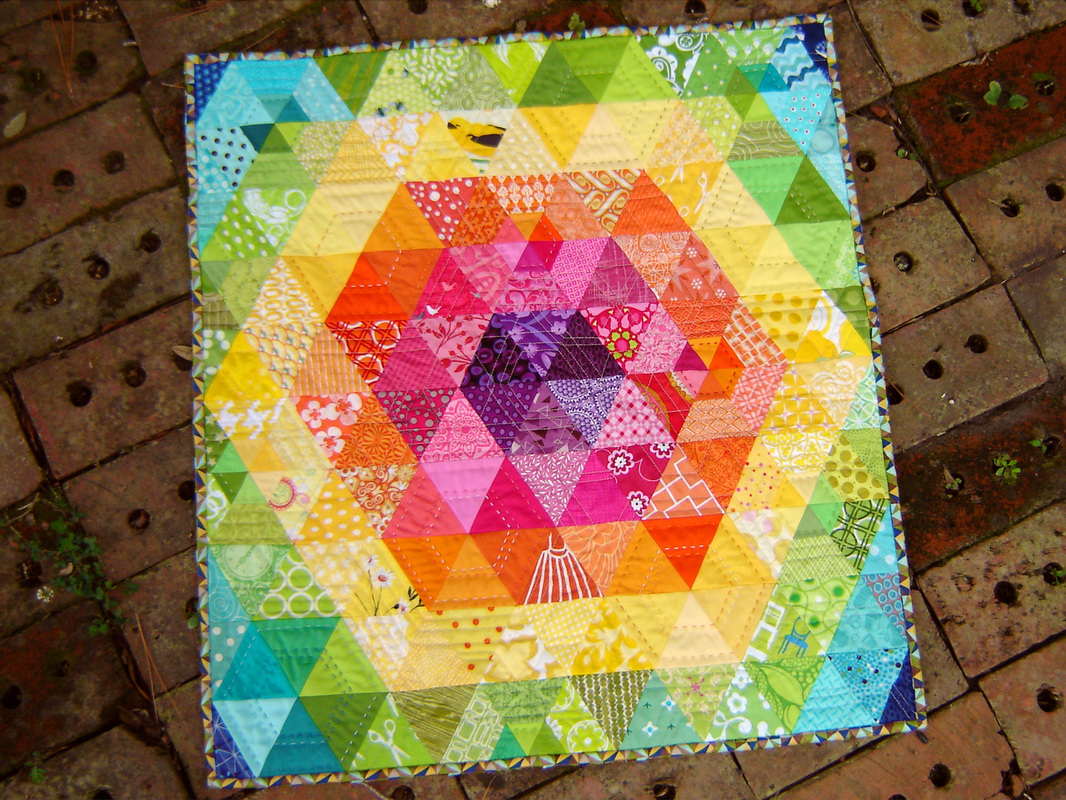
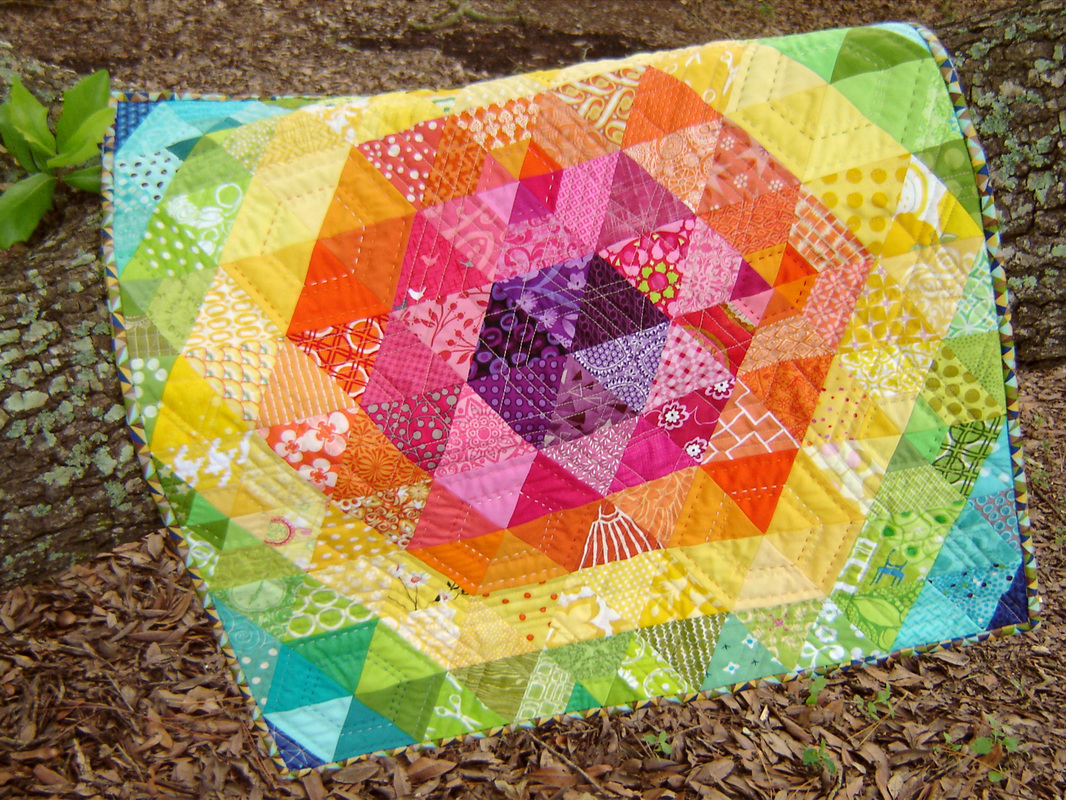
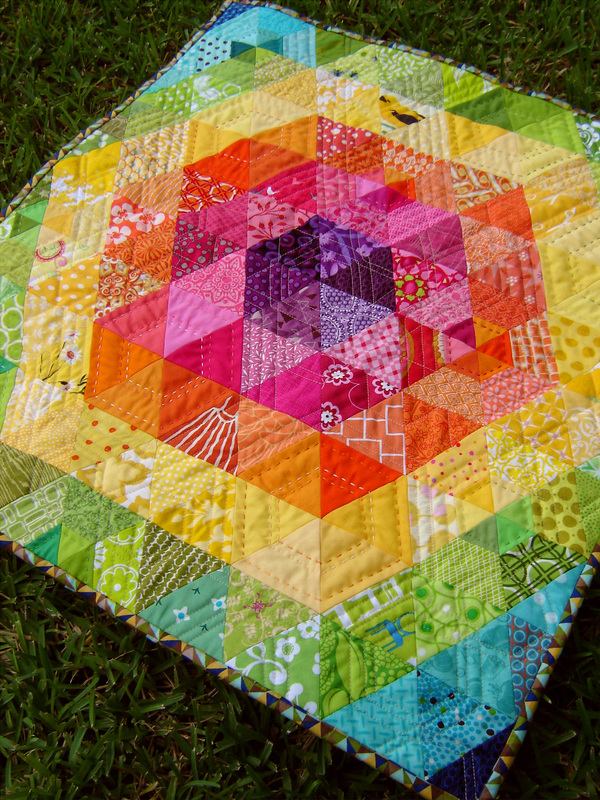
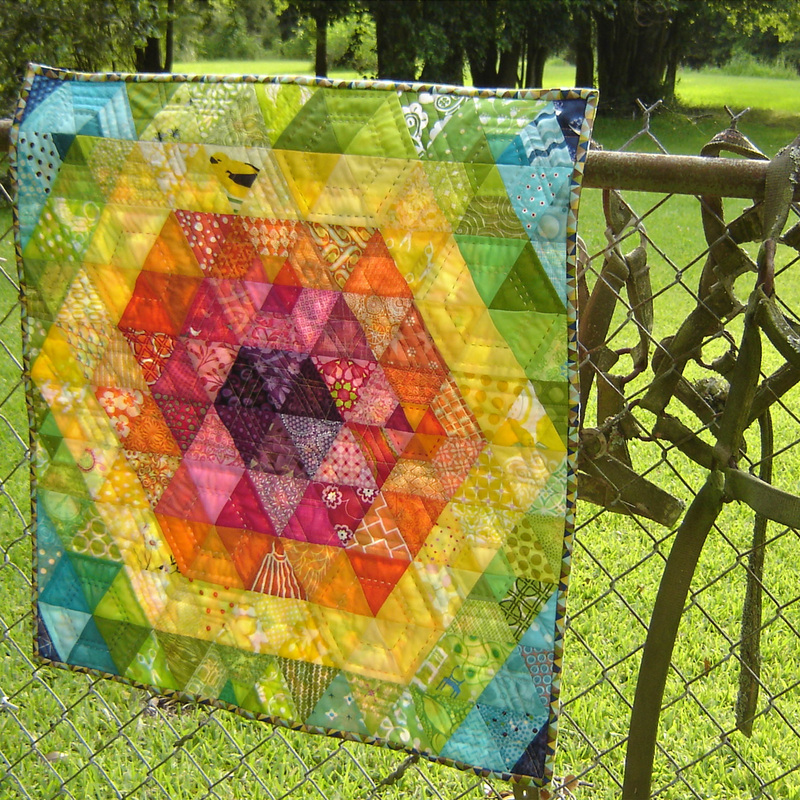
Other than a sneak peek that I gave you guys this past week, I haven't shared any of this project with anyone.  Not sure why that is, but I think I honestly got so wrapped up in making it, I didn't want to stop and take pictures and blog about it.  Hope you don't mind!  The pattern is from my favorite designer, Anna Maria Horner, and is called Patchwork Prism.  I just love the pattern, and I just love this mini quilt that I created.  My husband wants to hang it above the fireplace, which actually is a big deal since he never wants to put anything above the fireplace, and I might just let him.
Picture
I made some modifications to the pattern so that it would actually be do-able for me, and allowed me to use fabric totally from my stash (yippee!)  The pattern makes a 70" ish large quilt, so I reduced the template on my copier some odd amount like 63% in order to get the template small enough to fit the triangle on a 5" charm square.  You see I participated in several large rainbow charm swaps this year and have quite the collection to use, this quilt ended up being almost totally from those charms, with the small addition of some scraps from my stash.  There are no duplicate prints in this quilt, with the exception of solids, which I had to duplicate, since they probably don't make that many yellow solids.  The main thing that I chose to do differently with this pattern was to ignore the light, medium, and dark value fabrics, and to rather highlight the "prisms" by making them out of solid fabrics.
Picture
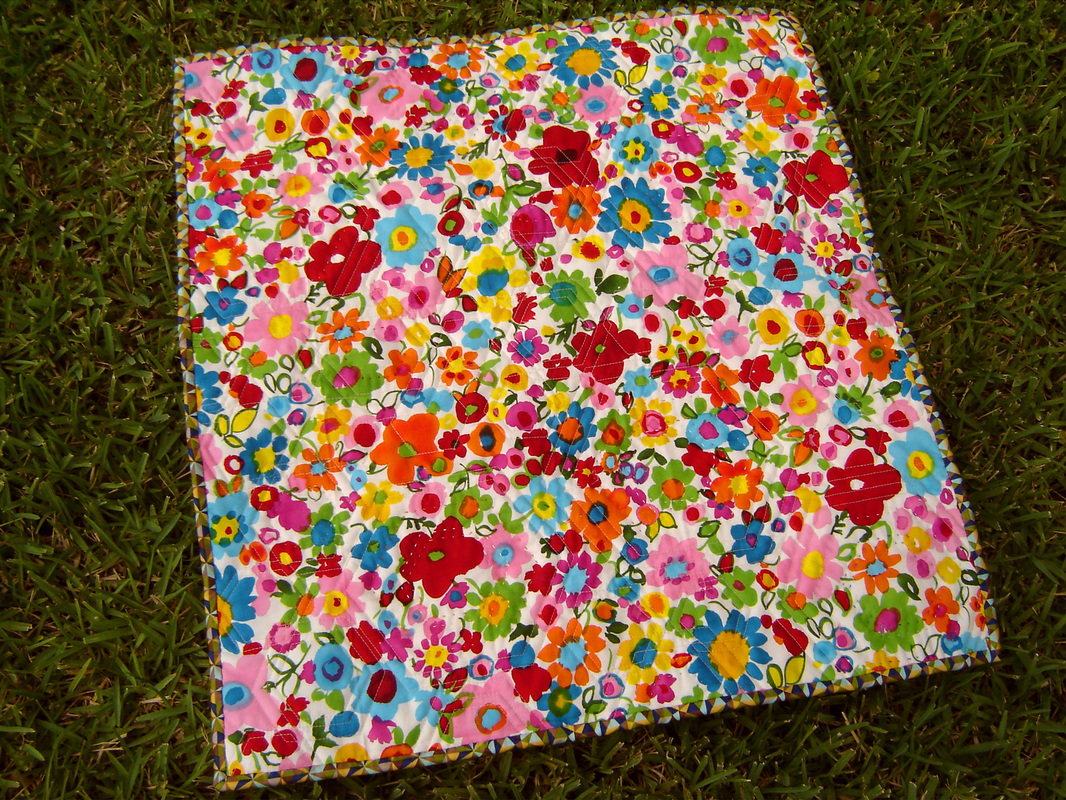
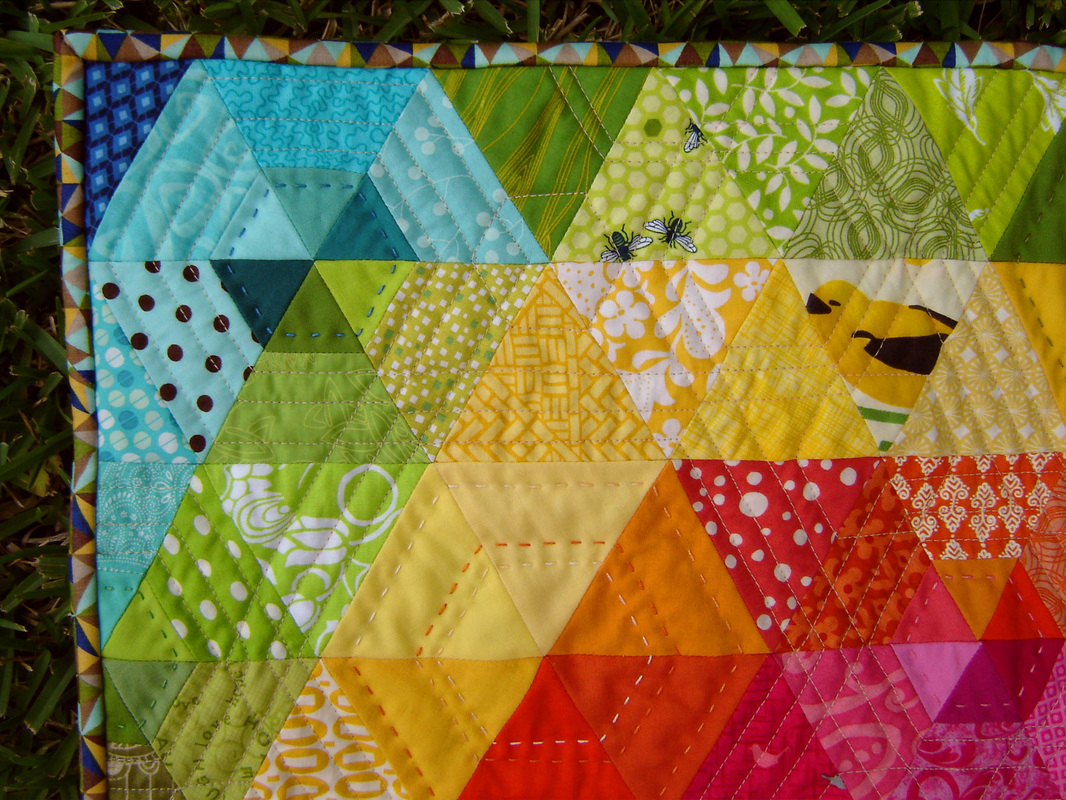
You can see here that I chose a rather wild floral Alexander Henry print for the back that highlights all the colors, but I do wish I had done something less crazy because alas it is near impossible to see all the quilting on the back, it is just too busy.  Oh well, lesson learned.  If you look closely at the photo below you can see several things.  First, I chose a Lisette sateen print from JoAnn Fabrics for the binding.  It is a triangle geometric print and I thought it just highlighted the colors on the edges perfectly.  I love it.  Second, if you look closely you will see that I chose to do both machine and hand quilting.  I started machine quilting hexagons around the solid prisms, then I just went from there, radiating out, and then adding more hexagons where there were "blank" spots.  This is the heaviest quilting that I have done to date, and I am quite pleased with the effect.  After I was finished machine quilting, I went back and using variegated Pearl Cotton size 8, I hand quilted inside of each prism large chunky stitches.
Picture
The birds and the bees.
Picture
This wall hanging measures 24.5" x 27.5" and I added little ribbon loops to the top back in order to hang this rainbow on the wall.  Sorry, I don't have any photos that show the loops, but they are hot pink and really small.  I used a cotton/poly (80/20) blend batting, which seems to be the norm for me, it is what I like, so I use it!  It was machine quilted with a neutral tan color that I wanted to "blend into" the quilt, which I think worked out pretty nicely, if I do say so myself!

I am linking up with Sweet Diesel Designs Patchwork Prism Quilt-Along and with Ellison Lane Quilts Summer Sewing Contest.  Be sure to stop by each of these great blogs and check out all the other fabulous entries, because I promise there are some GREAT entries!
Picture
A few "artistic" shots...
Picture
Picture
Picture
Ellison Lane Quilts
24 Comments

I Love You Patty Young

6/14/2012

7 Comments

 
Picture
Front View
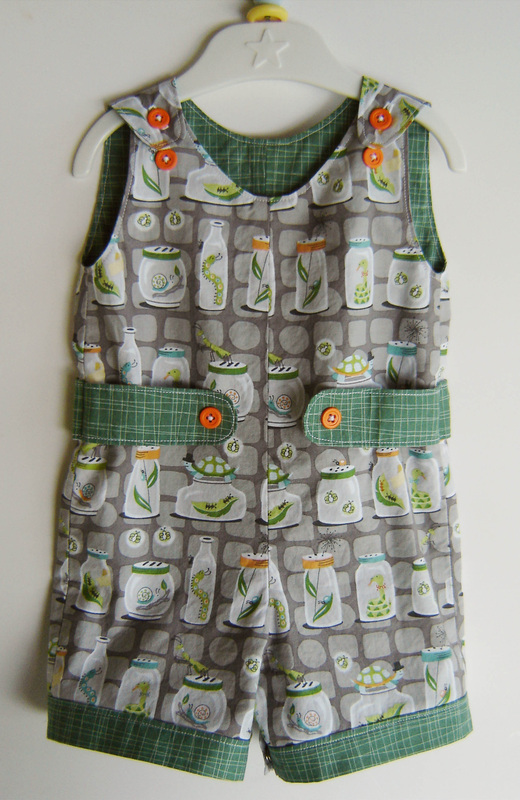
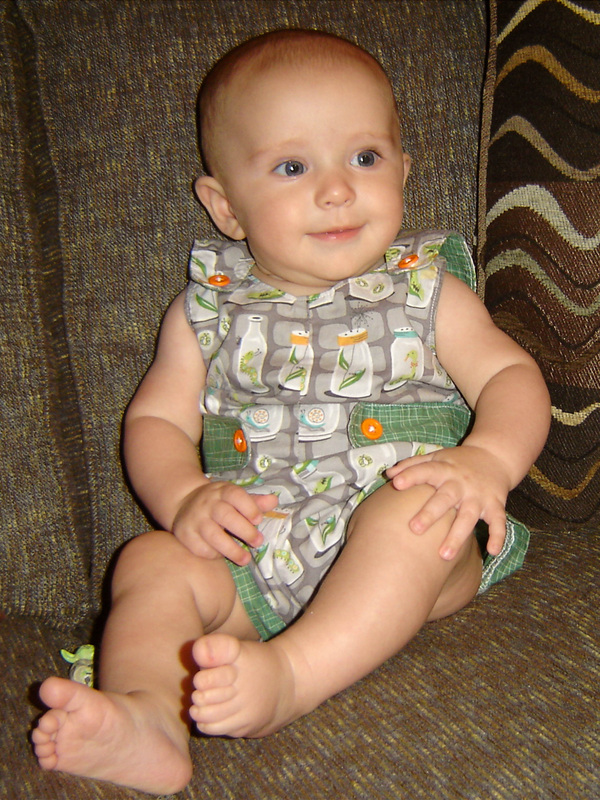
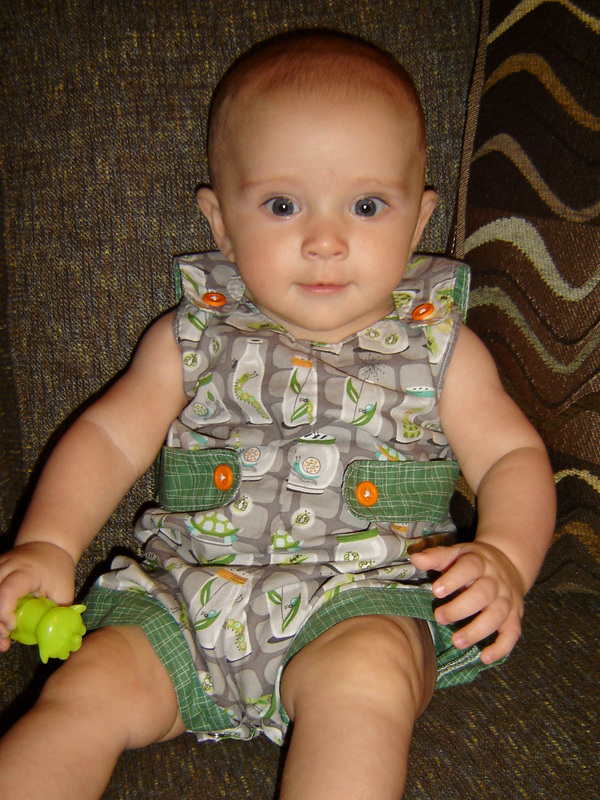
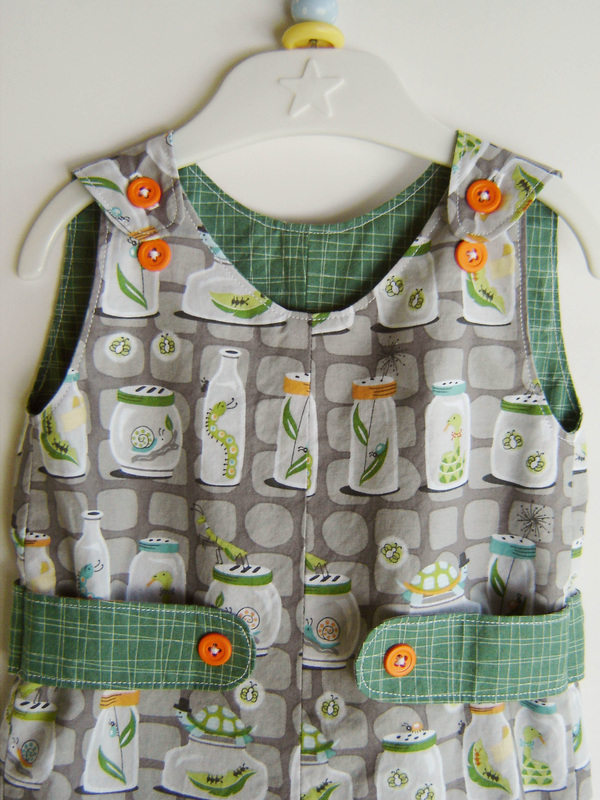
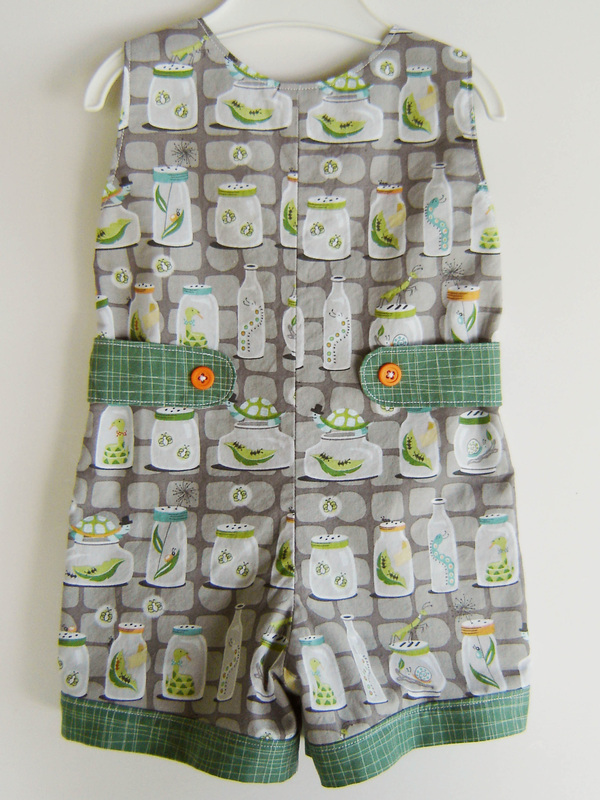
Yes, I said it, and no Patty Young, I don't love you in that way, but boy do I love your pattern, Natalie and Nate.  I mean, I am IN LOVE with this pattern, it is honestly the BEST THING EVER!  I have made two so far, and have enough fabric to make at least 5 more, and I am dead serious about that.  It is one of those patterns that is just genius, the construction is so simple, no exposed seams with the exception of the bottom leg bands, and it goes together so quickly.  The hardest part is picking out the fabric, and maybe the two button holes.  I think I'll have more children just to be able to dress them in these outfits!  Ok, that was a little much, but I am considering it!
Picture
Can you find Yoda?
My 4.5 month old son is currently in 6 month clothing (what a chunk!,) so I made the 6 month size, and it fits perfectly!  The two buttons on the shoulders allow for great adjust-ability, in these pictures he is wearing it buttoned on the second button, for a slightly tighter fit around the neck.  I was able to cut the exterior and interior fabrics out of 1/2 yard of fabric each, with leftovers to spare.  The exterior print is Backyard Baby, Bug Jars in Gray by Patty Sloniger and the interior print is Early Bird by Cosmo Cricket.  This project only took a few hours, and I think it would be a great outfit for anyone who is considering getting into making clothes for your kids or grandchildren.  It is totally do-able and the pattern instructions are so detailed and easy to understand!
Picture
Yes, that is a Toy Story alien in his hand.
When my first son was born, I searched fruitlessly for a cute romper pattern for him, and alas, never found one, so as soon as I saw this pattern, I quickly snatched it up, and went to work!  I love the fact that you don't have to finish any of the seams, because they are all enclosed, no annoying scratchy seams to irritate that precious baby skin!  It has a snap crotch for easy diaper changing, and the pattern includes sizes 6 months - 3T, which means we will be enjoying these rompers for years to come!
Picture
Front Detail View
Alright, enough gushing about Patty Young and her wonderful pattern.  I am linking up to Ellison Lane Quilts, Summer Sewing Contest, be sure to head over there and check out all the other fabulous entries!
Picture
Back View
Ellison Lane Quilts
7 Comments
<<Previous
Forward>>

    Marci Girl

    A feisty mom designing, sewing and blogging her way through everyday life!

    Subscribe
    Follow on Bloglovin
    Picture
    Follow on Bloglovin


    Categories

    All
    2017 Finish A Long
    2018 Finish A Long
    2019 Finish A Long
    Bee Sewcial
    Book Reviews
    Clothing
    Everyday Life
    Giveaways
    Handbags
    Handstitched Class
    Inspirational Projects
    Marci Girl Designs
    Projects
    Quilt Along
    Quilting Bees
    Quilts
    Random Thoughts
    Recipes
    Sew Along
    Sewvivor
    Style Stitches
    Swaps
    The Penny Sampler Class
    Tutorials
    Wip Wednesday


    Happily
    Participating In:

    Picture
    Picture
    Picture
    Picture
    Picture
    Picture

    Picture


    Archives

    January 2020
    November 2019
    October 2019
    July 2019
    April 2019
    March 2019
    February 2019
    January 2019
    December 2018
    October 2018
    August 2018
    July 2018
    June 2018
    May 2018
    April 2018
    March 2018
    February 2018
    January 2018
    December 2017
    November 2017
    October 2017
    September 2017
    August 2017
    July 2017
    June 2017
    May 2017
    April 2017
    March 2017
    February 2017
    January 2017
    April 2016
    March 2016
    February 2016
    January 2016
    September 2015
    July 2015
    October 2014
    September 2014
    August 2014
    July 2014
    June 2014
    May 2014
    April 2014
    March 2014
    February 2014
    January 2014
    November 2013
    October 2013
    September 2013
    August 2013
    July 2013
    June 2013
    May 2013
    April 2013
    March 2013
    February 2013
    January 2013
    November 2012
    October 2012
    September 2012
    August 2012
    July 2012
    June 2012
    May 2012
    April 2012
    March 2012
    January 2012
    December 2011
    November 2011
    October 2011
    September 2011
    August 2011
    July 2011
    June 2011
    May 2011
    April 2011
    March 2011
    February 2011
    January 2011
    December 2010
    November 2010
    September 2010
    August 2010
    July 2010
    June 2010
    May 2010
    April 2010
    March 2010
    February 2010

    Picture

    RSS Feed

Powered by Create your own unique website with customizable templates.