I'm getting Figgy with it!
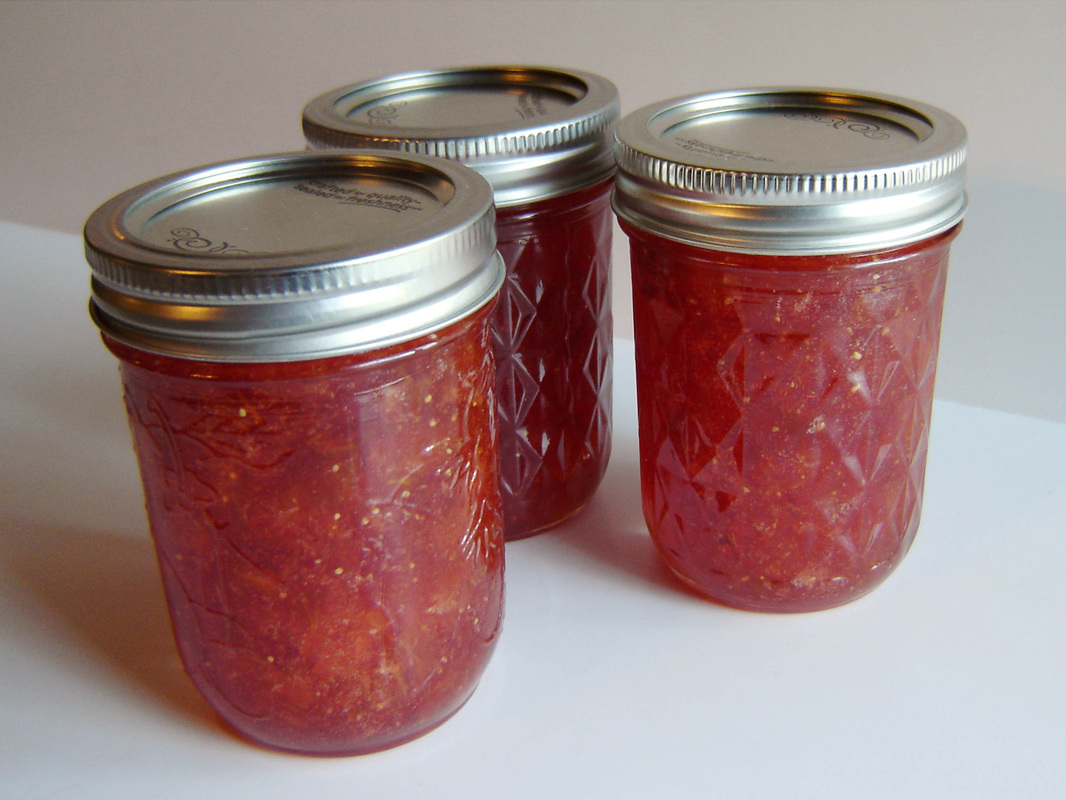
Yes, those lovely jars contain Fig Preserves or Fig Jam as I like to call it, and it is easier to spell. Doesn't really look like figs, and to be honest, it doesn't really taste like figs either, but you won't hear me complaining. I like figs, but they aren't my favorite, and I'm not really sure what I did to create this unique tasting batch, but this jam tastes a lot like strawberries, and the pretty color lets my brain think it is strawberries too. My mom brought over bags and bags of figs this weekend from a neighbor who was swimming in them, and since one batch was really really ripe, I decided to go ahead and cook them, thus the canned jam you are looking at here.I jumped online, looked up this RECIPE, and got to chopping, then cooking, and finally canning. I did not want to leave the figs whole, so I quartered them, and then in the cooking process used a potato masher and mashed the heck out of them. I left the skins on and just cut off the stem and the very bottom of the fig. Below are the ingredients and measurements that I used, and I am putting it here more as a reference for myself later, like I said earlier the full recipe is available at the link above or below. Fig Jam (or Preserves)
Ingredients: 5 1/2 cups of quartered figs, stems and bottoms removed.7 cups of sugar1/4 cup fresh lemon juice1/2 cup water1 box of regular pectinDirections:Step by step directions can be found HERE. I found this site to be very easy to follow and understand. The longest part is cleaning the figs, the rest goes really quickly! My mom and husband seem to think that the lemon juice is what created or preserved the pretty pinkish red color, but I'm not sure. Any ideas? Maybe it was just this variety of figs, the inside was very pink/red and the outside was not very brown, but rather more of a light green/brown color. I'm rather ignorant on the matter, but was quite pleased that it turned out so pretty. Make sure to hop on over to A Quilter's Table and visit Debbie and all the other entries this week at Tuesday a the (summer} Table!
A bit disappointed that I was unable to attend Sewing Summit later this year, also disappointed that most likely I won't be attending Quiltcon. Really extremely disappointed that I couldn't be part of the Anna Maria Horner embroidery retreat also. Do you see a trend here? I do. Blah. Being in the funk that I was, I started thinking about taking Rachel's Handstitched Class. You know, the Rachel from Stitched in Color. It would be fun to take a class this summer, so I bit the bullet and signed up. I will admit that I have done a bunch of these techniques before, but there were a few that I had never attempted, and I thought it would be great fun to learn something new. We are already in Week 3, though we have one week of lessons and one week off, so it is really like we are in Week 2. Unfortunately for me, I am already rapidly falling behind. Seven projects have been introduced, and alas this little needle book is the only project I have completed at this point. I do so like it though, and this is the first time I have ever done reverse applique, which is really neat and has so many possibilities. The blanket and running stitch are not new to me, so I decided to take liberties with Rachel's pattern and create my own design, thus my little needle book features raindrops and a sassy little umbrella. I didn't have a fancy button, so I went with a clear one that would show off that funky thread that I saved from some packaging I received in the mail one day.
I thought the raindrop lining fabric was appropriate! If you were wondering what is next to the scissors, it is my seam ripper, never leave home without it!
Below is my selection of fabrics for the Medallion Quilt we are making in the class. A different palette for me, but I love the modern fabrics. I was getting everything ready to start, but alas had wax paper instead of freezer paper, and yes, there is a HUGE difference. Oh well, everything is a learning experience. Hopefully I can locate some freezer paper soon!
It is absolutely amazing to me that I was nominated as a finalist in the Summer Sewing Contest over at Ellison Lane Quilts. Thank you so much! Wow, I am truly blown away. If you have already voted for me, thank you, I truly appreciate it. If you have yet to vote, you can HERE, and no, I'm not asking for your vote, there are so many great finalist, you should vote for the one you love, but if you love mine, I'm number 11. Just saying.In my original post about the Patchwork Prism, I shared that we were considering hanging it above our fireplace. Well here it is, in all its glory! We both love it and boy does it brighten up the room! I also have a few random bits I would love to share: I read a great blog post over at The Sometimes Crafter about the various evolutionary stages of a quilter. I loved it and thought it was so appropriate. You can read it HERE. I am in desperate need of a new iron, and am seriously considering this model HERE. Do you know anything about Singer Irons? I am also in the serious researching stage of this sewing machine found HERE, to be used exclusively for machine quilting. Any thoughts or advice? That's it folks....
We visited the in-laws for Father's Day this year and my mother-in-law treated everyone to BBQ ribs and a host of other sides and deserts. Aside from being delicious, we also got to bring home leftovers. Score! Nothing better than having a bunch of home cooked food that I didn't have to cook!
Last night was time to eat the leftovers, and rather than just reheat them, I created what I am now calling "Lazy Pulled Pork." The meat from the ribs was already falling off the bone, so I just finished pulling it off the bone and created this super easy, quick dish.
I've yet to decide if this photo is delicious looking or just slightly gross. Lazy Pulled Pork
Ingredients: Left over rib meat. I used the equivalent of one rack of ribs. Meat pulled off the bone. 1/2 red onion, chopped into thin strips. Your favorite BBQ Sauce, preferably one made with Sugar and not High Fructose Corn Syrup. (I used Bull's-Eye Memphis Style) I have found that BBQ sauce made with real sugar tastes better and caramelizes better too! 1 Tbsp Oil (your choice) Hamburger buns, pickles and anything else you would like to top it with.
Directions: Heat 1 Tbsp Oil over medium heat in a large pan. Add red onions and cook until nice and soft. Add rib meat and heat through. Add BBQ Sauce, enough to make everything nice and covered and saucy, I used around 1/2 cup, but it is totally up to you. Simmer for about 10 minutes, until everything is nice and hot and bubbly. Toast buns, and serve topped with pickles. Enjoy!
Other than a sneak peek that I gave you guys this past week, I haven't shared any of this project with anyone. Not sure why that is, but I think I honestly got so wrapped up in making it, I didn't want to stop and take pictures and blog about it. Hope you don't mind! The pattern is from my favorite designer, Anna Maria Horner, and is called Patchwork Prism. I just love the pattern, and I just love this mini quilt that I created. My husband wants to hang it above the fireplace, which actually is a big deal since he never wants to put anything above the fireplace, and I might just let him. I made some modifications to the pattern so that it would actually be do-able for me, and allowed me to use fabric totally from my stash (yippee!) The pattern makes a 70" ish large quilt, so I reduced the template on my copier some odd amount like 63% in order to get the template small enough to fit the triangle on a 5" charm square. You see I participated in several large rainbow charm swaps this year and have quite the collection to use, this quilt ended up being almost totally from those charms, with the small addition of some scraps from my stash. There are no duplicate prints in this quilt, with the exception of solids, which I had to duplicate, since they probably don't make that many yellow solids. The main thing that I chose to do differently with this pattern was to ignore the light, medium, and dark value fabrics, and to rather highlight the "prisms" by making them out of solid fabrics.
You can see here that I chose a rather wild floral Alexander Henry print for the back that highlights all the colors, but I do wish I had done something less crazy because alas it is near impossible to see all the quilting on the back, it is just too busy. Oh well, lesson learned. If you look closely at the photo below you can see several things. First, I chose a Lisette sateen print from JoAnn Fabrics for the binding. It is a triangle geometric print and I thought it just highlighted the colors on the edges perfectly. I love it. Second, if you look closely you will see that I chose to do both machine and hand quilting. I started machine quilting hexagons around the solid prisms, then I just went from there, radiating out, and then adding more hexagons where there were "blank" spots. This is the heaviest quilting that I have done to date, and I am quite pleased with the effect. After I was finished machine quilting, I went back and using variegated Pearl Cotton size 8, I hand quilted inside of each prism large chunky stitches.
The birds and the bees.
This wall hanging measures 24.5" x 27.5" and I added little ribbon loops to the top back in order to hang this rainbow on the wall. Sorry, I don't have any photos that show the loops, but they are hot pink and really small. I used a cotton/poly (80/20) blend batting, which seems to be the norm for me, it is what I like, so I use it! It was machine quilted with a neutral tan color that I wanted to "blend into" the quilt, which I think worked out pretty nicely, if I do say so myself! I am linking up with Sweet Diesel Designs Patchwork Prism Quilt-Along and with Ellison Lane Quilts Summer Sewing Contest. Be sure to stop by each of these great blogs and check out all the other fabulous entries, because I promise there are some GREAT entries! A few "artistic" shots...
Front View Yes, I said it, and no Patty Young, I don't love you in that way, but boy do I love your pattern, Natalie and Nate. I mean, I am IN LOVE with this pattern, it is honestly the BEST THING EVER! I have made two so far, and have enough fabric to make at least 5 more, and I am dead serious about that. It is one of those patterns that is just genius, the construction is so simple, no exposed seams with the exception of the bottom leg bands, and it goes together so quickly. The hardest part is picking out the fabric, and maybe the two button holes. I think I'll have more children just to be able to dress them in these outfits! Ok, that was a little much, but I am considering it! Can you find Yoda? My 4.5 month old son is currently in 6 month clothing (what a chunk!,) so I made the 6 month size, and it fits perfectly! The two buttons on the shoulders allow for great adjust-ability, in these pictures he is wearing it buttoned on the second button, for a slightly tighter fit around the neck. I was able to cut the exterior and interior fabrics out of 1/2 yard of fabric each, with leftovers to spare. The exterior print is Backyard Baby, Bug Jars in Gray by Patty Sloniger and the interior print is Early Bird by Cosmo Cricket. This project only took a few hours, and I think it would be a great outfit for anyone who is considering getting into making clothes for your kids or grandchildren. It is totally do-able and the pattern instructions are so detailed and easy to understand!
Yes, that is a Toy Story alien in his hand. When my first son was born, I searched fruitlessly for a cute romper pattern for him, and alas, never found one, so as soon as I saw this pattern, I quickly snatched it up, and went to work! I love the fact that you don't have to finish any of the seams, because they are all enclosed, no annoying scratchy seams to irritate that precious baby skin! It has a snap crotch for easy diaper changing, and the pattern includes sizes 6 months - 3T, which means we will be enjoying these rompers for years to come!
Front Detail View Alright, enough gushing about Patty Young and her wonderful pattern. I am linking up to Ellison Lane Quilts, Summer Sewing Contest, be sure to head over there and check out all the other fabulous entries! Back View
An artistic rendering of what I have been working on for the past few weeks. I finished it up today and I'll be revealing it later this week, can you guess the pattern?
|