The Two in One Tote, two challenges, one tote! It all started last year when I joined the Modern Quilt Guild as an individual member. How exciting to be able to have that opportunity, I was and am thrilled. The first thing that I loved about being a member was that now I could participate in the fabric challenges that I had seen so many groups participating in. So here is the very first, The Riley Blake Challenge. The guild sent all those who signed up 6 fat eighths of Riley Blake fabric and we could make whatever we wanted, just so long as it was quilted. We could add any solids, or any Riley Blake fabrics.
Right from the start I new I wanted to make a beach bag. We need a new one desperately. The old one was skin chaffing and just all around terrible. Even though I knew I wanted to make a tote, I really had no idea on what to do with the fabric, or how far the fat eighths would really go on a large tote. So there the fabric sat for quite some time, and then the Guild extended the competition and therefore my fabric sat even longer. At the beginning of the year, while blog surfing I came across a blog post from Craft Buds announcing theMosaic Tiles Quilt Along. Oh, now there is an idea. So I ordered the book, Modern Bee by Lindsay Conner, and once it arrived, a plan was formed.
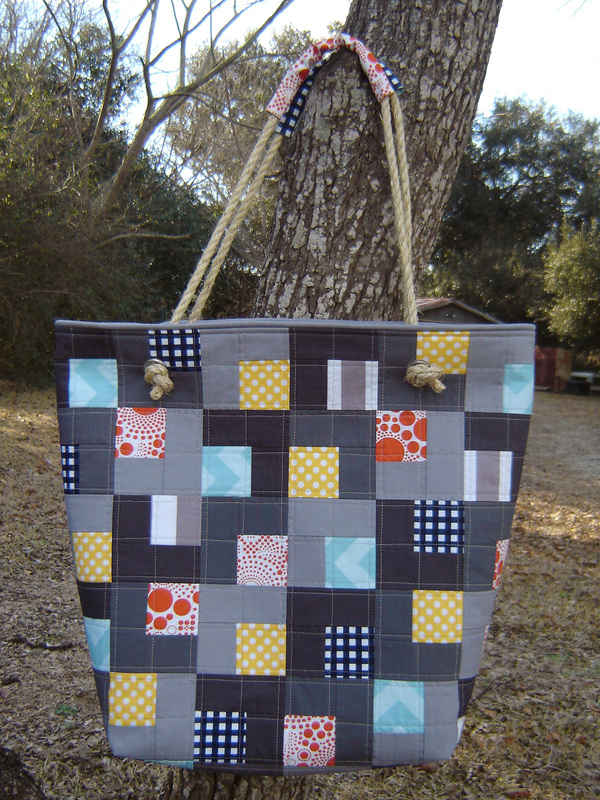
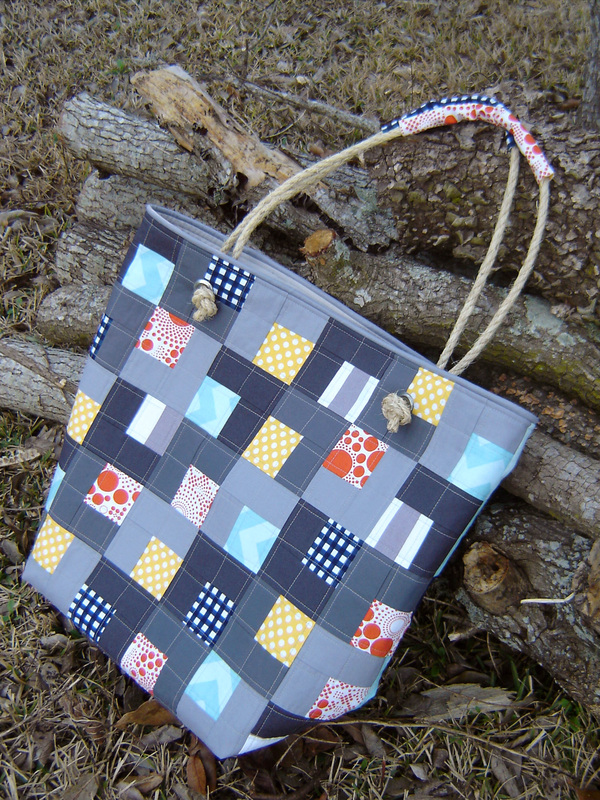
The Mosaic Tiles block is a 11.5" x 11.5" block, and I roughly figured that if I made four blocks, that would be right around the right size for my tote (or one side of it at least.) The Riley Blake Challenge included the dark gray solid, so I added in two coordinating shades of gray and set to making the blocks. I purposely arranged the layout, the grays in diagonal lines, and then the prints just random. Once I had the four blocks completed and sewn together, I attached the panel to fusible fleece and quilted with a medium gray 1/4" away from the seams with my walking foot.
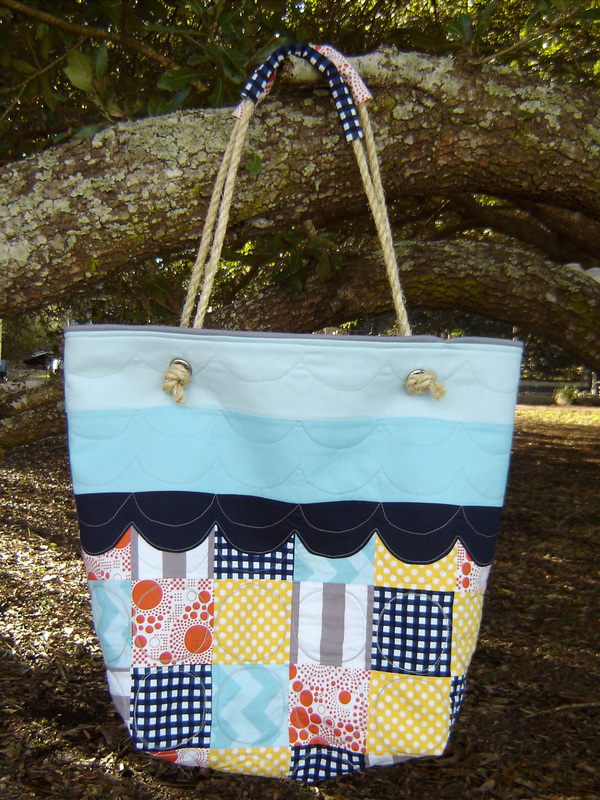
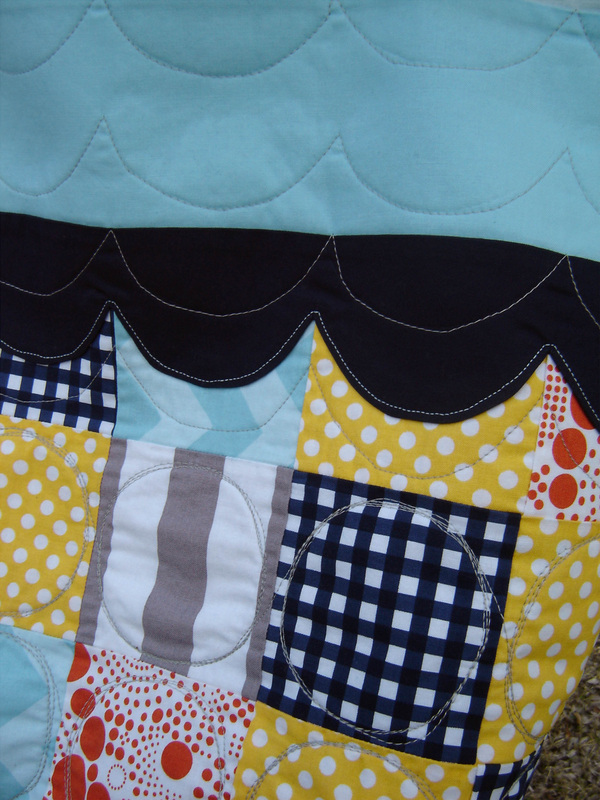
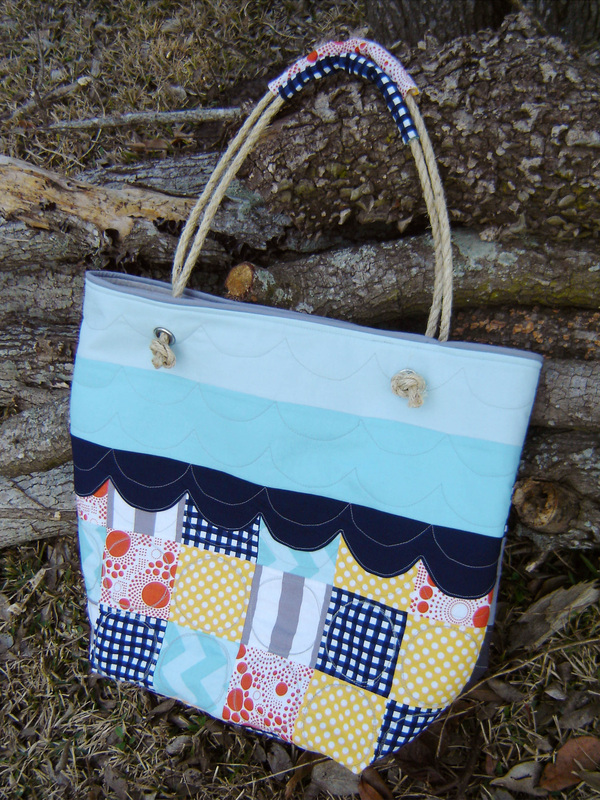
I loved it, the only problem was that I didn't have enough fabric, solid or print to have a matching second side. So now what? I started with taking the prints that I had left and cutting out 18 - 4.5" x 4.5" squares, leaving only a 3" x 9" piece of fabric left. I randomly sewed these together, creating a small panel the same width as the front, but quite a bit shy of being tall enough. I pondered for a while and thought of my intended purpose of the bag, a beach bag and decided to try a modern applique beach wave. Any why not add in a little ombre too? I dug through my stash found 3 coordinating blues, and drew up a wave template. I didn't want to use raw edge applique, so I put two layers of the dark blue together, traced my template and sewed on the line in a short 1.5 stitch. I then cut with my pinking shears close to the seam, cut a few notches, then turned the fabric. After fidgeting with it a bit, I then Ironed the HECK out of it and created a smooth-ish wave that contained no raw edges on the exterior. I then machine stitched this wave on top of the patchwork panel about 1/8" away from the edge. Now that the hard part was done, I added the two blue solids and now I had a second finished panel. I also fused this side to fusible fleece and then was faced with how to quilt it.
I knew that I didn't want to repeat the straight line quilting, and wanted a totally different look for this side. I decided that the patchwork colorful part reminded me of the umbrellas and people on the beach, so I free motion quilted the circle "umbrellas" on the "beach." Then I knew I had to echo the waves onto the beach a bit and of course in the water. I used my walking foot to quilt the waves, which I guess? was the most accurate way to do it? Maybe if I was super skilled I could have free motion quilted it, but I don't that at this point my skills are quite that good. The only problem I ran into during this whole process was when I had to free motion quilt the circles. The first and second round went fine, but when I made the third and fourth loop of stitching the fabric really pulled in and distorted, creating a "bubble" of sorts in the center of the circle. I know that the problem was probably caused because I didn't have enough layers and was only quilting through cotton and fleece. I ironed the HECK out of that section, but in the end, it definitely has texture.
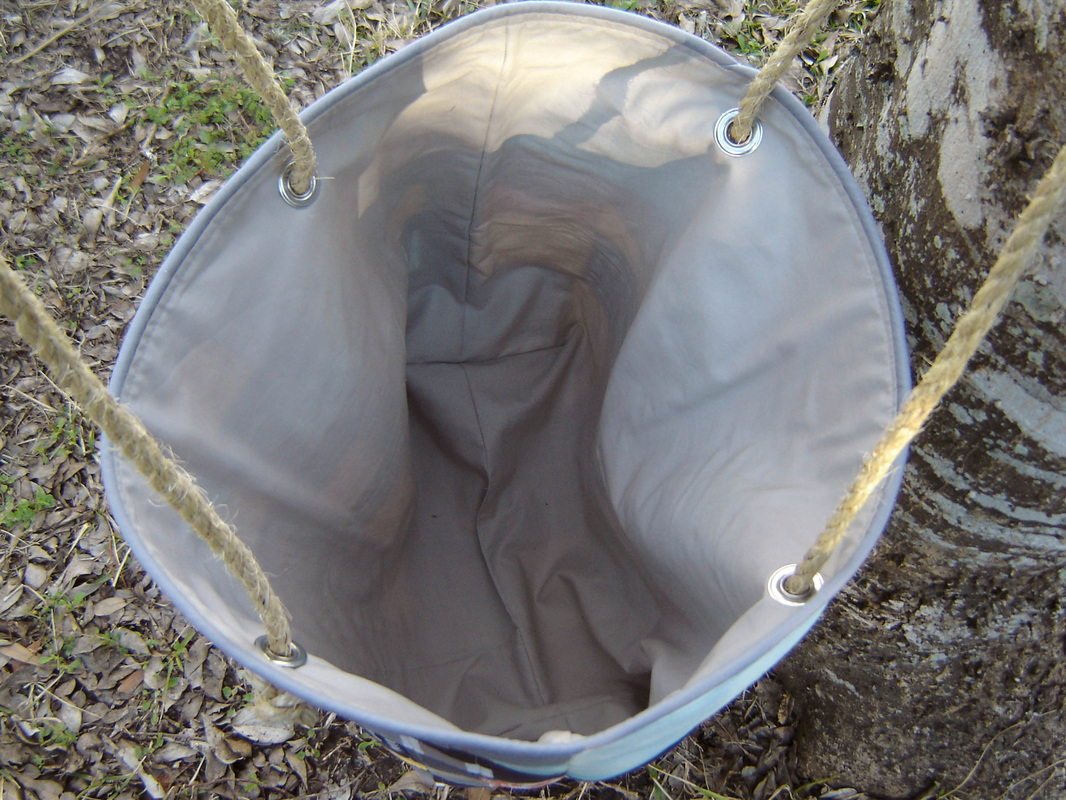
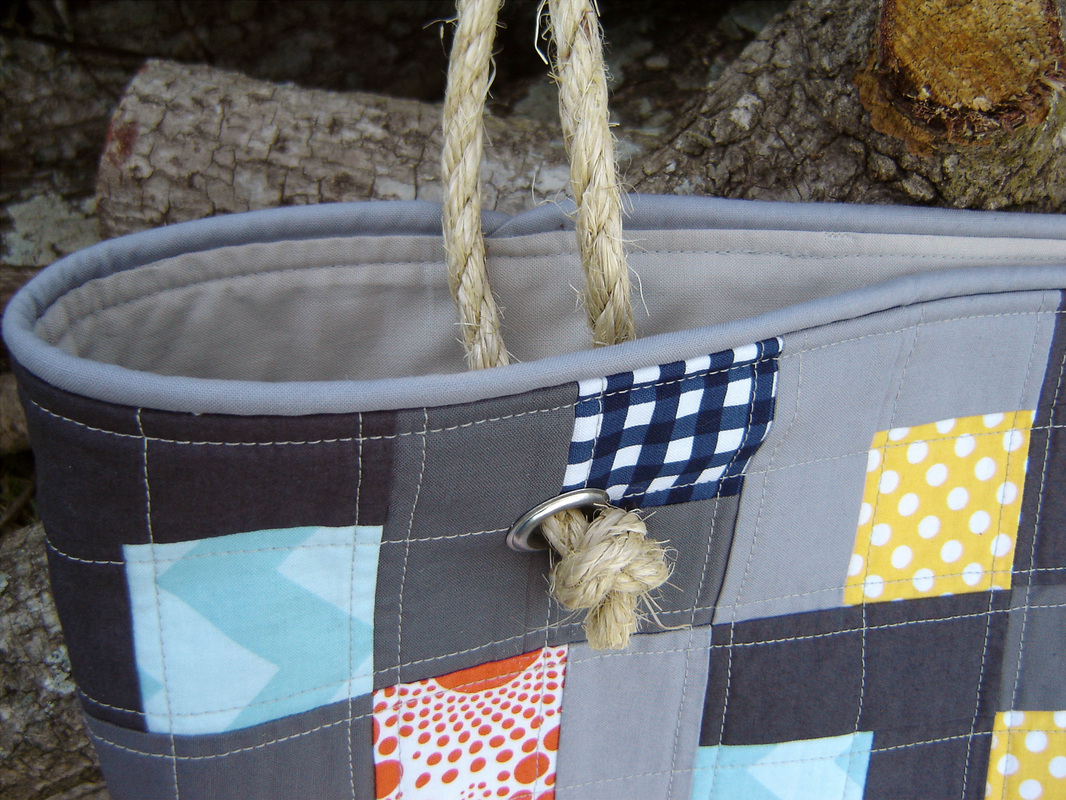
Now that my quilting was complete, I found a matching gray solid for the lining, and started to assemble the bag. I stitched the sides and bottom. Created a gusset, and was overall pleased with the size and shape. it really was just right. Just big enough to hold several beach towels, a few toys and such, but not too big. When it came time to sew the lining and the bag together, at the last moment I decided to add piping to the top edge, just to add a little extra touch. I am really glad that I did, it really separates the exterior from the interior. This bag is pretty floppy, does not stand on its own, but that is exactly what I wanted, because when it is time to travel and store it, I can just roll it up and tuck it out of the way!
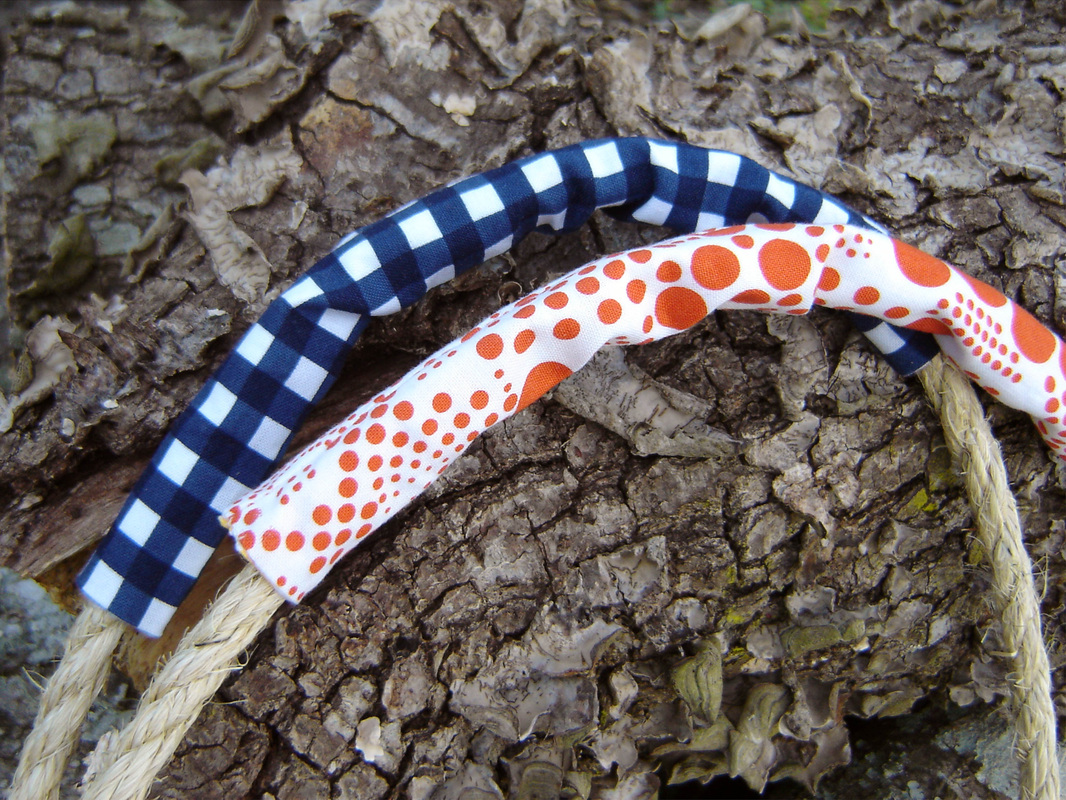
The plan all along was to have rope handles, I mean you can't have a beach bag without rope handles, right? So once the bag was all sewn, I installed 4 silver grommets that had a 1/2" hole opening. Now I just needed to go to the local hardware store for some rope. I ended up buying a 3/8" natural sisal. It slipped perfectly through the grommets, I tied knots on each end and it was just the right size. Now I complained earlier about my old beach bag chaffing our skin, so of course I couldn't have the rope raw against our bare shoulders. I looked at the scraps I had left, took the 3" x 9" pieces, cut it down to 2.5" x 9" and created lined tubes that slipped onto the rope, nice and slim little handle covers. My bag was now complete! It measures 20.5" wide, 18" tall and an 8" gusset, and a 12" handle drop. It is LARGE!
I really enjoyed the process, the finished tote and being able to participate in two challenges, simultaneously. Thank you Riley Blake for providing the fabric, and for the Modern Quilt Guild to host this challenge. Also, thank you toCraft Buds for hosting the Mosaic Tiles Quilt Along, because honestly, that side of the tote is my favorite, and in my opinion the most modern!
I almost forgot, but this is also my first finish in the first quarter of the 2014 Finish Along hosted by Katy at The Littlest Thistle!


 RSS Feed
