• Home
  • Blog
  • 2020 Finish - A - Long
  • 2019 Finish - A - Long
  • 2018 Finish - A - Long
  • Contact
  • 2017 Finish - A - Long
  • Shop
Marci Girl Designs

City Sampler Quilt - A Finish

4/9/2018

7 Comments

 
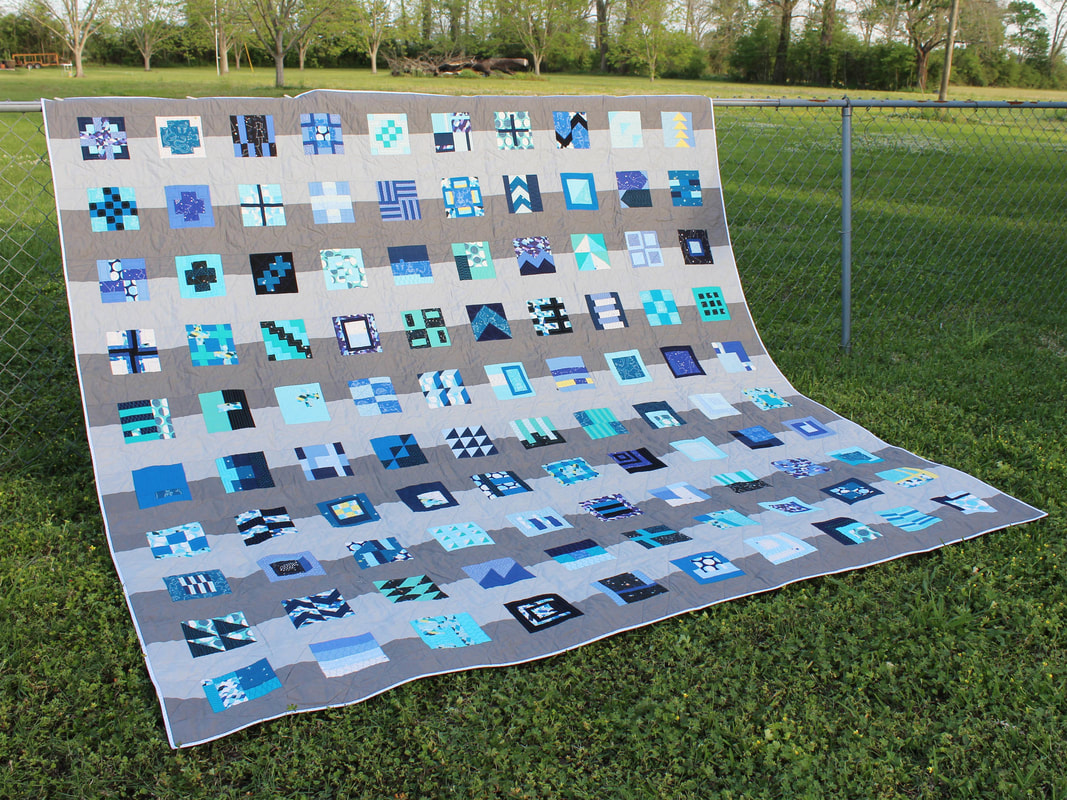
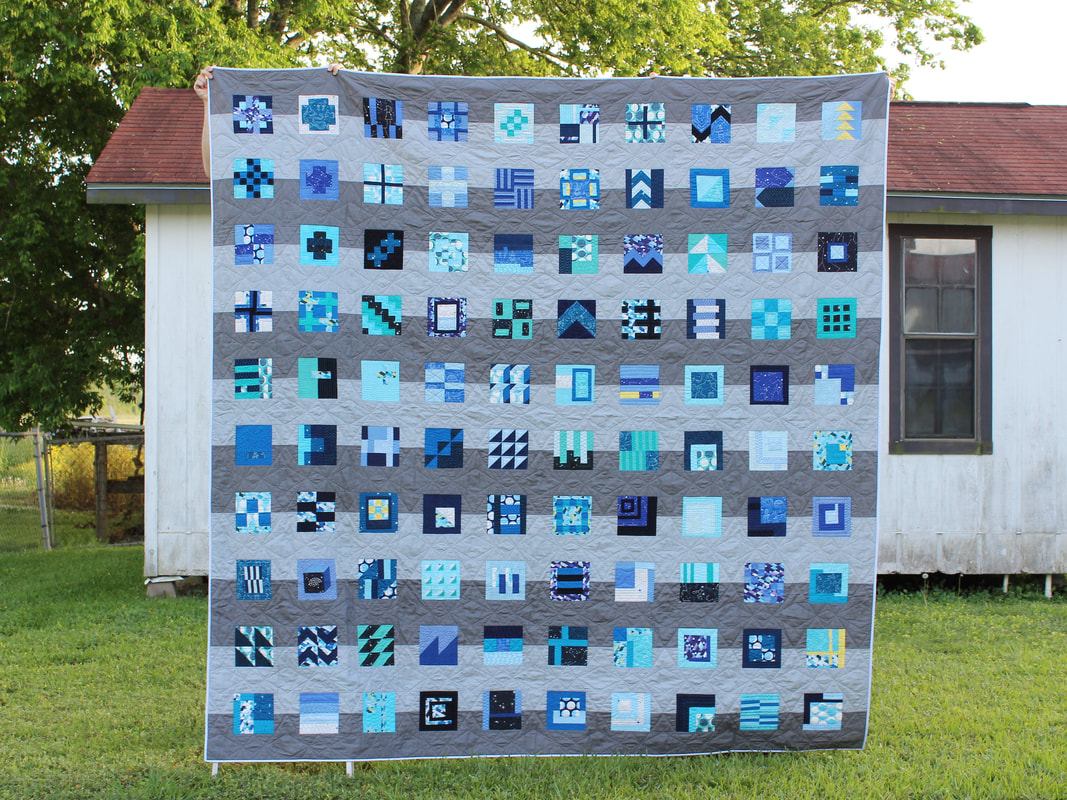
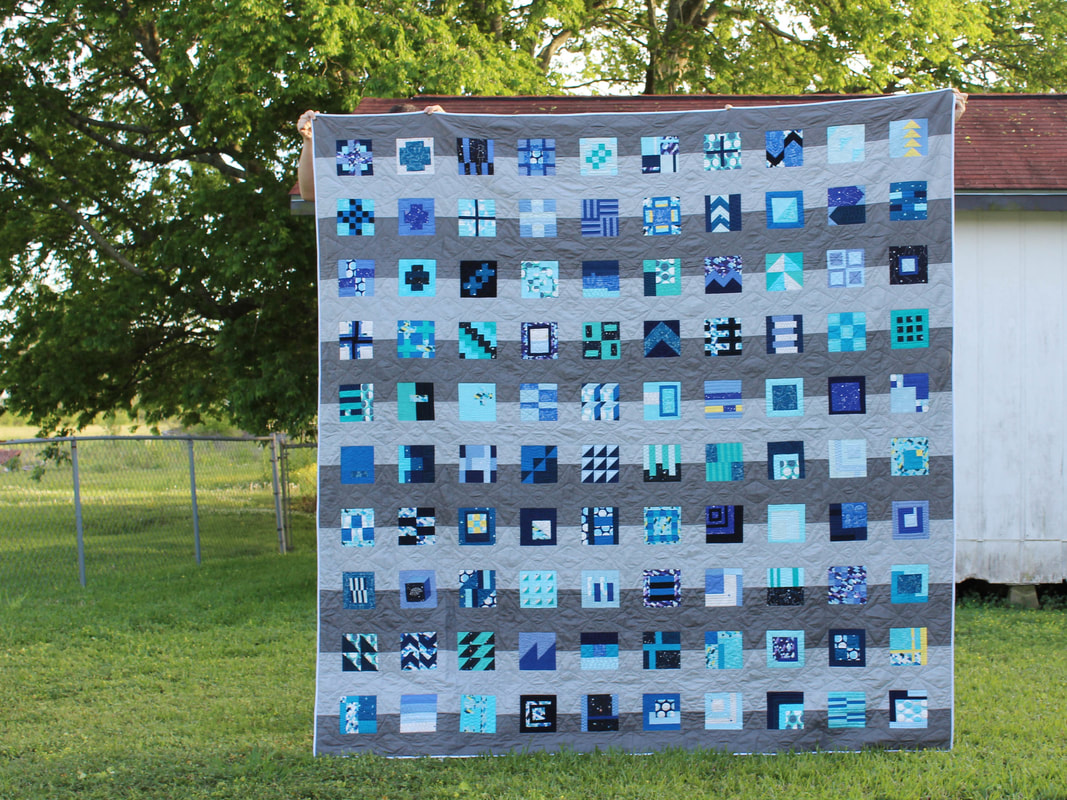
FINALLY, FINALLY we are here today with a finish.  It took a bit of digging on the blog, but I found out that I started this project mid-June 2013, you can see that first post HERE. Four years and nine months to be exact.  That is a long time to work on a project, but I'm happy to report it is finished and on my bed!
Picture
A brief history - This quilt is from the book, Tula Pink's City Sampler, 100 Modern Quilt Blocks.  It was started in 2013 as part of a Sew Sweetness quilt along, if I remember correctly, I finished all the blocks in time to link up at the end of the quilt along.  I used Lizzy House's fabric line Constellations and matching solids to construct the blocks.   I believe the blocks sat for quite some time while I decided on layout and ordered fabric.  I chose one of the finishes from the book and the two gray solids are Hawthorne Threads solids line, Hawthorne Hues.  I constructed the quilt top and ordered backing (a Riley Blake wide back) as I didn't want to have to piece it.  My mom helped me baste this monster on my kitchen floor and then the quilt sat for quite some time.  In 2016 Gnome Angel hosted an Instagram event, #100days100blocks and instead of making the blocks I decided to quilt the blocks in the same manner in which they were quilted in the book in the 100 day time frame.  I met that deadline and quilted each of the individual blocks.  Then the quilt sat again until the beginning of this year when I decided it was time to get this monster finished (and my husband said he was tired of seeing it folded and full of safety pins.)
Picture
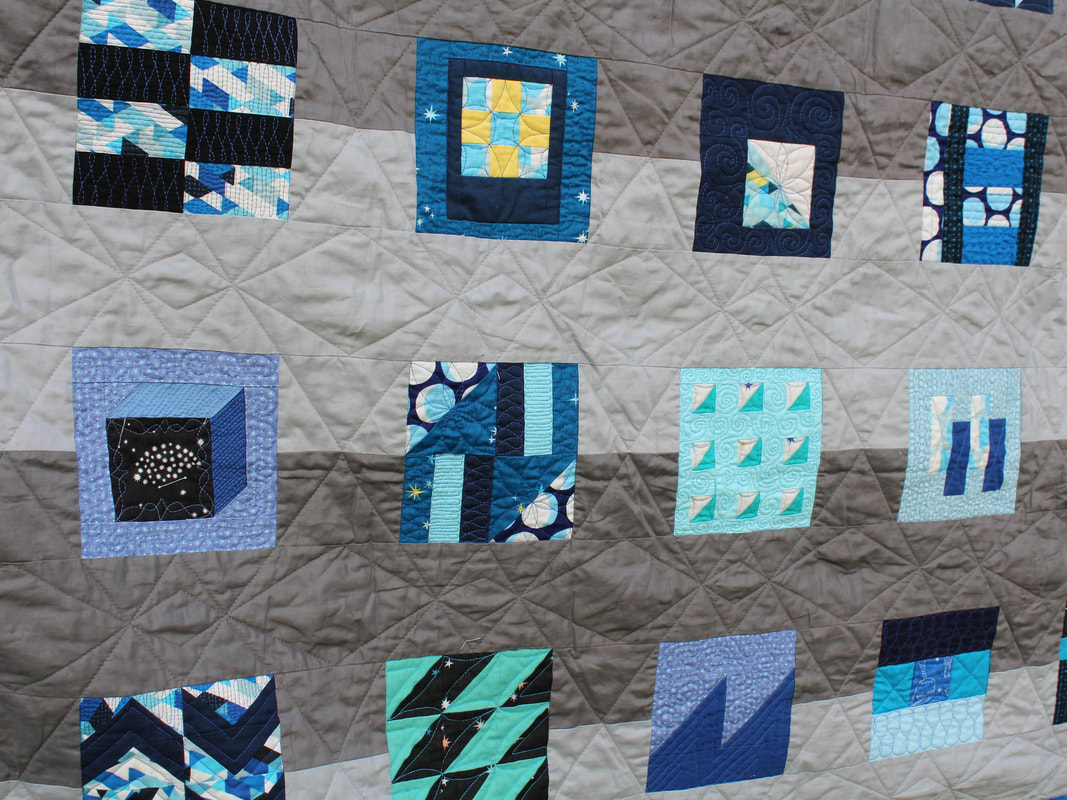
The quilting story - All 100 blocks were quilted using free motion quilting and based on how they were quilted in the book.  The blocks in the book were quilted by Angela Walters and I thought it would be a great learning experience to duplicate how she had quilted each block.  Boy was it a great learning experience and I highly recommend it!  By the time I had finished quilting all 100 blocks I really felt that I had a great grasp on free motion quilting.  This was the easy part, the hard part was deciding on how I was going to quilt the stripes or background and why the project sat for so long. I was so hung up on the idea that it had to be free motion quilted and I kept circling around some kind of "star or celestial" theme.  In the end I just couldn't figure out a way to make it work and I just picked up the quilt.  Fast forward to January of this year, Debbie at A Quilter's Table was working on a table runner for her mom and talked about the book Walk by Jacquie Gering, which I already owned but had yet to read.  I started reading the book and it just hit me!  Why not straight line quilt it using the techniques/designs from this book?  I was overthinking it as usual.  I pulled out the quilt and using the blocks and stripes as a connect the dots of sorts was able to use the Point-To-Point Lines technique in the book and created this really cool diamond pattern seen below.
Picture
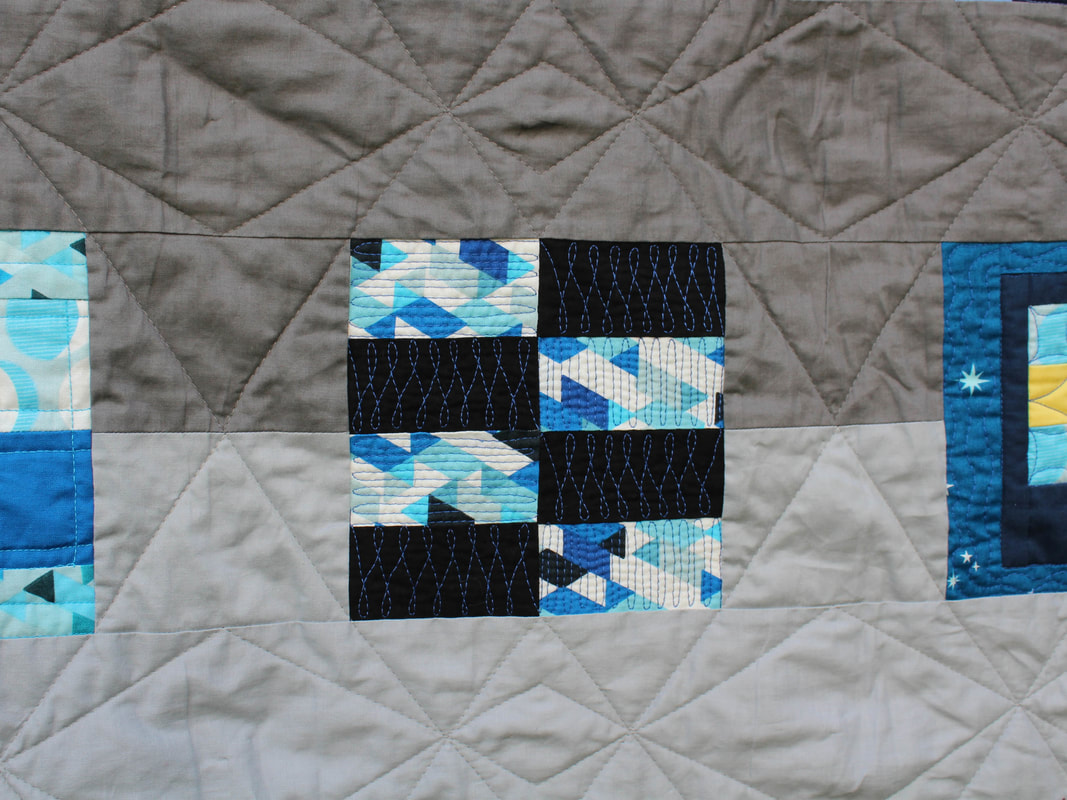
I started with the dark stripes and marked the centers between each block and the centers of each block that extend into the stripe.  Then using my hera marker I "connected" the dots creating large and small diamonds.  I quilted all the dark stripes in this manner.  When that was complete I went back and added in the smaller diamonds that are in the center, once again, marking centers and using my hera marker.  Once all the dark gray lines were complete (half of the quilt finished) I switched to the light stripes.  I had to mark considerably less since I was matching up to the dark stripes.  You can see this below where the diamond points meet from the dark to the light stripes.  I used matching 40 weight Aurifil 100% cotton thread and had no issues from the start.  No breaking, no tension issues, it worked perfectly.  The quilting took me roughly 3 weeks to finish, working a few lines every day until it was done.  I quilted it on my Juki 2010, using a size 14 stretch needle, and I wrestled the hell out of it as it is really heavy.
Picture
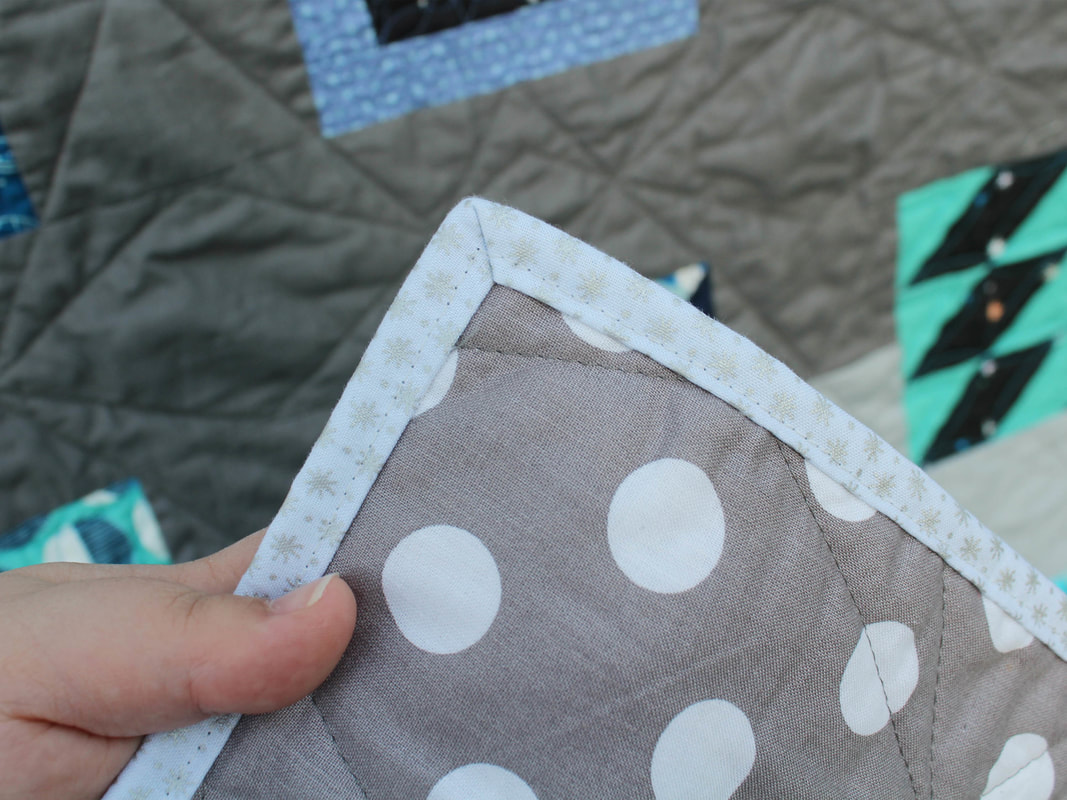
The binding is a Lizzy House asterisk print that I bought specifically to use for this and thank goodness I bought a yard as I used almost all of it.  I decided to machine stitch every bit of the binding as everything else on this quilt was done by machine, so why not.  I did try a new to me technique when binding this quilt and from now on I'll do nothing else as it worked so wonderfully.  I stitched the binding to the front as I normally would and then i took the time to iron the binding to the back and iron the mitered corners.  Then using Elmer's washable school glue, I ran a small bead underneath the binding and ironed it again (to dry the glue almost instantly) thus holding it exactly where I needed it and I used no pins or binding clips.  From the front of the quilt I stitched in the ditch right beside the binding and you can see below exactly how it turned out.  Using this method I didn't have any mess-ups or spots where the binding didn't get stitched, it worked perfectly! Ta-da!  I was finished.
Picture
I finished the quilt mid-March and on Easter Sunday with the help of my husband and brother-in-law was able to get photos.  The finished quilt measures 102" x 104" and they are both standing on ladders in order to hold it high enough to get the whole thing off the ground.  You have no idea how thrilled I was to get these photos and this quilt finished.  It really and truly made my Easter day.

This quilt has been on my Finish-A-Long list, on and off for years so I am delighted to say that in the first quarter of 2018 it is officially linked up and off of my list!  The quilt is now on my queen sized bed in our new master bedroom in the addition that we have been working on for the past year.  This quilt is really a king-sized quilt so it hangs generously off the sides and gives us plenty to cover our pillows which is fantastic.
Picture
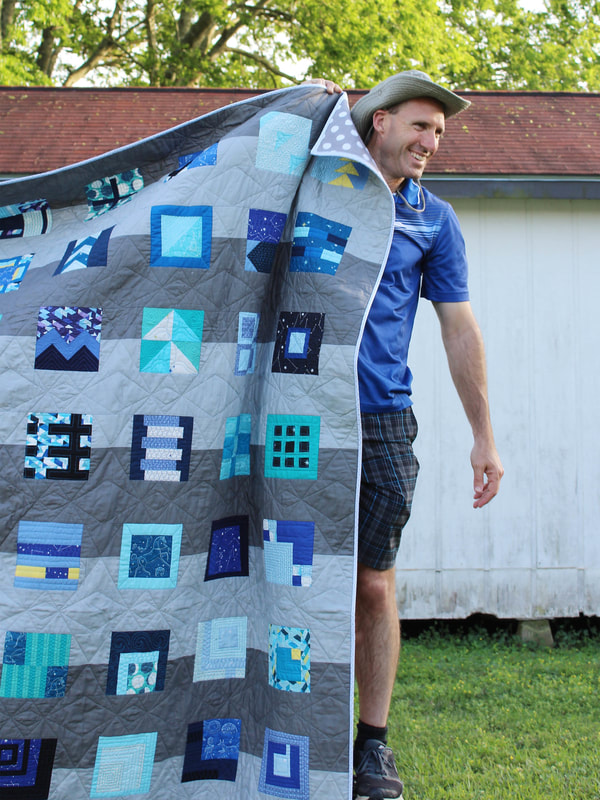
I had to include this outtake of my husband cutting up after we finished taking photos.  It really is like pulling teeth to get help for 5 minutes to take these photos, but he was a big help and without him I wouldn't have been able to get it done.
Picture
I'm linking this finish up with the 2018 Finish-A-Long, even though I'm not eligible for prizes since I'm a host, but that is ok as the ultimate prize is this finish!  My Q1 list can be found HERE.

Though the link-up is closing in a few hours, you do still have time to link-up so go and do it, you can find the Q1 Finishes link-up HERE.  If you didn't join us for Q1, feel free to join Q2, anyone with sewing/quilting/stitching/yarn work projects are welcome to join us and we would love to have you!
Picture
7 Comments
Georgi S link
4/9/2018 11:29:36 am

Love Love Love your City Sampler quilt! I made one a while back, but it was one of my first so I didn't do much quilting on it. I might just have to make another one and quilt the blocks like you did. I love the walking foot quilting for the background. Just gorgeous!

Reply
Debbie link
4/9/2018 12:32:58 pm

OH MY GOODNESS! Marci! This is SO gorgeous and I can only image how good it feels to have this quilt finished!!!! It's so big. And really, your final quilting is such a perfect match for it - just really puts it over the top. CONGRATS!! A truly excellent finish.

Reply
Anne Dawson link
4/9/2018 04:25:36 pm

I love it. I want to do the next 100 blocks in 100 days and your quilt will help keep me motivated!

Reply
lisa link
4/9/2018 08:32:30 pm

It's a wonderful finish and the colours are classic! I overthink quilting too! So that's great advice to copy another design. Like, who's going to care that you designed the quilting or no? You made every inch of this quilt with your own hands and you are proud of it.

Reply
Felicity link
4/9/2018 10:09:35 pm

HOORAY!!! What a fantastic finish - I admire your patience with the quilting. I would definitely have rushed and assed it up. Gorgeous, gorgeous gorgeous.

Reply
Ella
4/10/2018 01:10:07 pm

I love the blues. Lizzy is one of my favorites, too. I was surprised how big this quilt gets. (As a result, mine is still in the to be quilted heap.)
Yours is glorious!

Reply
Dawn
4/16/2018 07:16:13 am

That's lovely! Fantasic quilting!!!! And your hubby is cute, too!

Reply


Leave a Reply.

    Marci Girl

    A feisty mom designing, sewing and blogging her way through everyday life!

    Subscribe
    Follow on Bloglovin
    Picture
    Follow on Bloglovin


    Categories

    All
    2017 Finish A Long
    2018 Finish A Long
    2019 Finish A Long
    Bee Sewcial
    Book Reviews
    Clothing
    Everyday Life
    Giveaways
    Handbags
    Handstitched Class
    Inspirational Projects
    Marci Girl Designs
    Projects
    Quilt Along
    Quilting Bees
    Quilts
    Random Thoughts
    Recipes
    Sew Along
    Sewvivor
    Style Stitches
    Swaps
    The Penny Sampler Class
    Tutorials
    Wip Wednesday


    Happily
    Participating In:

    Picture
    Picture
    Picture
    Picture
    Picture
    Picture

    Picture


    Archives

    January 2020
    November 2019
    October 2019
    July 2019
    April 2019
    March 2019
    February 2019
    January 2019
    December 2018
    October 2018
    August 2018
    July 2018
    June 2018
    May 2018
    April 2018
    March 2018
    February 2018
    January 2018
    December 2017
    November 2017
    October 2017
    September 2017
    August 2017
    July 2017
    June 2017
    May 2017
    April 2017
    March 2017
    February 2017
    January 2017
    April 2016
    March 2016
    February 2016
    January 2016
    September 2015
    July 2015
    October 2014
    September 2014
    August 2014
    July 2014
    June 2014
    May 2014
    April 2014
    March 2014
    February 2014
    January 2014
    November 2013
    October 2013
    September 2013
    August 2013
    July 2013
    June 2013
    May 2013
    April 2013
    March 2013
    February 2013
    January 2013
    November 2012
    October 2012
    September 2012
    August 2012
    July 2012
    June 2012
    May 2012
    April 2012
    March 2012
    January 2012
    December 2011
    November 2011
    October 2011
    September 2011
    August 2011
    July 2011
    June 2011
    May 2011
    April 2011
    March 2011
    February 2011
    January 2011
    December 2010
    November 2010
    September 2010
    August 2010
    July 2010
    June 2010
    May 2010
    April 2010
    March 2010
    February 2010

    Picture

    RSS Feed

Powered by Create your own unique website with customizable templates.