Have you ever wondered what "quilt as you go" was? Or how to do it? You are in luck! I have a great tutorial brought to you today by the lovely Leanne of she can quilt and myself! We are guest posting today over at Lily's Quilts, click here to check out her awesome blog, full of tutorials and all sorts of goodies!
The photos below are mine, but all of the wording is Leanne (which is really the hard part, to me anyway!) Enjoy the tutorial:
The photos below are mine, but all of the wording is Leanne (which is really the hard part, to me anyway!) Enjoy the tutorial:
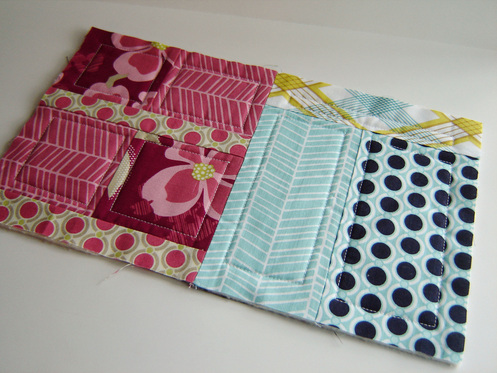
Finished Quilted Blocks
Today Leanne from she can quilt and Marci from Marci Girl Designs are blogging together as a guest post on Lily's Quilts.
To us, one of the scariest parts of a QAYG approach to quilt construction is how to join all those blocks without making a HOT MESS. Would the quilt have lumpy seams? Would the batting wad up into bumps?
One method is to leave the off the backing while you quilt the front and batting together. Then you sew together the front/batting blocks and add the backing at the end. This allows you to have a continuous backing piece but the quilting from the front will not show on it. Penny at sewtakeahike has a tutorial for this method here.
Some methods use strips applied with, or without, additional batting between the QAYG blocks. The strips can be wide or skinny and add an interesting design element to the quilt. Marianne at The Quilting Edge has tutorials here and here. Sew We Quilt @ Stash Manicure has a tutorial here. Monica at the Happy Zombie has a tutorial here.
Another interesting approach is to bring the backing fabric to the front between the QAYG blocks and use it as a sashing. There is a video by Penny Halgren showing this method here. This tutorial from Mary Ann at Rocknquilts, explains how to join the batting with an iron-on tape specially designed for batting. This idea is intriguing, but we are not certain that it would work easily in a tight spot and it requires you to purchase the special iron-on tape.
Marci and I wanted a slightly different result. We wanted:
Here is our approach:
To us, one of the scariest parts of a QAYG approach to quilt construction is how to join all those blocks without making a HOT MESS. Would the quilt have lumpy seams? Would the batting wad up into bumps?
One method is to leave the off the backing while you quilt the front and batting together. Then you sew together the front/batting blocks and add the backing at the end. This allows you to have a continuous backing piece but the quilting from the front will not show on it. Penny at sewtakeahike has a tutorial for this method here.
Some methods use strips applied with, or without, additional batting between the QAYG blocks. The strips can be wide or skinny and add an interesting design element to the quilt. Marianne at The Quilting Edge has tutorials here and here. Sew We Quilt @ Stash Manicure has a tutorial here. Monica at the Happy Zombie has a tutorial here.
Another interesting approach is to bring the backing fabric to the front between the QAYG blocks and use it as a sashing. There is a video by Penny Halgren showing this method here. This tutorial from Mary Ann at Rocknquilts, explains how to join the batting with an iron-on tape specially designed for batting. This idea is intriguing, but we are not certain that it would work easily in a tight spot and it requires you to purchase the special iron-on tape.
Marci and I wanted a slightly different result. We wanted:
- a clean join on the front seam without adding any kind of design element to the front or the back of the quilt,
- the batting securely joined so it would not shift into a lump,
- as little hand sewing as possible,
- no bulky seam from sewing the front and the batting together,
- the quilting to show on the back of the quilt.
Here is our approach:
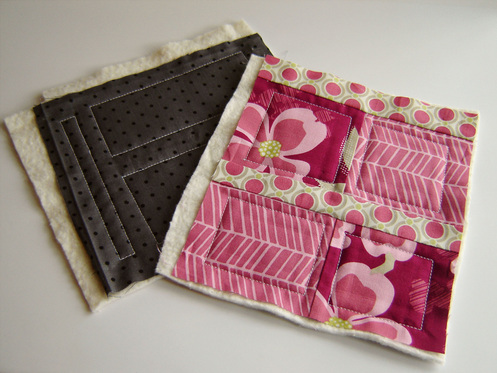
Front and Back of Quilt Blocks
Quilt your blocks with the backing fabric in place. Make sure your back fabric and batting are larger than the front block. This gives you something to hang onto while you quilt and the extra for the joining of the blocks later. Leave about 1 inch unquilted at the edges of the front fabric.
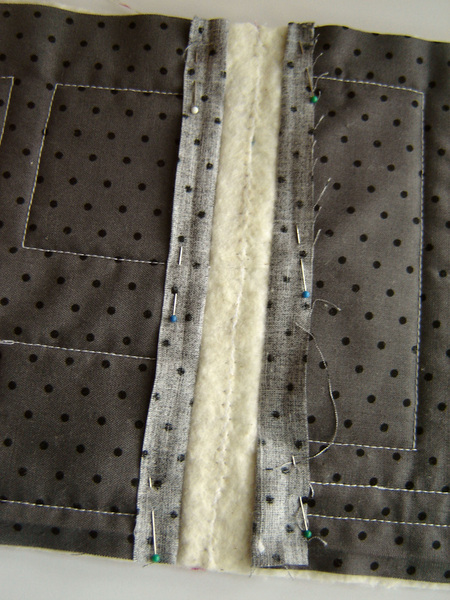
Align the two blocks and place them right sides together. Fold and pin the batting and backing fabric out of the way. If your fronts are out of line, trim them. Stitch your front fabric, right sides together with a 1/4 inch seam.

Press open the front seam. Be careful to use a heat setting on your iron suitable for your batting.
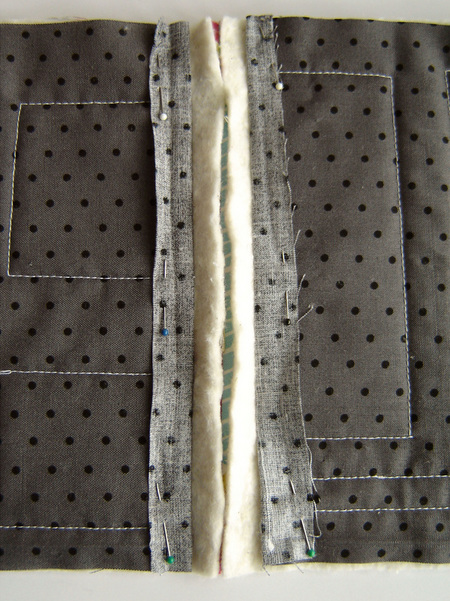
With the back of the blocks facing you, lay the piece flat and pin back the backing fabric. Carefully trim the batting with scissors so that when it is lying flat both sides of the batting touch but do not overlap. Perfection is not required here, batting is forgiving.
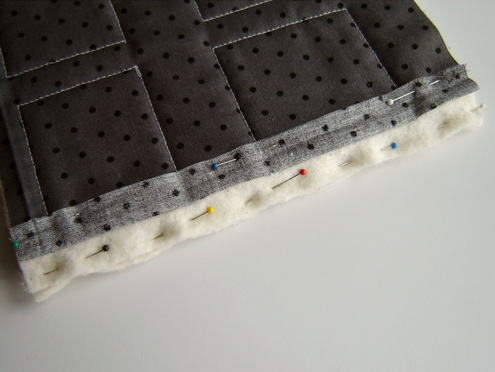
Fold the blocks, right sides together. Push the seamed front fabrics into the fold and pin them out of the way. Pin the batting together.
Sew the batting together using a blanket stitch ( _l_l_l_l_ ) or a short zig zag ( vvvvvv ). Stitch slowly so that the needle goes into the two pieces of batting on one side and goes over the edge of the batting into nothing on the other side.
Sew the batting together using a blanket stitch ( _l_l_l_l_ ) or a short zig zag ( vvvvvv ). Stitch slowly so that the needle goes into the two pieces of batting on one side and goes over the edge of the batting into nothing on the other side.
When you are done, open the seam and smooth the batting or give it a very gentle tug to flatten it out. The idea is similar to a flatlock that you can do with a serger. You may want to test this out on some scrap pieces of batting to get the best size of stitch to achieve this with your sewing machine.
The goal is to secure the pieces of batting together without creating an overlap or lumpy seam.
The goal is to secure the pieces of batting together without creating an overlap or lumpy seam.
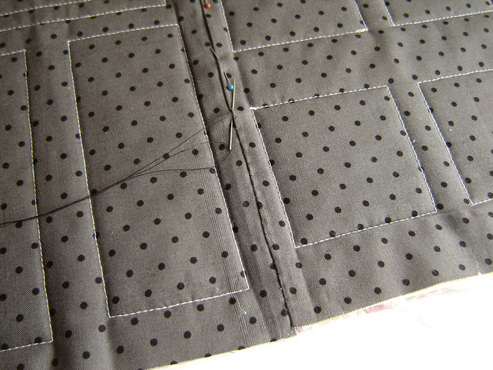
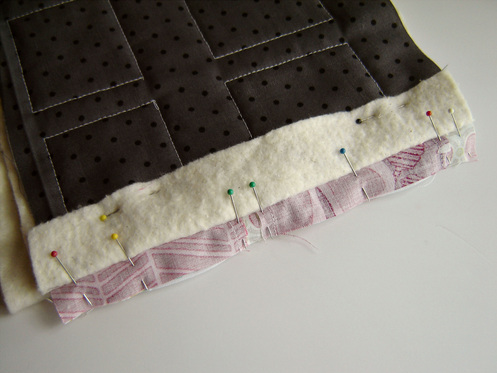
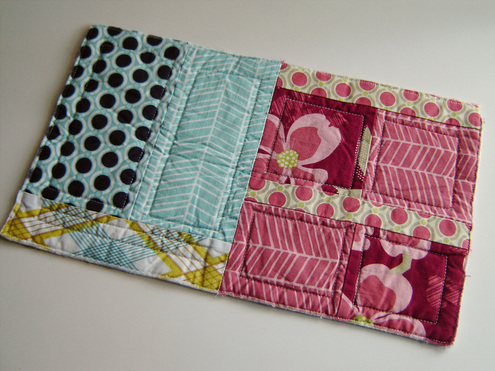
The last step matches some of the tutorials mentioned earlier. Trim the backing fabric if needed so that the pieces overlap about 1/2 inch when smoothed out. On one side, fold and iron under 1/4 inch of backing fabric. You may want to hang one side over the ironing board to make this easier. Then place the back fabric with the turned-under side on top, smooth, pin and hand sew it in place. The photo below shows this sample after it was finished, washed and dried.
Repeat for all your blocks, horizontally row by row and then vertically row by row.
We are going to use this method on our huge Dresden blocks from Lily's Quilts QAL. If you decide to give this a try, let us know how it works out.
Best,
Leanne and Marci
Repeat for all your blocks, horizontally row by row and then vertically row by row.
We are going to use this method on our huge Dresden blocks from Lily's Quilts QAL. If you decide to give this a try, let us know how it works out.
Best,
Leanne and Marci
Washed and Dried Sample
Thanks so much to Lynne for having us today! A huge Thanks to Leanne for all the hard work! I have so enjoyed working with you on this three country collaboration! It is amazing to me that a gal from Louisiana, Britain and Canada can work together (without ever having met) to come up with something so useful! Thanks ladies, it has been fun!


 RSS Feed
