• Home
  • Blog
  • 2020 Finish - A - Long
  • 2019 Finish - A - Long
  • 2018 Finish - A - Long
  • Contact
  • 2017 Finish - A - Long
  • Shop
Marci Girl Designs

Bee Connected - Quilting Bee

5/10/2011

3 Comments


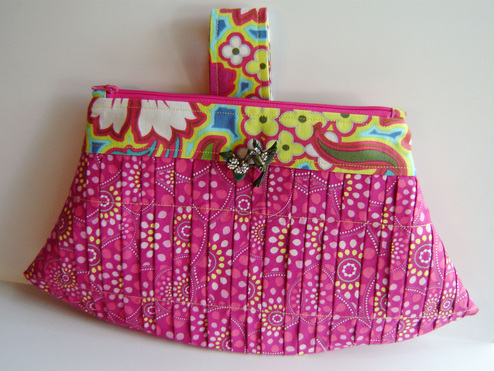
I joined an online quilting bee!  Several, in fact (as if I didn't have enough on my plate!)  The basic premise of an online quilting bee (taking place on Flickr) is that you participate for 12 months, 12 people, and for 11 months you make blocks (from fabric they send you, and a pattern of some sort) and then for 1 month, you send everyone fabric and the pattern, and they make for you!  This bee has everyone making 2 blocks per month for the one person, so in theory when it is your month you will receive 24 completed blocks!  Neat concept right?  I thought so!  My month in this bee, "Bee Connected" is March 2012, so I have plenty of time to pick my fabric and pattern.
Picture
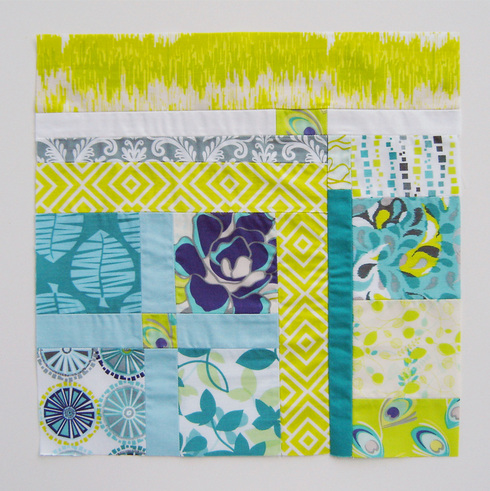
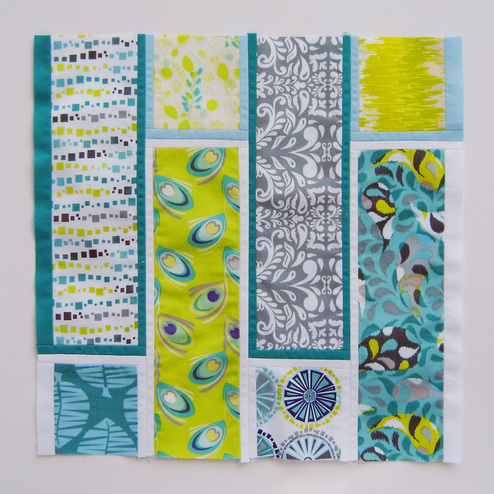
These are the first set of blocks that I have made for "toerintx," she had the first month (technically June) but sent her fabric out early since she is due to have a baby "any minute now!"  So, I got busy stitching them up!  These fabrics are gorgeous, and have a great feel.  Her requirements for the blocks were that they measure 12.5" square and only contain rectangles and squares (and it must contain one square and at least one solid print.)  I had fun creating these blocks.  The first is an improv block, and I just started with the left hand corner square, and kept adding until it was the right size.  The second block I sketched up, and carefully drafted, and you can see it is quite "planned."  I love this block and would love to make a quilt myself using this pattern, though it was quite hard to maintain those 1/4" seams!
Picture
I didn't have quite enough fabric to make another block (like I wanted anyway) so I made this 6.75" x 7.5" starter block for "toerintx" to add on how she feels when she gets it!
Picture
Looking forward to getting to know these 11 ladies better, and learning a bunch of new piecing techniques!
3 Comments

Style Stitches Perfectly Pleated Clutch

5/9/2011

5 Comments

 
Picture
Wow, it is the beginning of May and I already have my clutch done!  I was really excited to start working on it, and nothing better than getting something crossed off the list.  I really enjoyed working on this one, and it came together really quickly, and honestly I thought it was pretty darn easy, maybe the more Amy Butler patterns you accomplish, the easier they get?  I hope so!
Picture
Picture
I changed a few things with this pattern (and maybe that's why I think it was easier!)  I did not use the zipper installation method Amy Butler suggest, after learning a hard lesson with six Origami bags, I knew I wouldn't do it like that again.  I used the Noodlehead tutorial, and installed little tabs on the ends.  I love this method, and it creates such a wonderful edge and a clean finish.  I only made the tabs about 1/4" and then narrowed my seam in that area to about 1/4", so that I would have the same amount of opening space, which worked out perfectly.  When it comes time to attach the handle (or baste it) I also did a zig-zag stitch to really attach the handle on the bag, I don't want pulled or ripped seams.  Other than that, I didn't change anything else.
Picture
Originally, I thought the bag shape was a little weird, but now that I have made it, I rather like it and think it really accentuates the pleats.  I love the fact that Amy Butler had you create different size pleats ranging from 3/8" to 5/8", this really made the pleat process easier, because each one didn't have to match perfectly.  The only thing I would do differently if I made it again, would be to lengthen the handle just a tad bit.  I found it a bit to snug to put on quickly, and honestly who wants to fight getting the strap on your wrist?  If I made it again, I would add about 1/2" to 1" in the overall length.  Bree over at My Crafty Crap, (don't you just love that blog name) did just that, and added just a touch of length to her strap, and she said it fit perfectly!  Awesome!
Picture
As a last little touch, I added the little hummingbird broach to it, and thought that it added that "little something extra!"  I made the medium sized clutch, and thought it was the perfect size for a night out on the town.  Now all I need is a baby sitter!
Picture
Picture
amybutler-button2
5 Comments

Lisette Portfolio Dress Sew-Along

5/7/2011

7 Comments

 
Picture
A few weeks ago I decided to participate in the Lisette, Portfolio Dress Sew-Along.  Though I am a bit late in posting this, I did technically finish my "muslin" a few days ago, just before the deadline.  But a few sick days kinda creeped in and I didn't get the chance to take pictures, but here they are now!  I decided to make a muslin (which I NEVER do) simply because I didn't want to mess up a lot of really nice expensive fabric, and I really wanted this baby to fit.  I don't have pictures of it on me, I'm home alone today and don't have a mirror that would work for taking shots!  I hope to take more pictures next week! And yes, this tunic does fit, and this "muslin" is a keeper to wear!
Picture
Up close detail stitching done by machine.
So, what did I think of it?  Well....I will start by saying that I LOVED the instructions, and the pattern itself, very simple, easy to construct, and honestly I put this baby together in one day.  I am super excited to try their other patterns.  I cut it out on the size based on my measurements, and it fit, a little big, so I took in the side and back seams about 1" - 2" in spots.  I also made this a tunic instead of a dress, and this took quite a lot of pattern altering to delete the pockets, but I was able to figure it out, and keep the nice swoop on the front that I loved so much.  I am pretty darn short, so before I cut it out, I had to take up about 1.5" in the mid section to make it shorter, plus I shortened the cut line to make it a tunic.  I was pretty pleased when all was said and done, it fit well, felt good, and even though the neckline was a lot higher than anything I normally wear, I liked it.

What is the catch?  Well when my husband got home, I tried it on for him and asked him what he thought.  His response and following conversation:
"What is it for?"
Ummm...a shirt to wear. 
"Where?"
During the day, around the house, you know everyday clothes.
"So, not in public right?"
Why, does it look that bad?
"Well....it looks handmade, not the construction or anything, but you can tell it is something that you can't buy in the store."
So, it looks that bad?
"It doesn't look good, or not very flattering."
Well poo....

So now that he has said all this, honestly, what do I think?  Before he came home, I was pleased, but could see that it wasn't the most flattering shirt that I own, maybe it is the fabric, maybe it is just too baggy in the middle, but on a whole, I was happy with it and planned to wear it.  Now, I guess I won't be wearing it in public! HA!

All that being said, I do plan to make another with the original floral print that I bought for this pattern.  I am going to eliminate the neck band, and just replace it with a thin bias tape finish, and keep everything else the same.  I think one of the main problems with mine was that the collar band didn't lay flat at all and kind of stood out from my body, and was just too high around my neck.  Maybe he will like the next version, or maybe not, oh well, you win some, you lose some!

7 Comments

Style Stitches Monthly Bag Challenge - May's Bag

5/5/2011

3 Comments

 
Picture
New month, new project!  Time to pick out fabrics for the Style Stitches bag this month.  May's bag is the perfectly pleated clutch, and honestly I wasn't that thrilled about making this one, but toward the end of last month I started to get a little excited to make all those pleats!  I've done pleats before, but not this many, and not over an entire surface.  It is quite a neat effect.
Picture
Amy Butler's Style Stitches Perfectly Pleated Clutch
Below are the fabrics I have chosen to make this clutch.  The hot pink, an Art Gallery print, is going to be the main body (the pleated part.)  The fabric to the right is an Amy Butler print from Soul Blossoms, it will be the accent fabric.  The greenish colored fabric all the way to the left is some funky polyester blend stuff that I will be using as the lining.  I have decided to make the medium size, it seems the most versatile for me.  The best part?  I do believe that I have a fabulous broach to accent the bag and these fabrics!  Then my clutch can be "so pretty" just like the picture above!
Picture
3 Comments

WIP Wednesday - Week 12

5/4/2011

7 Comments

 
It is Wednesday again! Oh, and I have pictures this week!  Aren't you glad?  Anyways....I finally finished my Advent Calender Quilt!  Yippee!  I have been working on this quilt since September, and I'm tired of it!  You are only getting the sneak peak photo below, because my intention is to enter it in the Blogger's Quilt Festival next week, and I don't want to share everything ahead of time!  I am super glad to have this project finished, and look forward to putting it up until Christmas!

I have one new project this week, May's bag for the Style Stitches Sew-Along, and I'm getting this one finished up early this month (I promise!)

I have been making my muslin (practice to make sure it fits) tunic using the Lisette Portfolio pattern, and hope to get this baby finished by Thursday!  Wish me luck!

As a last little add in for my partner in the Pretty {Little} Pouch Swap, I made her a small little needle book, to store all her needles!  I have one just like it and use it every day!
Picture
Finished Projects:
Advent Calender Quilt
Picture
Cut out and waiting to be sewn together.
Ongoing Projects:
Organizing my OUT OF CONTROL Fabric Stash (65% complete)
Bottled Rainbows Ticker Tape Quilt-Along (5 of 16 blocks complete)
Lily's Quilts Quilt-Along  (Using Sherbet Pips)
Making a Light Box (Supplies bought, partly assembled)
Sewing (for myself) a few tops/shirts.
Amy Butler's Style Stitches Perfectly Pleated Pouch

Other Random Projects: (These are not counted in my weekly stats!)
A Box Full of Alterations and Random "Fix It" Projects.
Roughly 150 + Items that are Finished and Need to Be Photographed for my Shop.
Picture
This Week's Stats:
New Projects - 1
Completed Projects - 1
Currently in Progress - 6
Picture
Dream Projects On Hold For Now:
A Cathedral Window Quilt
Cutting into the stack of Home Dec fabric to make Mary Rose Clutches.
Sock Monkey Quilt
Denyse Schmidt Home Dec Fabric Wall Hanging Quilt
Making a bunch of clutches from a new pattern that I have purchased.

WIP Wednesday at Freshly Pieced
Head over to Freshly Pieced to have a look at what everyone else is working on!
7 Comments

Pretty {Little} Pouch Swap

5/2/2011

6 Comments

 
Picture
Picture
Well here she is, finished!  This is my completed pouch for the Pretty {Little} Pouch Swap!  This is my first time making a box pouch, and I used the tutorial found at The Plaid Scottie, and you can click HERE for directions on how to make one yourself!  This tutorial was really great and easy!  I changed up a few things, like dimensions, and the handle, you can really customize these style bags, which I love!  I used a lot of Echino scraps, and some cool linen looking denim like weird material I found at Hancocks and now wished I had bought the whole bolt instead of one yard!  I used fusible interfacing, and lined it with a great Amy Butler print, though I don't have any "open" shots.  I did a bit of hand stitching, for that little extra touch and really hope that my partner loves it!  It is just about 10" long and about 5" high, and would be a great "project" or "toiletry" bag.
Picture
Picture
I also made this little "coin" pouch for my partner, using the Noodlehead tutorial, found HERE.  This was my first time installing a zipper in this manner and I love it!  This method creates such clean lines and a great turned edge, I was really pleased!  I used some Heather Ross Far Far Away II scraps, and Echino for the backing (I think, I'm not really sure who designed the backing fabric!)  I did a funky little caterpillar like pull string on the zipper pull, and just love how weird it looks!  I ended up with a small little 1/4" trimming from the Heather Ross fabric, and instead of throwing it away, I stitched 3 lines down the center, and then frayed the edges to create this "unique" looking zipper pull.
Picture
I was really happy that I challenged myself to try two new techniques for this swap, and was really pleased with the results of both of the tutorials that I tried.  All I have to do now is find a few little goodies to put into the bag, wrap her up, and ship her off to my partner!  I do hope you love it!
Picture
6 Comments
Forward>>

    Marci Girl

    A feisty mom designing, sewing and blogging her way through everyday life!

    Subscribe
    Follow on Bloglovin
    Picture
    Follow on Bloglovin


    Categories

    All
    2017 Finish A Long
    2018 Finish A Long
    2019 Finish A Long
    Bee Sewcial
    Book Reviews
    Clothing
    Everyday Life
    Giveaways
    Handbags
    Handstitched Class
    Inspirational Projects
    Marci Girl Designs
    Projects
    Quilt Along
    Quilting Bees
    Quilts
    Random Thoughts
    Recipes
    Sew Along
    Sewvivor
    Style Stitches
    Swaps
    The Penny Sampler Class
    Tutorials
    Wip Wednesday


    Happily
    Participating In:

    Picture
    Picture
    Picture
    Picture
    Picture
    Picture

    Picture


    Archives

    January 2020
    November 2019
    October 2019
    July 2019
    April 2019
    March 2019
    February 2019
    January 2019
    December 2018
    October 2018
    August 2018
    July 2018
    June 2018
    May 2018
    April 2018
    March 2018
    February 2018
    January 2018
    December 2017
    November 2017
    October 2017
    September 2017
    August 2017
    July 2017
    June 2017
    May 2017
    April 2017
    March 2017
    February 2017
    January 2017
    April 2016
    March 2016
    February 2016
    January 2016
    September 2015
    July 2015
    October 2014
    September 2014
    August 2014
    July 2014
    June 2014
    May 2014
    April 2014
    March 2014
    February 2014
    January 2014
    November 2013
    October 2013
    September 2013
    August 2013
    July 2013
    June 2013
    May 2013
    April 2013
    March 2013
    February 2013
    January 2013
    November 2012
    October 2012
    September 2012
    August 2012
    July 2012
    June 2012
    May 2012
    April 2012
    March 2012
    January 2012
    December 2011
    November 2011
    October 2011
    September 2011
    August 2011
    July 2011
    June 2011
    May 2011
    April 2011
    March 2011
    February 2011
    January 2011
    December 2010
    November 2010
    September 2010
    August 2010
    July 2010
    June 2010
    May 2010
    April 2010
    March 2010
    February 2010

    Picture

    RSS Feed

Powered by Create your own unique website with customizable templates.